Creating a RTF Frame

Displaying and Editing RTF Inside Cradle

This blog will help explain what RTF frames are and how they are used within Cradle.

Rich Text Format can be used to enhance the data shown in Cradle. This is displayed in a Rich Text Frame. Whether this is to allow BOLD, Underline or a different Font. Generally requirements and specifications should be broken down into atomic components. The ‘detail’ should be expressed in a short and concise  statement or paragraph. However, higher level requirement or tables are often useful and in these cases the emphasis / layout provided by RTF is desired.
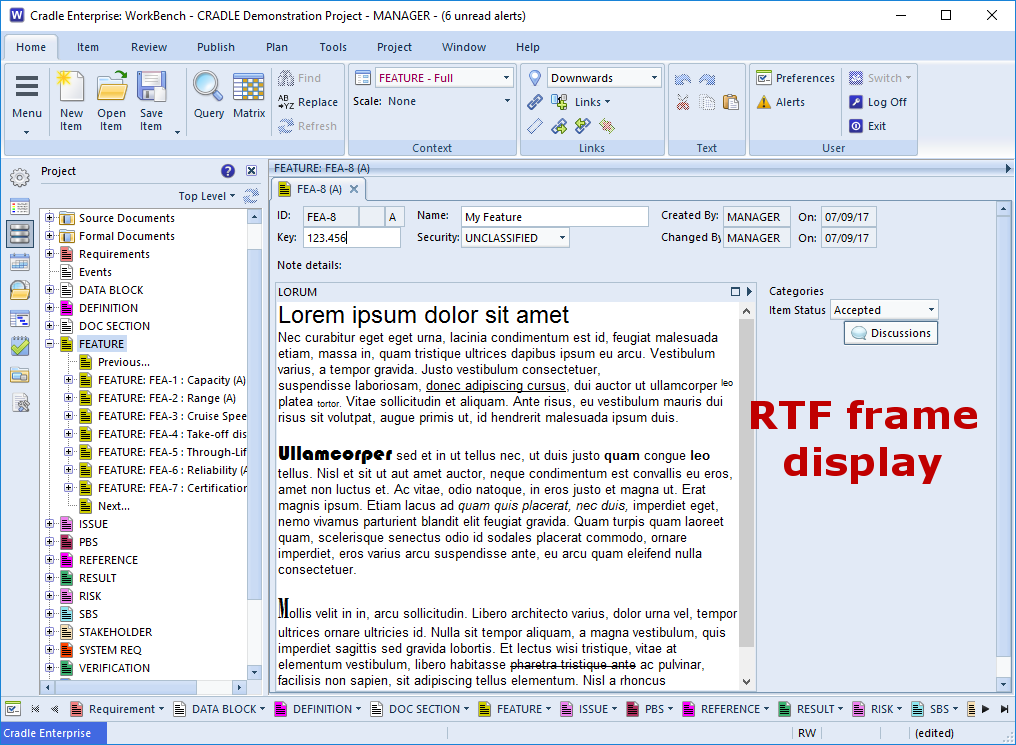
demonstration of RTF in Cradle
RTF Frame Display

To create the RTF Frame, open WorkBench and navigate to Project Setup. Inside Project Setup from the Options dropdown menu select “Item Definitions” and open the tab Frame Types.

In most cases using the shipped schemas, you’ll see a frame of type RTF, however, the steps to create a frame are: Select New… this will open the “New Frame Type”  dialog in which you can give your frame any name, for this I have named mine the “Blog RTF“, You will now see the Frame you have created in the list, select Edit… in this dialog you now have several settings, the “Base Type” will allow you to change the Frame Type, you will want to change this to “RTF“. Other options are available such as being able to restrict the RTF Frame by choosing a Required Skill, provided that you have a set of predefined skills in your project schema.

Now to assign this frame to an Item Type, first you will want to open “Item Types“. Select your item of choice, for this I have selected System Note – Feature. Select “Frames…” and give this a sensible name such as “RTF“.
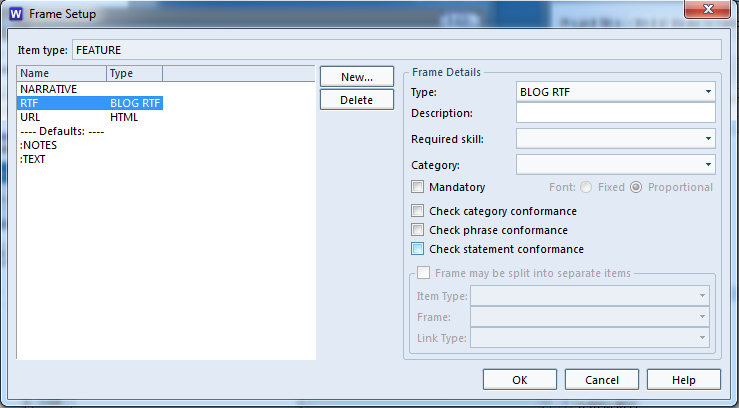
Frame Setup dialog showing RTF frame assigned to FEATURE item type
RTF assigned to FEATURE

For more information regarding Frames select here

Article Updated 04/02/2019 – Added intro

Item Suspect Integrity and How to Use it

Showing Suspect Items

Changing an item may impact related items. For example, changing a stakeholder requirement may necessitate changes to the system requirements linked to it, cascading the change to the product configuration items.

Item integrity shows items that are ‘suspect’

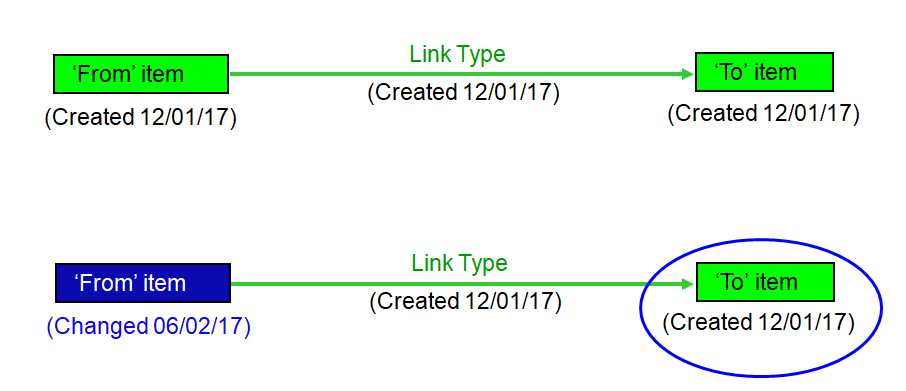
Items are classed as suspect when an item changes after a link was made:


Visual explanation of suspect
As the ‘from’ item has been modified the ‘to’ item becomes suspect

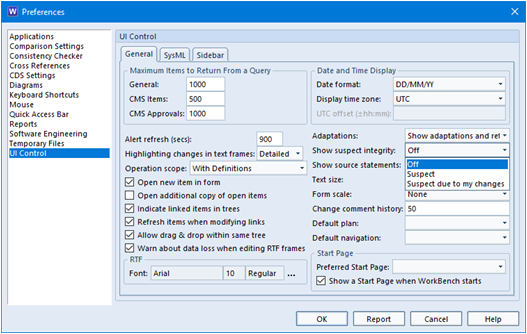
Cradle provides three methods of showing items that are suspect which can be set/chosen in Preferences, these methods are:


  • Off
  • Suspect
  • Suspect due to my changes
Item integrity options in Preferences

If you enable Suspect or Suspect due to my changes in preferences, suspect items will be shown in red.

Confirming Integrity

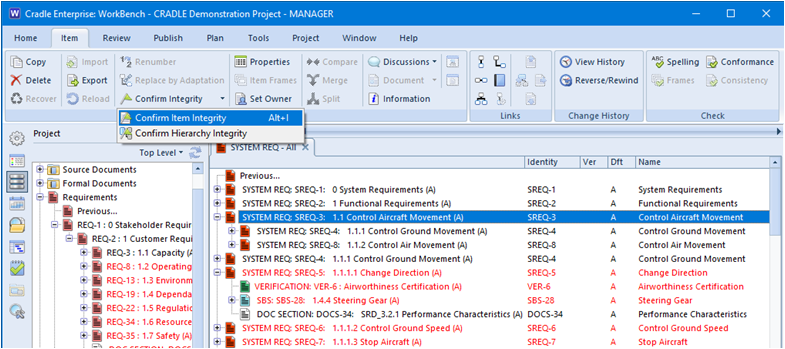
Once you have reviewed the item suspect item there are two courses of action. One to change the item to comply with the changes ‘further up the hierarchy’, or just to confirm there are no changes needed. Integrity can be confirmed by a user-with read-write access, confirming integrity is recorded in the item’s change history.

Confirm item integrity

You also have the option to view suspect item in WebAccess you have to choose your method in options but items will be highlighted in red in queries if they are classed as suspect.

Enabling suspect integrity in WebAccess
Article Updated 04/02/2019 – Moved image and give example of when an item would become suspect

Skill Based Access of a Category

If you require only some users to be able to make a change to a category or categories, then you can use a skill to stop other users from accessing it but they will still be able to see the options set.

Setting the skill on a category

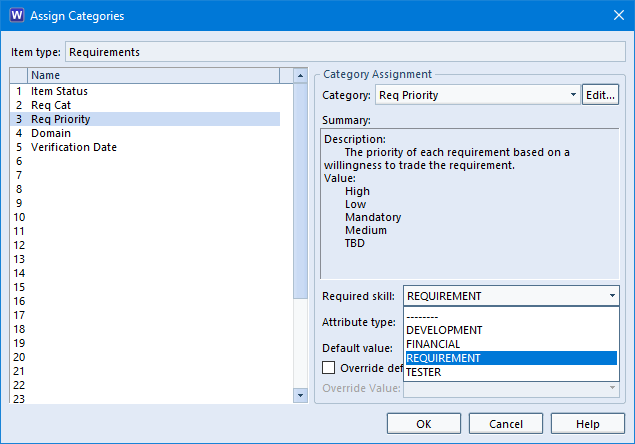
In Project Setup, select the Item Type the category is set for. With the Assign Categories dialog open, select the category you wish to restrict. There is a ‘Required skill:’ option which can be set differently for each category in each item type. This means that a category can be used Requirements and SYSTEM REQs but have different skills for each item type and so can be altered by different users.

Use a skill to restrict access
Setting a skill for a category to restrict access

Once Project Setup is Saved and Closed any users that now login, that do not have the required, will be able to see the option set but not alter it.

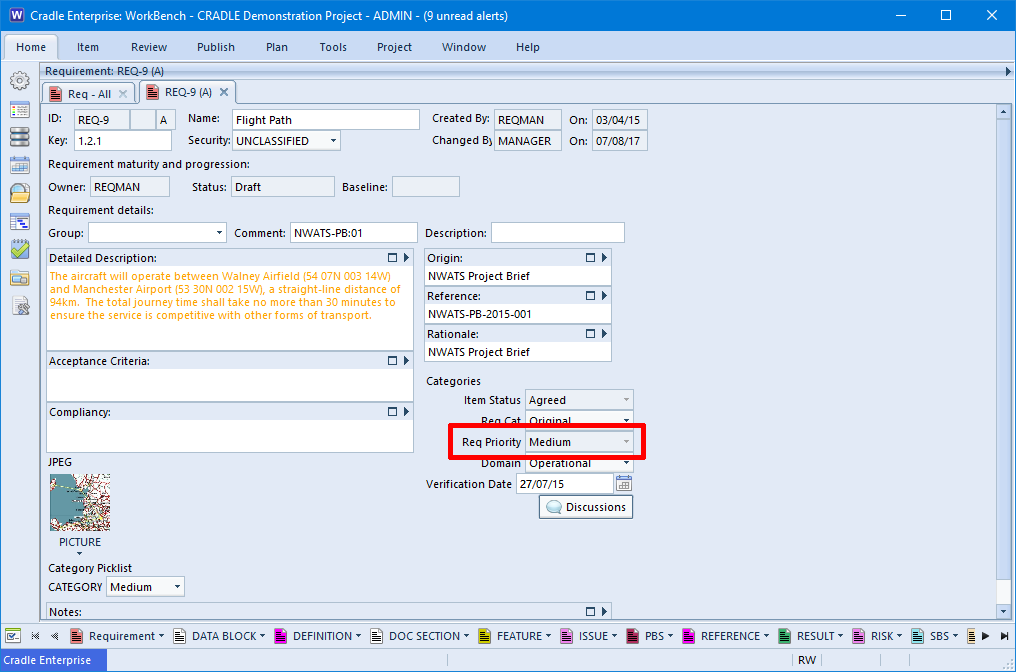
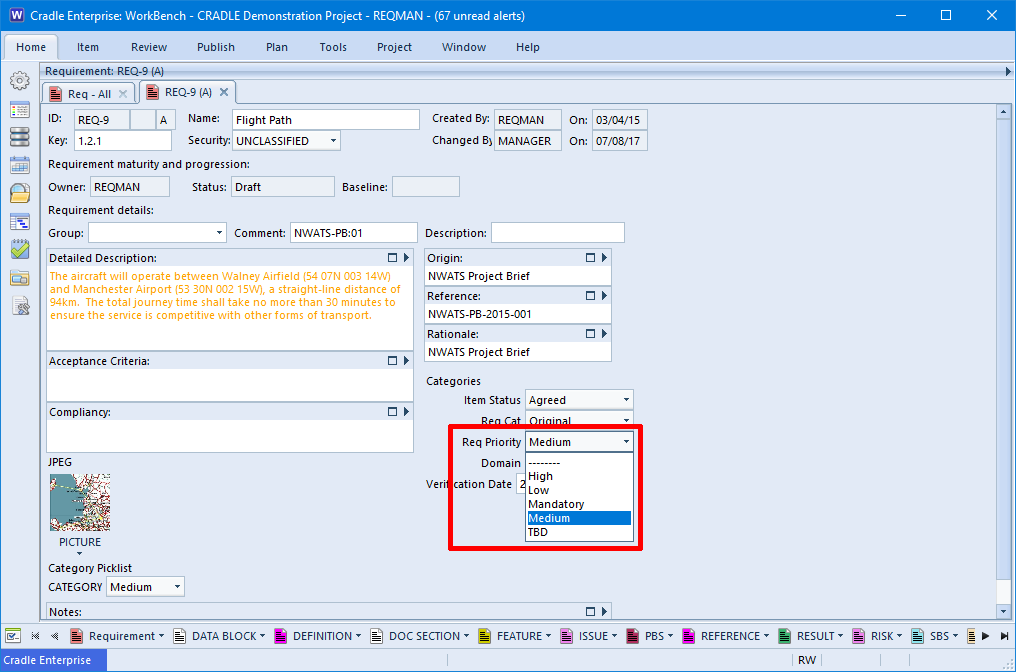
Using the DEMO project as an example, I set the category skill for Req Priority to REQUIREMENT. The ADMIN user does not have the REQUIREMENT skill and so once set, is able to see the as option set but not able to alter it.

No skill, so no access
No access for this user

When logged in as REQMAN who does have the REQUIREMENT skill, they can see and alter the category option.

User has skill to has access
User has access

This restriction works throughout WorkBench including in queries, forms and Item Properties.

This also works in Web Access forms and queries.

Setting Categories in Project Setup

Silent Installs

What is a silent install and how do I do it with Cradle?

Silent installs are  installations which do not require user interaction.

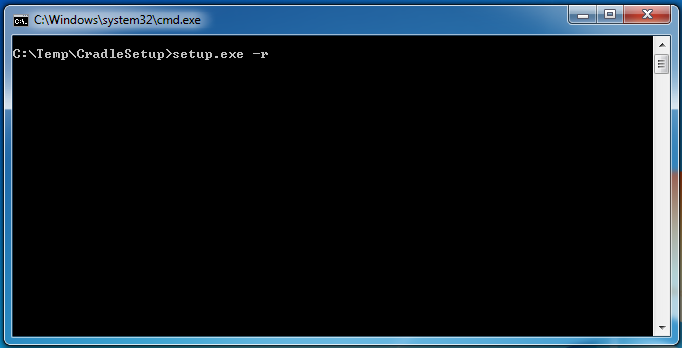
To perform a silent installation you will need to create a “setup.iss” file, this is created when making your recording for the silent installation by opening the command prompt and running setup.exe -r. After completing the installation you will have the “setup.iss” file in your system drive e.g C:\Windows.

Record silent install

You can now perform a silent installation with your recorded settings!

On the machine you would like to do the silent installation, place your setup.iss file in the same directory as the setup.exe. For full installations or server only installs, you will also need your security code which you place within a text file such as “code.txt“. You must only enter the Security Code on the first line and add a carriage return. For client only installs the file can be blank.

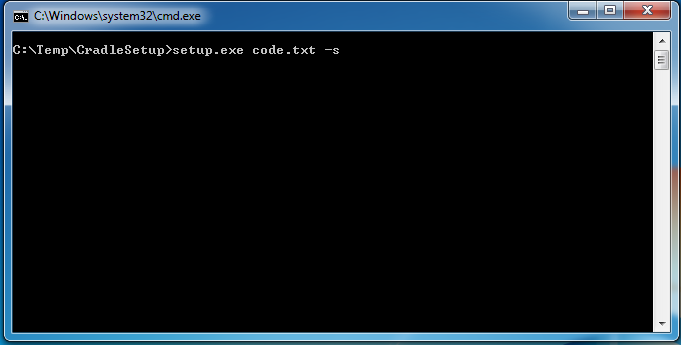
Now you have your files ready, open the command prompt navigate to your setup.exe directory and enter the following setup.exe code.txt -s

Run silent install
Run silent install

You are now running your silent installation!
Remember when you have finished you will need to restart the machine.

Please note this does not work with Toolsuite

If you would like more information on this please go to Cradle Documentation – Installation Guide – Windows and to Chapter 8. Or click here for Installation Types


Managing your Cradle Environment

A Fully Customisable Systems Engineering Environment

We use definition files to define your Cradle environment to your project’s needs.

  • Queries – how we filter items in the database
  • Views – how we view the lists of filtered items
  • Forms – how we see individual items
  • Matrices – how we view results of queries and linked items in rows and columns
  • Metrics – how we can see the numbers of items meeting a criteria
  • Reports – how we output exported tables containing a set of query results formatted according to a particular view and table style.
  • Dashboards – management summary that can define KPIs
  • Navigations – how we filter cross references
  • Startpages – how we provide a range of selectable actions, each of which either displays a PDF file, opens a specific page in the Cradle help, opens a particular dialog or runs a query, report or similar. The start page is displayed in the main working area of the WorkBench UI and is fully customisable
  • Sessions – store information about your required WorkBench environment such as window dimensions, current project, opened queries, reports etc. to be loaded upon login
  • Graphical Print Settings – how we print diagrams
  • Hierarchy Diagram Properties – style in which we show items
  • Capture Setups – how we are to capture items in Document Loader
  • Report Styles – styles available for reports which include font, alignment, underline, etc.
  • Graph Styles -styles available for graphs which include fonts, grid size, axes size, etc.
  • Export Formats – settings of exports to reuse at a later time
  • Import Formats – settings of imports to reuse at a later time

All of the above are available in WorkBench and subsets are available in other tools, e.g. you can run queries in WebAccess or use Import Formats with c_io

For more information on how to setup these definition file please see definitions section of our online help.

These definitions are stored in one of several areas:

  • Project – visible to all members of the Cradle project (PROJECT privilege is required)
  • User Type – visible to all users with your user type in this project
  • Team – visible to all members of your current team in this project
  • User – visible only to you when logged in as this Cradle username in this project
  • Personal – visible to a specific machine login username, across all projects to which  he/she has accesses
  • Automatic – visible to all members of this Cradle project (you cannot save definitions with this scope). Automatic definitions are created as a starter set when an item type is defined. They are a good starting candidate for editing and then using ‘Save As
  • System – you cannot save definitions with this scope

Managing Definitions

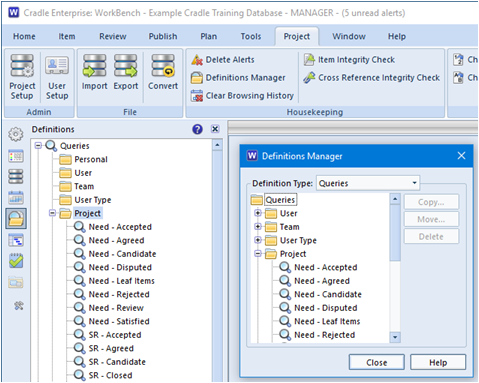
WorkBench provides the ability to manage your Cradle environments via:

  1. Definitions Sidebar
  2. Definitions Manager
Managing definitions scrrenshot
Managing definitions

These allow you to copy, move or delete definition files through the WorkBench interface.

Using these methods to manage your definitions enables you to reduce the number of stored definitions within a project by allowing users to share definitions at the team-level as opposed to users having their own copies of the same definitions.

Redundant Definitions

To reduce the amount of redundant definitions, it is possible for the user to create a User Definition opposed to creating a Project definition if it is for personal use. It is also possible to delete previous Definitions if they are no longer required.

Examples

A user could:

  • Move definitions from a user to that user’s team, or to the project, for everyone to use
  • Copy definitions from one team to another team or a member of another team
  • Move definitions from a user to become accessible by all users of a specific user type
Updated Article 04/02/2019 – Added info on Redundant Definitions

Using a Company Templates for Document Publisher

Company Templates

Does your company use different types of Microsoft® Word template for different types of document? Did you know that you can use those company templates inside Document Publisher?

Document Publisher has different locations you can save the files to but it can also open files from outside these locations as well. These files will then be shown as ‘local’ and can then be edited in Document Publisher. Once you are happy with the company template it can be saved to any one of the locations the user has access to within Cradle.

Loading an External Template

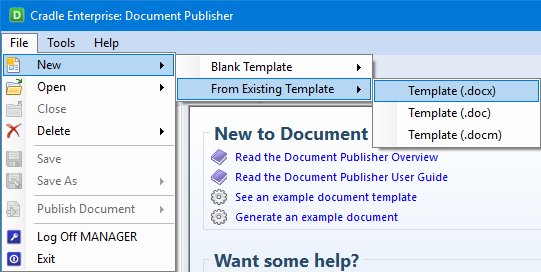
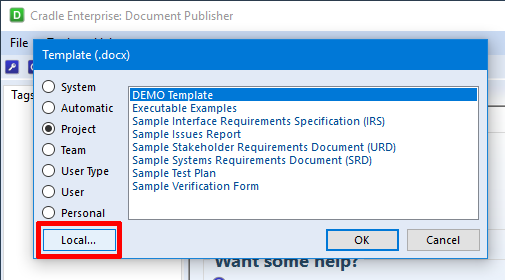
Select the File menu and then New, then From Existing Template and select the template type the user wishes to open. Once the Template dialog opens, click the Local... button.

Opening New From Existing Template
Document Publisher Open Template dialog

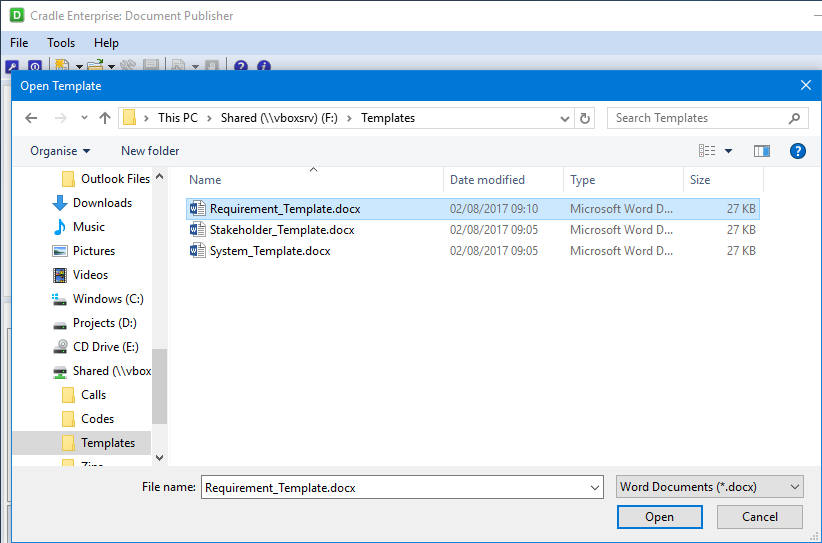
This will then open explorer in which the user can then locate and open the file they require.

Explorer through Document Publisher

This will then open the file named as NewTemplate and not as the name of the file you have opened from. Once you have added at least one tag, Document Publisher will allow you to save the template.

Saving a File

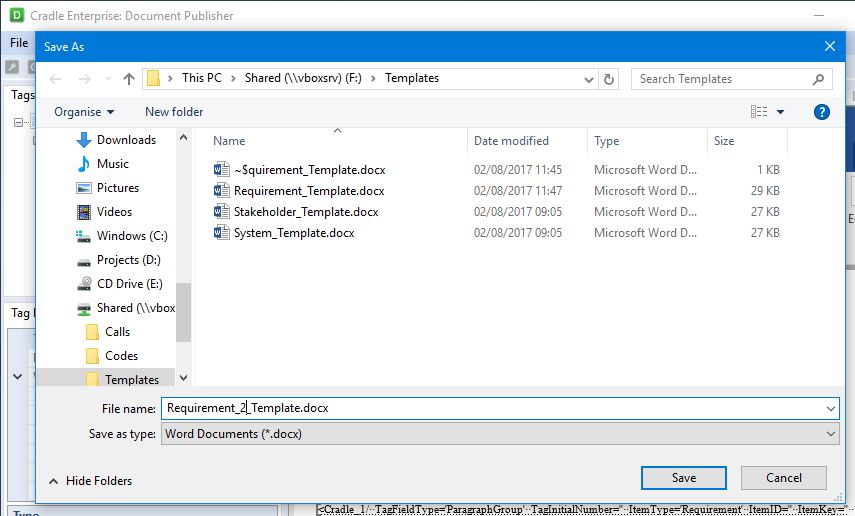
The first is to select the File menu and Save, then the Template dialog opens, the user can either save it to one of the locations they can access or as below, select the Local… button and rename and save it through Explorer.

Saving templates through Explorer
Saving templates through Explorer for Document Publisher

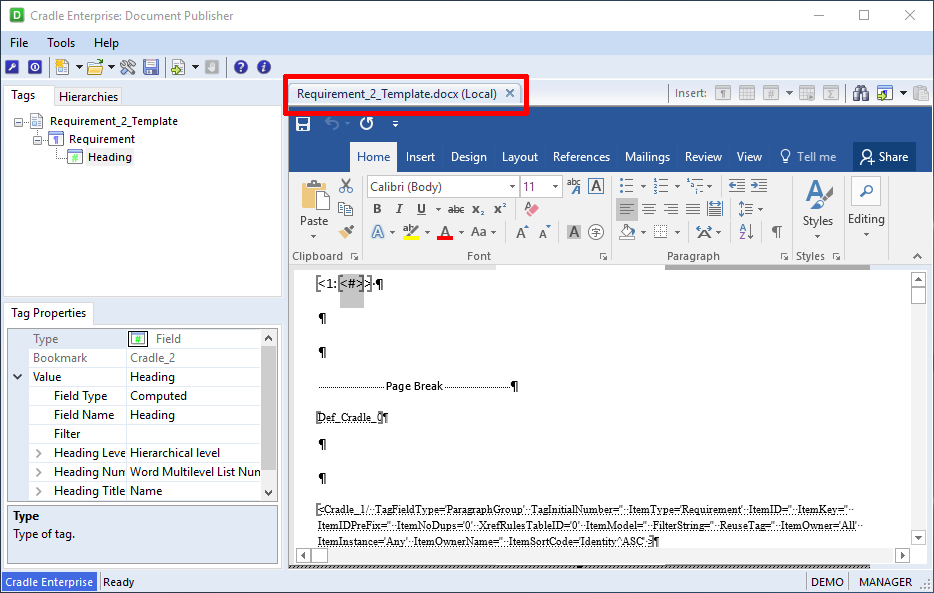
This will then save the file to that location and show in Document Publisher as (Local).

Showing template is saved Local
Showing the file is saved as Local and not in a Cradle Location.

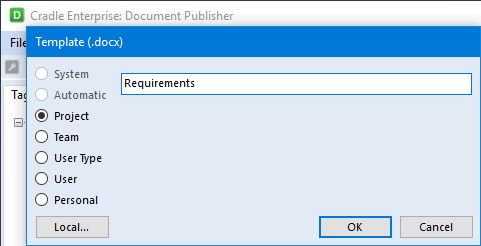
This file when finished can then be saved into a Cradle location e.g. Project so it can then be published through WorkBench. To do this the user will click the File menu and then Save and when the Template dialog opens, select the Location the user requires and change the name they want the file to have.

Template Dialog using the Project Location
Saving in the Project location and new name for the file.

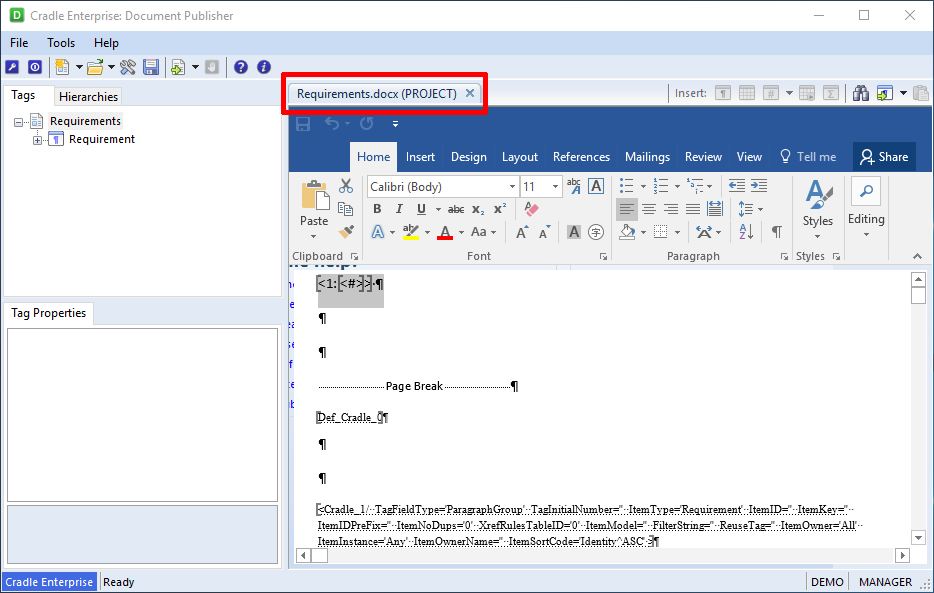
This will now show it is saved in the project location. This can be done to any location the user has access to.

Tempalte in project area
Template is now saved in the Project Location

To see how to Publish through WorkBench, click here

For Publishing a draft template, click here

For free Microsoft® Office templates and themes, click here

Maintaining and Repairing your Cradle Databases

Problems with your Database?

In the rare occasion that something has gone terribly wrong with you database, here are some things that you may find helpful:

Retrieving Licence Statistics

If you are finding that you are running out of licenses or you just want to have an overview of license usage over a period of time you can use c_usage which can be run to output the information from Cradle into an excel file. You then copy this date from the excel file into a spreadsheet we supply called c_usage.xls which once the data has been pasted into the spreadsheet will then update it’s other worksheets which will display the corresponding information in graphs.

For more information on how to retrieve licence statistics please see our online help.

Retrieving Specific Error Logs

All components of the Cradle software distribution include crash resistance such that, in the event of an internal error occurring within the software component, internal recovery action is taken, and the software component remains running.

In all cases, the recovery action includes adding an entry to an error log file that provides a complete description of the internal environment of the software component when the problem arose.

This log could potentially become quite large over time and you may only want retrieve one or more entries from this log, c_errlog can be used to retrieve one or more entries from the error log files produced by Cradle.

For more information on how to parse an error log file please see our online help.

Checking the Version of your Cradle PDB Files

Check the version of your database files
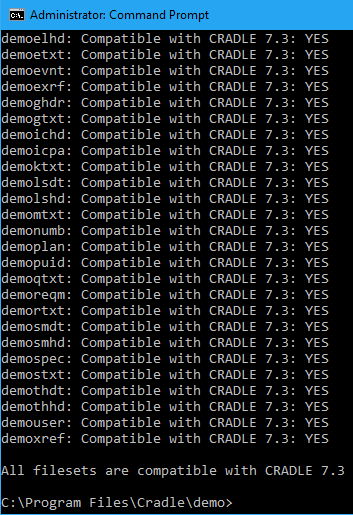
The c_pdbver utility allows you to determine the version of your database files, it check the filesets are compatible with a version number you specify and confirms whether or not each fileset is in the specified version.

pdb_ver result
7.3 compatibility check

For more information on how to check the version of database files please see our online help.

Checking and Repairing Database files

If you have had a machine crash or hardware failure when Cradle was writing to the database files you may want to check and repair the database file to ensure you don’t see any further corruption to your database. We supply a utility for this called dcheck that checks and repairs damage to the ISAM files within a Cradle PDB.

For more information on how to check/repair database files please see our online help.


Exporting a Single Item Frame using ‘getframe’ with c_io

Exporting

A user can export a single item’s text or binary frame and place it in a file using getframe. A batch file is great for this as a user can use copy and paste the same command line numerous times,  replacing the identity for each line. Then when run, all the frames will be quickly exported.

The start of this command line is the same as for all main options, using the path and login details.

The -getframe options are as follows:

Options for getframe in c_io.exe
The options for getframe in c_io.exe

-getframe option sets the frame name to be output for the first item that matches the query or identity (if used).

-file sets the name and location of the file to be output

-query option sets the query to be used

-qloc sets the location of the -query option

-identity over rides any set within the used query

c_io.exe Batch File GetFrame Examples

"%CRADLEHOME%\bin\exe\windows\c_io.exe" -login admin,ADMIN,demo -getframe NOTES -file "C:\Temp\notes.txt" -query "Req - All" -qloc automatic

Using -identity

"%CRADLEHOME%\bin\exe\windows\c_io.exe" -login admin,ADMIN,demo -getframe TEXT -file "C:\Temp\REQ-2_TEXT.txt" -query "Req - All" -qloc automatic  -identity "REQ-2"

"%CRADLEHOME%\bin\exe\windows\c_io.exe" -login admin,ADMIN,demo -getframe PICTURE -file "C:\Temp\REQ-9_PIC.jpg" -query "Req - All" -qloc automatic  -identity "REQ-9"

Helpful other c_io options

There are several helpful options especially when using in a batch file.

-log allows a user to specify a name for a log. This is the log that will have the details of the actions performed during the  import.

-noldap allows users to bypass using LDAP when running a command line or batch file.
-errorstack option is for logging any issues with the import

"%CRADLEHOME%\bin\exe\windows\c_io.exe" -login admin,ADMIN,demo -export "C:\Temp\all3.exp" -type all -noldap -errorstack -log "C:\Temp\all4_log.log"

"%CRADLEHOME%\bin\exe\windows\c_io.exe" -login admin,ADMIN,demo -export "C:\Temp\pdb3.exp" -type pdb -noldap -errorstack -log "C:\Temp\pdb3_log.log" -verbose

Options not used within a batch file

There are a couple of options that are not used in a batch file. The reason is that they are only useful in a command line, in a command prompt as they show pop ups with information on them.

-ver lets the user see what the version number, date and time of the build they are using.
-help option allows a user to see the command line options.

Links to Other Batch File Options

Read Publishing a Formal Document Using a Batch File article for information of formal documentation.

Details of importing can be read in Importing Using c_io in a Batch File


Cardinality Control in Link Rules

The Cardinality Values and Uses

In the latest release of Cradle using Cardinality in a cross reference has been introduced. This extends the capability of controlling cross references to the point of how many relationships an item can have.

The Many-to-Many Relationship

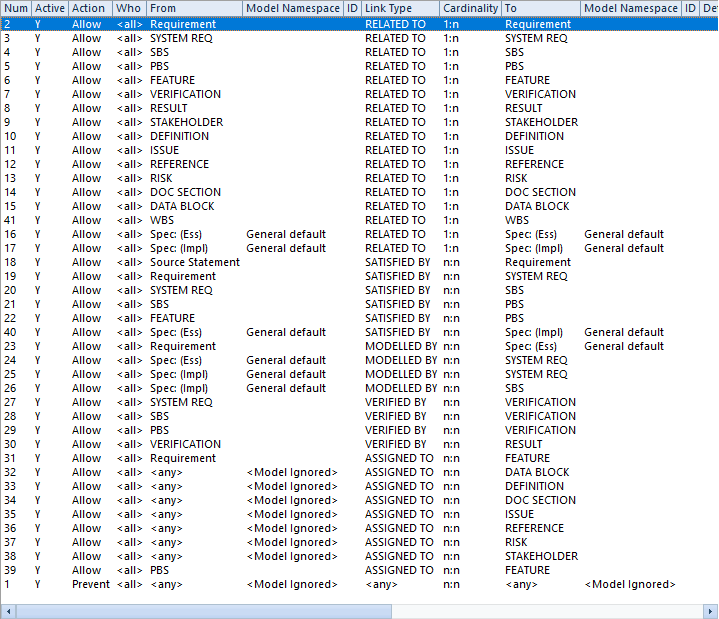
This is the default option for a rule when it is first set. This is also the default option when a rule is imported from an older version which does not have this option. This cardinality relationship is applied to:

  • Most of the link rules in the as-supplied Cradle demonstration databases DEMO and SYSM
  • Most of the link rules in the as-supplied default schema and quick-start
Demo Link Rules showing the Cardinality
Showing One to Many and Many to Many Cardinalities

The One-to-Many Relationship

This cardinality is used for parent-child relationships between items of the same type. Furthermore this option is applied to:

  • Parent-child link rules in the as-supplied Cradle demonstration databases DEMO and SYSM
  • Parent-child link rules in the as-supplied default schema default and quick-start

The Many-to-One Relationship

This option will allow many items linked down to a single item. Many users can be assinged to one Requirement.

The One-to-One relationship

This is mainly for links like a single result file to a single test file.

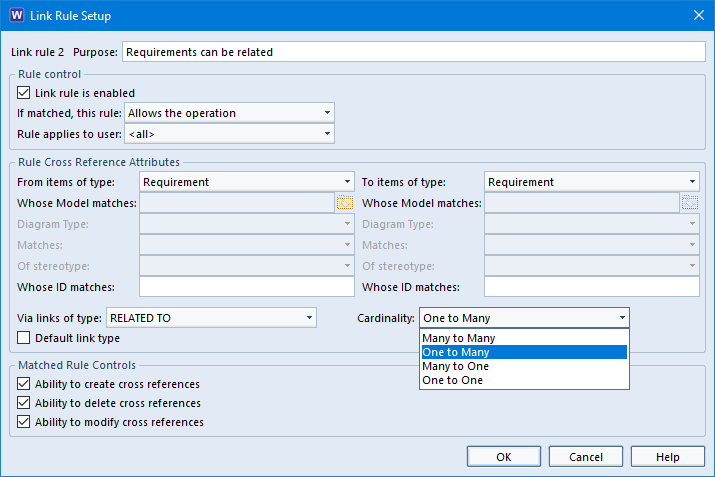
Link Rule Setup options
Showing the Cardinality option within the Link Rule Setup

The new cardinality option is for all item types which includes all the modelling types as well.

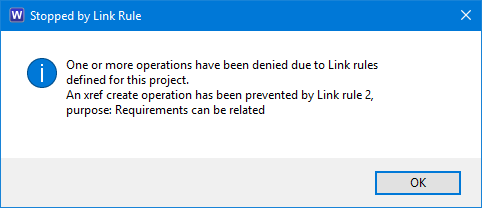
Hence if a user tries to set linked items which are against the rule they will see an error which will deny the links and the links will not be created.

Stopped by Link Rule Error Message
Error Message

Restrictions on use

Finally there are restrictions in how this option is accessed. For instance a Link Group cannot be used in conjunction with the Cardinality. Also the options to create or modify cross references must be checked or the Cardinality option will be disabled.

For information on getting started in Link Rules click here

Printing Diagrams using printdiag with c_io.exe

Printing many individual diagrams through WorkBench can be slow and time consuming. Using the option -printdiag in c_io.exe, a user can then print many diagrams at once. Once the first command line has been set up, it can be copied, pasted. The file name and the identity can be altered for each diagram that the user requires printing.

The options to do this are:

printdiag options in c_io.exe
The printdiag options in c_io.exe

Required Options

-printdiag allows a user to set the type of output for the diagram. The types currently used for this are:

  • hpgl – Hewlett-Packard Graphics Language
  • ps – PostScript
  • rtf – Rich Text Format
  • svg – Scalable Vector Graphics

Elective Options

-onlydiag will output the diagram without a surrounding frame and the details which the frame contains.

-catcode will print the category value in the diagrams border.

-portrait will cause the diagrams to be output into a portrait orientation rather than the default of landscape. This option is only used in conjunction with -printdiag, it will not work with any other c_io.exe options.

-file sets the name and location of the file to be output.

-query set the query to being used and as before -qloc sets the location

-identity overrides any identity set within the used query

-printdiag Batch File Examples

"%CRADLEHOME%\bin\exe\windows\c_io.exe" -login admin,ADMIN,demo -printdiag svg -file "C:\Temp\DFD_C.svg" -query "Diagram - Ess DFD" -qloc project  -identity "C"

"%CRADLEHOME%\bin\exe\windows\c_io.exe" -login admin,ADMIN,demo -printdiag rtf -file "C:\Temp\eFFBD_133.rtf" -query "Diagram - Ess eFFBD" -qloc project -portrait -identity "1.3.3" -onlydiag

Helpful other c_io options

There are several helpful options especially when using in a batch file.

-log allows a user to specify a name for a log. This is the log that will have the details of the actions performed during the import.

-noldap allows users to bypass using LDAP when running a command line or batch file.
-errorstack option is for logging any issues with the import

"%CRADLEHOME%\bin\exe\windows\c_io.exe" -login admin,ADMIN,demo -export "C:\Temp\all3.exp" -type all -noldap -errorstack -log "C:\Temp\all4_log.log"
"%CRADLEHOME%\bin\exe\windows\c_io.exe" -login admin,ADMIN,demo -export "C:\Temp\pdb3.exp" -type pdb -noldap -errorstack -log "C:\Temp\pdb3_log.log"

Options not used within a batch file

There are a couple of options that are not used in a batch file. The reason is that they are only useful in a command line, in a command prompt as they show pop ups with information on them.

-ver lets the user see what the version number, date and time of the build they are using.
-help option allows a user to see the command line options.

Related Posts

Read Exporting using c_io in a batch file article for information on how to create data transfer files from Cradle.