Control Item Reordering

Hierarchies of items are common in requirements management and systems engineering. It is easy to create hierarchies in Cradle. It is also easy to move items within hierarchies. Cradle calls this reordering. You can control item reordering so that you can prevent users accidentally reordering items in ways that are incorrect.

How to Reorder Items

You reorder items by drag and drop:
Control Item Reordering in 3SL Cradle
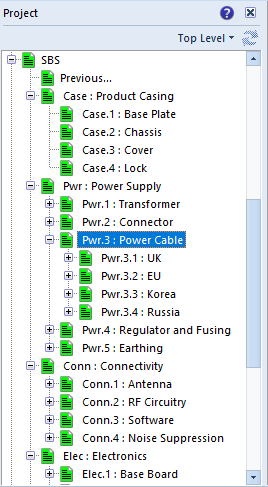
An Item to be Reordered
  1. First, select the item to be reordered
  2. Keep the mouse button pressed and drag the cursor onto another item
  3. Release the mouse button and choose from the reordering options
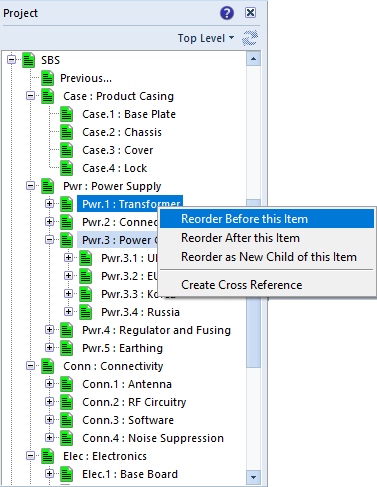
Choose the Reordering Operation

If you choose Reorder Before this Item, then:

  • The hierarchy Pwr.3 will become Pwr.1, including all descendents
  • The Pwr.1 hierarchy will become Pwr.2
  • The Pwr.2 hierarchy will become Pwr.3
  • The Pwr.4 and Pwr.5 hierarchies will not change
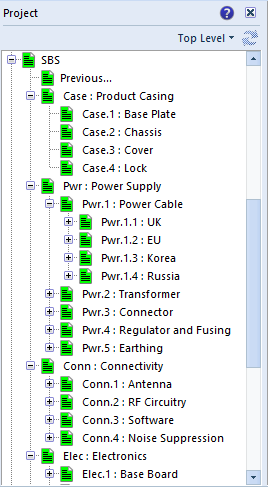
Result of Reorder Before Item Pwr.1

If you choose Reorder After this Item, then:

  • The hierarchy Pwr.3 will become Pwr.2, including all descendents
  • The Pwr.2 hierarchy will become Pwr.3

While if you choose Reorder as New Child of this Item, then:

  • The hierarchy Pwr.3 will become Pwr.1.N, where N is the number of the next child of Pwr.1
  • The Pwr.4 hierarchy will become Pwr.3, to close the gap in the numbering
  • The Pwr.5 hierarchy will become Pwr.4 to close the gap in the numbering

Control Item Reordering

Problems can occur if you drag-and-drop Pwr.3 either:

  1. To create a new hierarchy with a new top-level item. For example, if you drag-and-drop onto item Onto a top-level item, such as Product Casing or Connectivity and choose Reorder Before this Item or Reorder After this Item.
  2. Into a different hierarchy, such as the Case or Conn hierarchy

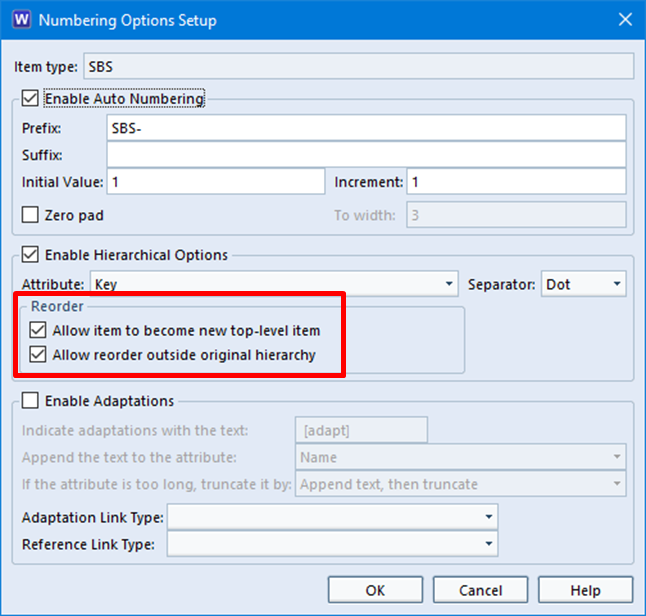
You can control item reordering by preventing either or both of these operations. You do this using checkboxes in the Numbering Properties:
Control Item Reordering
Options to Control Item Reordering in a Schema

If you de-select the Allow items to become new top-level item checkbox, you will prevent problem 1.

You can prevent problem 2, accidentally moving an item outside its original hierarchy, by de-selecting the Allow reorder outside original hierarchy. checkbox.

Both checkboxes are enabled by default.


Select Operations in Cradle

Since Cradle is not intelligent (unlike its users!), you have to tell it what you want to it operate on, before you tell Cradle to do anything. There are several select operations in Cradle, depending on what you are working with. Most of these select operations are common to other pieces of software, so what follows may not contain any surprises.

Select Operations in Cradle

In general, you will either select:

  • Items, to perform an operation on them
  • Text, to manipulate the text in some way

How to Select Items

When you see a collection of items, in a list, table, document or tree, you can select them and then apply an operation to them. So, starting with this table of items:

Select Operations in Cradle
A List of Items

the select operations in Cradle are:

  • Select all items by pressing CTRL-A:
Select Operations in Cradle
A List of Selected Items
  • Cancel all selections by pressing CTRL-D:
Select Operations in Cradle
A List of Items With None Selected
  • Select an individual item by positioning the cursor over it and then click your LEFT mouse button:
Select Operations in Cradle
A List of Items With One Selected
  • Select a range by positioning the cursor to the other end of the range and press SHIFT and the LEFT mouse button:
Select Operations in Cradle
A List of Items With a Range Selected
  • To add items to the set of selected items, or to remove a selected item from the set of selected items, position your cursor and press CTRL and the LEFT mouse button:
Select Operations in Cradle
A List of Items With Several Items Selected

You can combine these select operations in Cradle, as shown above.

If the results are not what you want, press CTRL-D and start again!

How to Select Text

The majority of items created in Cradle contain text, either plain text or rich text. You can store any amount of text (well, up to 1 TByte) inside each attribute (called a frame) in an item. You can have any number of attributes in each item.

So, items can store a little text, or an enormous amount of text.

When you edit text, you will see a cursor that is a vertical line. This shows you where text will be entered when you type on the keyboard, or paste text that you copied elsewhere.

The select operations in Cradle for text are:

  • Select all items by pressing CTRL-A
  • Cancel the selection by pressing CTRL-D
  • To select a position in the text, position your cursor and press the LEFT mouse button
  • Select a word by positioning your cursor anywhere inside the word and double-click, press the LEFT mouse button, quickly, twice,
  • Select a paragraph by positioning your cursor anywhere inside the paragraph and triple-click, press the LEFT mouse button, quickly, three times
  • You can select a range of text by positioning your cursor at the start, or end, of the range, and press the LEFT mouse button, drag the cursor, and release the mouse button
  • You can also select a range of text by positioning your cursor at the start or end of the range, then press SHIFT and then press Cursor Left, Right, Up or Down to extend the range in each direction.
  • If you ALSO hold the CTRL key, then Cursor Left and Right will extend the selection by one word
  • If you ALSO press the CTRL key, then Cursor Up and Down will extend the selection by one paragraph
  • You can change the end of a range of selected text to the start or end of a paragraph by pressing the SHIFT key and then pressing Home or End
  • You can change a range of selected in large amounts by pressing the SHIFT key and then pressing Page Up or Page Down

By combining these select operations in Cradle, you can easily work with even long blocks of text.

If you have not tried some of these technique, please try them!

When to Create a New Item Type

Items and Item Types

A Cradle database can store any number of items. Each item has an item type. Often it is easy to decide when to create a new item type, but sometimes it is not obvious.

When to Create a New Item Type

In general, there are 4 reasons to create a new item type:

  1. You want the items to have a different set of attributes (and perhaps therefore a different set of views) to any other item type. Your schema may already have an item type that is similar to the item type that you are considering. You could add the new attributes to this item type and then simply ‘ignore’ the extra attributes when they are not needed. if this would be too confusing, you will definitely need a new item type.
  2. You need to be able to enforce a different set of link rules for the items. For example, these ‘subsystem requirements’ may (and probably do) need different linking rules to the system requirements.
  3. You need a different workflow (review process) for the items, for example a different way of reviewing them, or different approvers, or a different way of dealing with rework when reviewers reject items.
  4. Using a different item type is the easiest way to distinguish the items from items of other item types, either to create queries, reports, documents, metrics or dashboards.

The last of these reasons is not as good a reason as the other three. Before creating an item type for this reason, it would be sensible to first consider whether these items (for the possible new item type) could be found with a
category-based, or key-based, or even comment-based query. The comment attribute is used to store the names of source documents for items that are captured by Document Loader.

Limitations

You can create any number of item types that in the databases of Cradle Enterprise systems. All of Cradle’s single-user products have a limit of 50 item types.

Creating an Item Type

Details of creating a new item type is covered in this post:

New Item Type name dialog
Creating New Item Types

Automatic Definitions

When you create an item type, Cradle will automatically:

  • Create a set of queries for the item type, accessible from the Quick Access Bar
  • Provide a set of views for the item type
  • Build a form for the item type

This means that you can immediately start working with items of your new item type.

Parametrics in Document Publisher

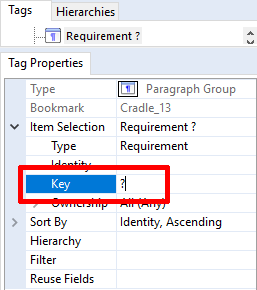
Parametrics can be very useful in Document Publisher. It uses a question mark ? as a marker to Document Publisher that this is an option and needs to be filled/selected by the user.

It can allow users to set the Identity/key of a single item or more to be output. This can be used in a hierarchy or with a single item type. Parametrics can also be used to set different properties and options in filters.

Single Parametrics

Using a single Parametric (?) allows a user to publish a template many times but use a different item Identity or Key each time. Note: Using a single parametric in several places in the template will always use the same item identity or key each time.

A parametric can be used at the database/top level or at the field level to set the items to be published. At the top level the parametric is entered for the Identity or Key.

Single Parametric set at Database level
Specify Key dialog
A popup for a user to set the Key(s) at a database level item.

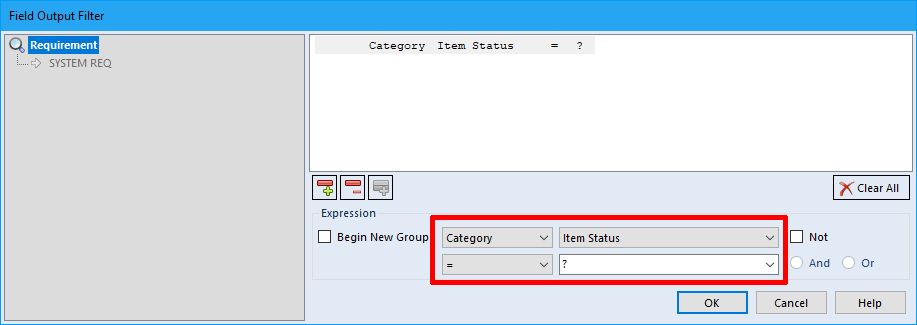
They can also be used in a filter for field to set or restrict the items to be output.

Using a category to detemine if a field tag is output.

In this case the Requirement attribute of Identity will only be output if its Item Status is set to Accepted.

This allows the user to set the Item Status Option.

As you can see below, only items with a status of Accepted have both the Identity and Key output for the Requirements.

Small excerpt of the items output

Named Parametrics

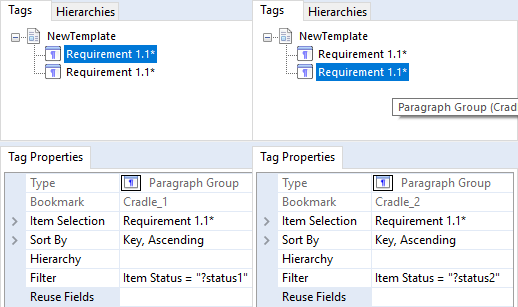
Using a Named Parametric (?named) means a user can have several different parametrics throughout the template and each can be set at time of publishing. So for example the user can set one named parametric for output based on one option of category (e.g. Agreed) and then later in the template use a different named parametric to output based on a different category option (e.g. Rejected).

Named Parameters for 2 different Paragraph Group Tags

During publishing a popup will allow the user to select Agreed for the first Paragraph Group popup:

Named Parametric for Status 1

They then can select Rejected for the second Paragraph Group popup:

The second popup to select a different Status

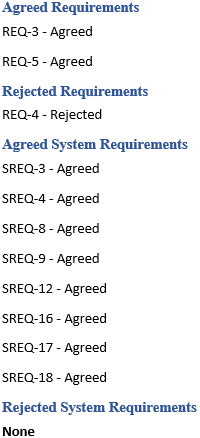
The published output will then show the 2 different outputs in the same document.

Output using the above options

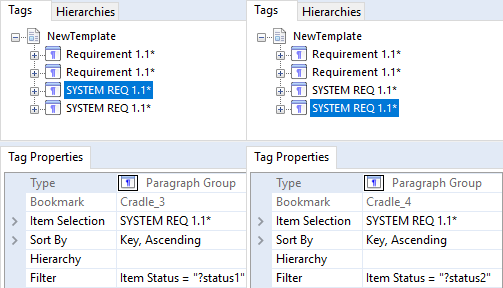
These named parameters can even be used in several places within the template. The user may want to show the Agreed Requirements and System Requirements in one document. As both item types use the same category (Item Status in our Demo) then the same named parametric can be used for both item types.

Using Named parametrics for both Requirements and System Requirements
Output using the same Named Parameters twice

In the above screenshot, the 2 named Parametrics have been used for Requirements and System Requirements and the output shows all the Agreed items but that there are no Rejected System Requirements.

Multiple Data Cells – Document View

Heading Styles in Document View

New Cradle 7.3.1 Feature (Multiple Data Cells – Document View)

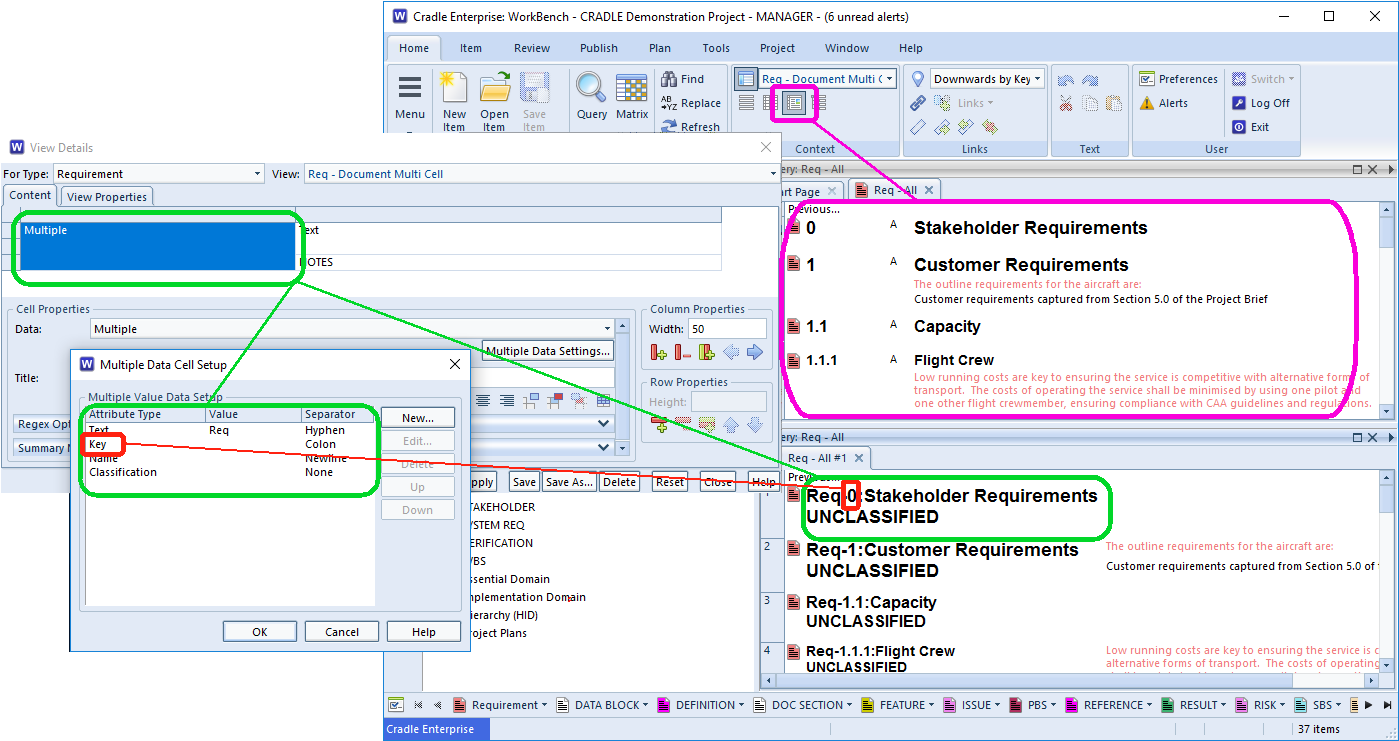
We’ve updated Document View in Cradle to allow triggering by content of Multiple Data Cells.

Document View is a style that gives a quick output from a query in a style akin to a document with heading levels being shown in different styles. These are triggered when the hierarchical attribute is present in the first cell.

Multiple Data Cells allow the combination of data values within one View Cell. If your Multiple Data Cell includes the hierarchical element, its Document Style behaviour will now be the same as if it were the element itself.

In the screen-shot below the Key is shown in the top view and then as part of a Multiple Data Cell in the lower part.


Showing the dialogs and results to use multiple data cell in document view
Multiple Cell in Document Style

Output to Hard Copy

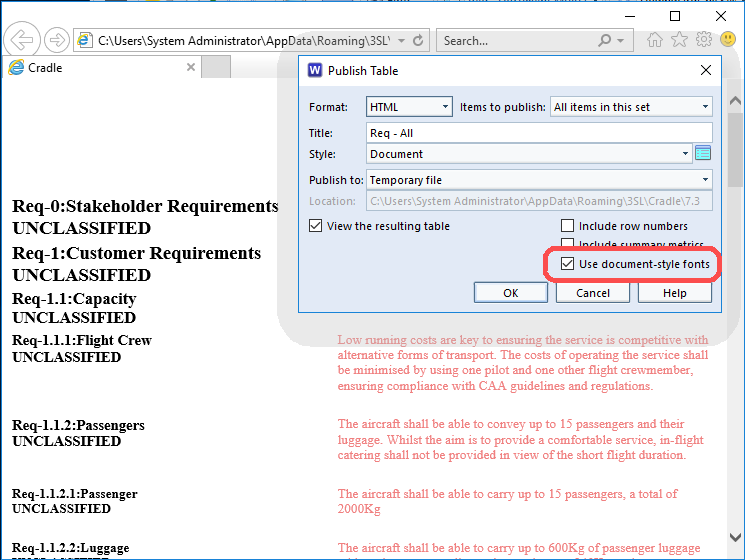
When there is no need to create a full formal document through Document Publisher, it is possible to publish the view to HTML or RTF quite easily. Simply ‘right click’ on the text in the view and select  Publish Table…. and then ensure that the option Use document-style fonts is selected.

Dialog and result of publishing table with document style fonts
Publish Table – Document Style Fonts

As can be seen in the screen-shot the multiple data cells – Document View Fonts  are preserved in the output. Now you can use whichever printer is attached to your system to produce the hard copy from the text in your browser or the RTF file, or save a tree and email the resultant file where appropriate.

Views

Cradle Views are a simple yet flexible way to arrange your tabular query output. To learn more see the help section on Views.

Related Articles

It is possible to copy the text from a multiple cell to your clipboard for use elsewhere.


How to Delete Source/Formal Documents

Deleting Source Document Versions

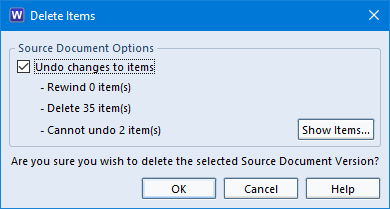
Source document versions can be deleted from the Project sidebar, the same way as regular items. When you delete a source document version, all cross references (source statements) to the captured items are also deleted. Previous versions of the source document and their cross references (source statements) are NOT removed.

Dialog shown when deleting source document versions
Delete Items Dialog

WorkBench only shows the most recent version of a source document. So for example, if you were to delete version 4 of a source document, then version 3 will now be the latest version and will be shown in the Project sidebar.

If you delete version 1 of a source document, then the source document is unregistered and deleted from the PDB altogether.

For further information on how to delete source document versions please click here.

Deleting Formal Documents

Deleting formal documents is similar to deleting standard Cradle items.

When a version of a formal document is deleted, Cradle will:

  • Delete the Word document stored inside the formal document
  • Remove the formal document
  • Delete the records that associate specific item instances with that version of that formal document

For further information on how to delete formal documents read the Cradle help.

Querying a Range

Categories and Calculations in Range

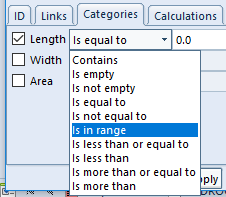
When running a query it is possible to specify more than just a single value. Categories and calculations with a numeric value can be queried to exist in a range. For example querying a range for categories, or calculations that have a numeric value can be tested for the mathematical values:

  • Is equal to
  • is not equal to
  • Is in range
  • Is less than or equal to
  • is less than
  • is more than or equal to
  • is more than

It can also be tested against the logical

  • Is empty
  • Is not empty

or textually

  • Contains
menu showing numeric query specifiers
Numeric Query Specifiers

Results

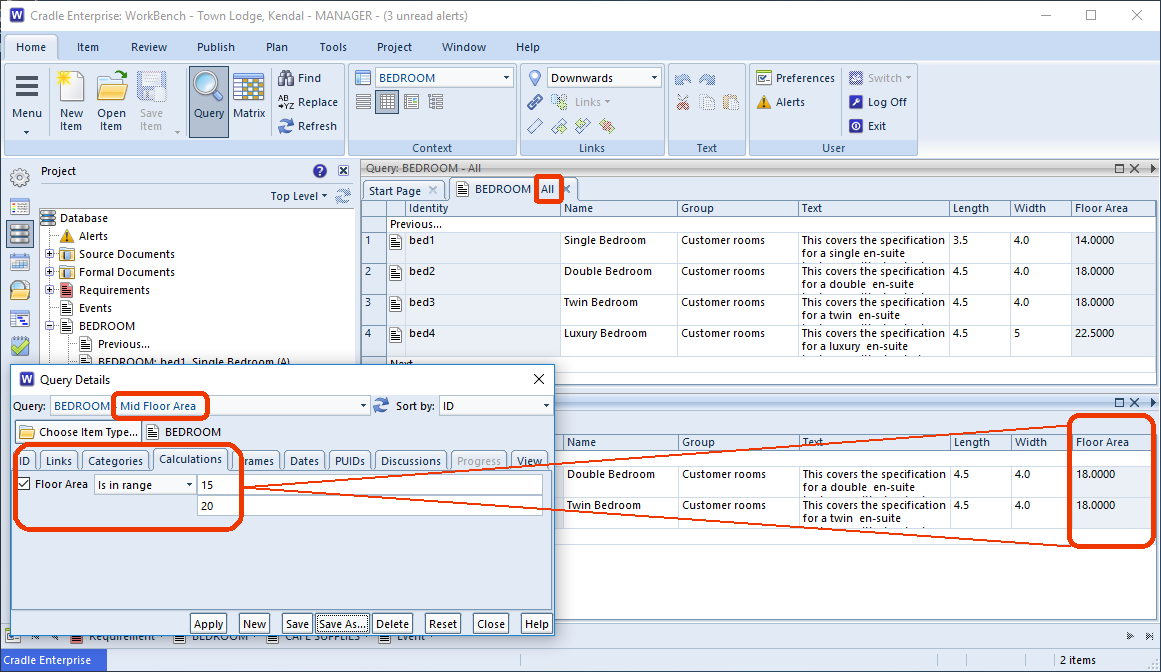
The following screen shot shows the result of running a query against all of the item type and re-running with a range calculation.

The top half of the display shows the calculation having 14m2 up to 22.5m2, but the query Mid Floor Area limits the return to those between 15m2 and 20m2.

result of running a query witha nd without a range
Querying a Range

Calculations in Cradle

Calculations

It’s possible to calculate values for display, query upon or to set a category within a Cradle item. Calculations can perform basic addition, subtraction, multiplication and division.

Setup

  • Open Project Setup and navigate to the Item Definitions section.
  • Ensure you have categories set up to contain any inputs you require. In this example Width and Length of type Real have been added and also an additional category of Area also of type Real.
  • Select the Item Types tab
  • Add these categories to your item type, here it is to the Bedroom item
  • Choose Calculations and add a New one, here called Floor Area
  • Create the calculation, in this case multiplying [@CAT:Length] * [@CAT:Width] and set the output type to Real.
  • Optionally set a category with the resultant value, in the example this is Area
  • Save the schema and return to the main interface.

Run

  • Edit the item to include values for the categories that are inputs to the calculation.
  • Save the item and the calculation will be updated and in this case also set the associated category.
Related Articles

Rule Sets can be used to set values based on categories and calculations where the value is based on logic matching rather than on simply the mathematical result.

A quick way to see calculation values without changing the View or Form

How to Delete Items

How to Delete Items from your Project

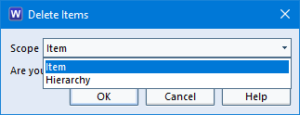
When deleting items you are presented with options that relate to the scope of the operation. The scope determines whether just a single item is deleted, or an item together with its supporting definitions, or an item and the hierarchy of items linked to it by cross references.

Available scopes when deleting items
Delete Items dialog
Delete button on the item menu
Delete

You can delete any number of items at the same time (in WorkBench, items can be deleted one at a time through Web Access). You must have read-write access to an item to be able to delete it is available through the context menu (right-click) or on the Item menu.

When you delete the last instance of an item, that is, if there are no more versions or drafts of the item after it has been deleted, and the item isn’t in a recoverable state, Cradle then automatically removes all cross references to and from the item. This ensures that there are never any dangling cross references in the database, that is cross references to or from items that do not exist.

The Delete operation has the same scope option as the Copy operation, with the same possible values and meanings. These are:

  • Item – delete the item only
  • With Definitions – delete the item and it’s definitions
  • Hierarchy – delete the item and it’s hierarchy

Please note the DELETE_ITEM privilege is required to delete items in the database.

If you are worried about a user being able to delete an item, it is possible to restict this user from this privilege, this is done via the “User Setup Privileges and Rights”

Cradle Help covers more on the steps on how to delete your items .

Configuration Management

It is usual to delete items when they are in a draft state. This is where the item is still in a fluid state and alterations are occurring frequently. When applying formal control (Configuration Management*) to a project, it’s normal to superseded or retire items when they are updated or no longer required. This maintains the full traceability through the project’s development. An overview of this formal control is detailed in the Cradle Help.

*Available in Cradle Enterprise

Related Articles

There is a recoverable facility which allows you to recover deleted items:

https://www.threesl.com/blog/how-to-recover-deleted-items/

Article Updated 04/02/2019 – Included how to stop users deleting items

How to Recover Deleted Items

Recovering Deleted Items

The recoverable status means that when you delete items, they are not removed from the database, but is placed into a recoverable state from where you can restore the item if you need to. The ability to recover deleted items in this way is similar to the Trash folder you may find on a mail program or Bin on an operating system home screen. When an item is restored all cross references to/from the item are also restored.

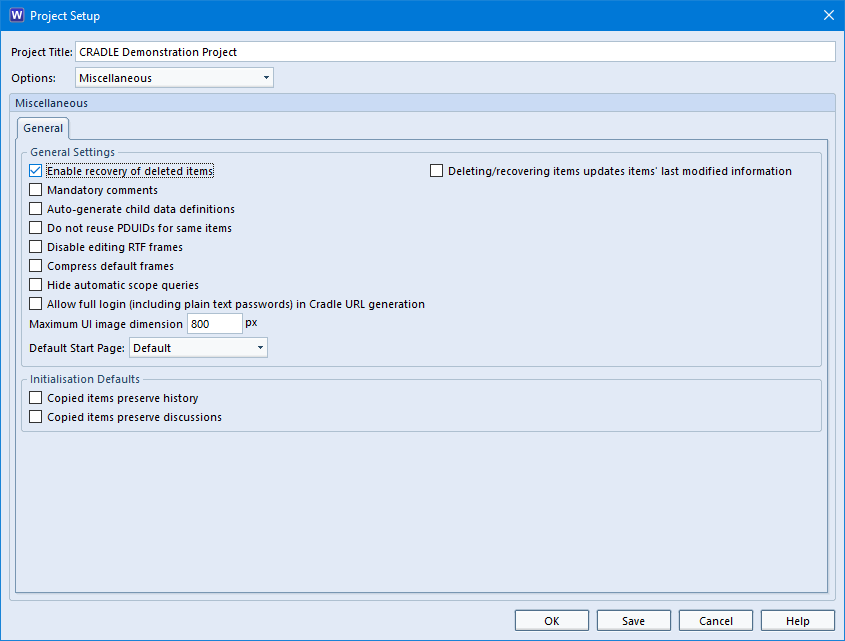
To set the recoverable option you need to set the Enable recovery of deleted items option within the Miscellaneous section in Project Setup:

Project Setup dialog showing settings to recover deleted items
Project Setup dialog

You will notice when you select this option the Deleting/recovering items …. option becomes enabled. This controls whether deleting a draft item (making it recoverable) should also modify the item’s last modifier/last modified date/time attributes. If set, this also affects those attributes when recovering an item, i.e. the date/time will reflect when the item was recovered.

Full Deletion

To really delete items from the database you can either:

  1. View the recoverable items and delete them, or
  2. Overwrite with a new item with the same identity as an item that is recoverable (you will receive a warning message so that you do not do this unintentionally)

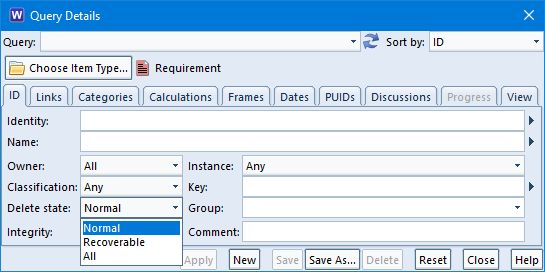
You can view the recoverable items by using the Delete State element in queries:

Delete states available within queries
Query Details Dialog

Tip: You can stop users from deleting items by disabling the delete item privilege in user setup. We feel that deleting an item is more of a project admin task and not for general users.

Viewing Deletions

As you can see there are three values:

  • Normal (the default) – selects items that are not recoverable
  • Recoverable – selects items that are recoverable, that is, the items that have been deleted and which can be restored
  • All – selects items irrespective of their recoverable status

Read the Cradle Help for information on how to recover deleted items.

When items are deleted (i.e. placed into a recoverable state) and change history is enabled for that item type, a comment of Item deleted is added to the change history of the recoverable item. Also, if the item is recovered a comment of Item recovered is added to the change history.

Article updated 05/12/2018 – Added tip