Batch File Startups & Shortcuts

There are a number of options that you can use when starting tools. WorkBench for example can be started connecting to a specific CDS. Sometimes, specific environment variables must be set. This is where using a Windows batch file startup is useful.

Windows Batch Files

A batch file is a short script, a list of commands that are run as if you had executed them from the command line. It could be that you want to connect to a company driver, run WorkBench and then exit. You may want to run a specific query on a specific project with the UI in a particular language.
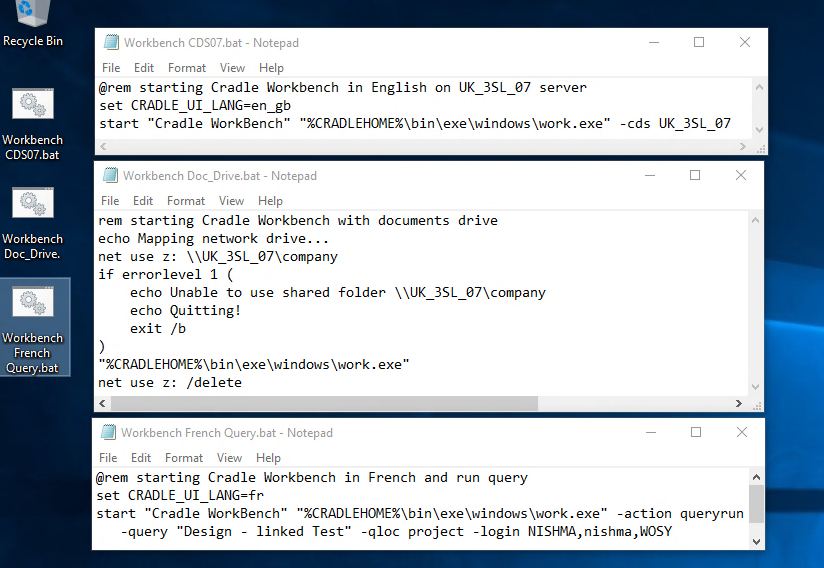
batch file content
Command Batch Files

Examples

Run WorkBench in English connecting to a particular server.

@rem starting Cradle WorkBench in English on UK_3SL_07 server
set CRADLE_UI_LANG=en_gb
start "Cradle WorkBench" "%CRADLEHOME%\bin\exe\windows\work.exe" -cds UK_3SL_07

Or you can run WorkBench, with the company documents drive connected.

rem starting Cradle WorkBench with documents drive
echo Mapping network drive...
net use z: \\UK_3SL_07\company
if errorlevel 1 (
echo Unable to use shared folder \\UK_3SL_07\company
echo Quitting!
exit /b
)
"%CRADLEHOME%\bin\exe\windows\work.exe"
net use z: /delete

You can even, run WorkBench, logging in and showing a query with a French UI.

@rem starting Cradle WorkBench in French and run query
set CRADLE_UI_LANG=fr
start "Cradle WorkBench" "%CRADLEHOME%\bin\exe\windows\work.exe" -action queryrun -query "Design - linked Test" -qloc project -login NISHMA,nishma,WOSY

Once you save the batch file, you can execute it from the File Manager, or a Shortcut, or as we’ve illustrated by double clicking the icons on the desktop.

Shortcuts

Windows desktop shortcuts can be created to directly run WorkBench. You’ll be able to set all the command line options, but won’t be able to do anything like connecting a drive.

Simply drag the WorkBench icon from the WindowsStart menu‘ onto your desktop. Right click and select Properties then add any options to the command line in the Target field. This example shows how we log into the DEMO project really quickly.

running WorkBench from a shortcut
WorkBench shortcut

Command Line Options for WorkBench

If you run WorkBench from the command line with a -help option,

C:\”%CRADLEHOME%\bin\exe\windows\work.exe” -help

you’ll be shown all the values that can be entered into a command line call.
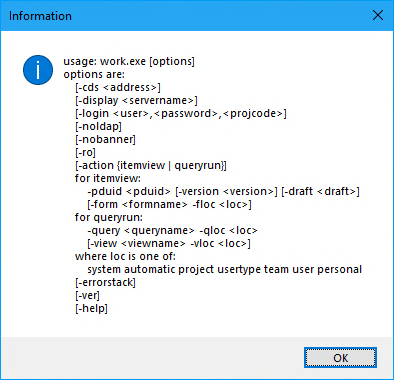
list of command line options for WorkBench
WorkBench Command Line Options
usage: work.exe [options]
options are:
   [-cds]
   [-display ]
   [-login ,,]
   [-noldap]
   [-nobanner]
   [-ro]
   [-action {itemview | queryrun}]
   for itemview:
      -pduid [-version ] [-draft ]
      [-form -floc ]
   for queryrun:
      -query -qloc
      [-view -vloc ]
   where loc is one of:
      system automatic project usertype team user personal
   [-errorstack]
   [-ver]
   [-help]

These values can be used in a direct shortcut , or in the command entered into he batch file.

Cross References in a Baseline

Cross References in a Baseline

The easiest description of a baseline is, a holding area for information owned by the project, i.e. how the database/items were at a particular point in time. There are both items and cross references in a baseline. The more cross references you have the larger the files will be. This means that if you do have many Baselines, you could find significant space being used on the server.

Are Baselines Taking Up a Lot of Server Space?

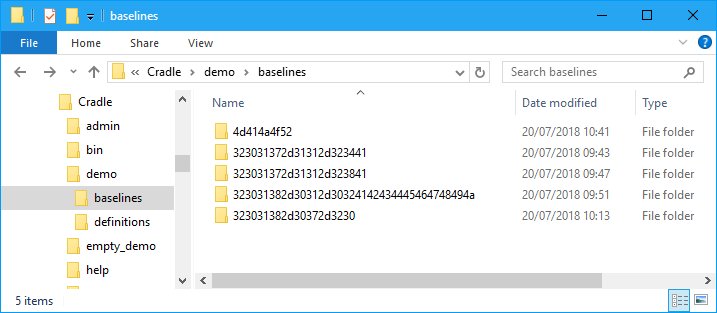
In our latest release of Cradle 7.4, cross references are separated from the other files when a baseline is closed. The cross references in each one are now placed in separate uniquely identified folders. Each folder has an alphanumerical identity, dependent on the length of the name for the baseline. This is twice the length of the baseline name.

The Baseline Folders
The Baseline Folders containing the Cross Reference folders.

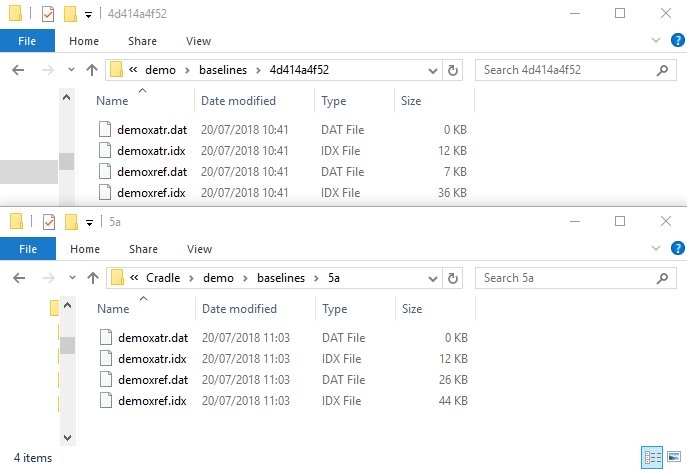
Inside each of these folders are 4 files containing the cross references and their attributes. The files will be different sizes depending on the number of cross references that existed at the time the baseline was taken.

Baselines Cross Reference Folders

Folder Maintenance.

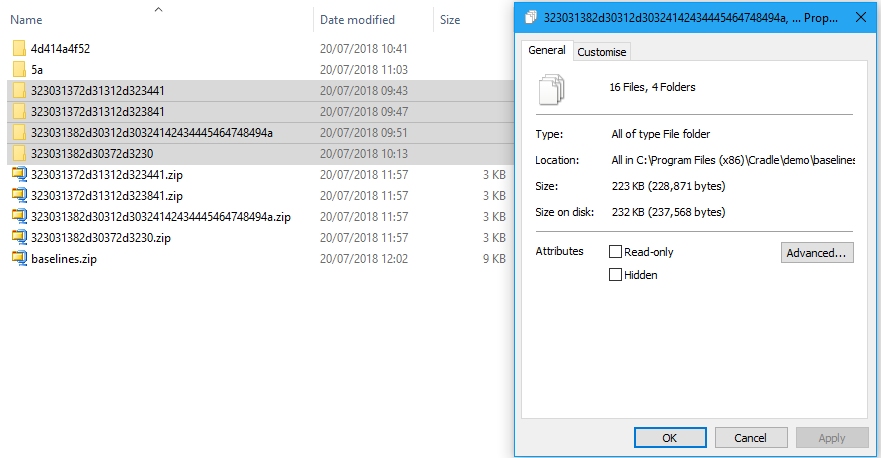
As these are individual baselines, a user can then zip these folders and remove them from the Baseline folder. Taking the four older folders, they total approximately 232KB on disk. If a user zips each folder it comes to 3KB each. If zipped into 1 file it comes to 9KB and so a saving of over 220KB.

Baselined Cross Reference Folder Zipped
Baselined Cross Reference Folders after zipping

Most databases are much later than this and so the space saving could be much larger. The user could also move the zipped files to a different server if required and so saving more space.

The only downside to doing this, is that if a user wishes to use Baseline Mode to see the cross references in a baseline, they will not instantly be there. Therefore, should the cross references be required in the future, just unzip the file into the original folder. Once the file is unzipped, a user can set the Baseline Mode and they will see the old cross references.

Related Articles

For a longer more in depth description of Baselines and Configuration Management click here.


Remote Workers and Cradle – Network Address Translation

Your company is using Cradle, but you’re a remote worker – how do you connect to the Cradle Database Server (CDS)?

With Network Address Translation – the IT administrator, where the CDS is located, can modify their firewall to redirect specific external ports to a local server.

Make a note of the internal IP address of the CDS – we’ll use CDS_IPADDR later in this post to reference this address. (In this test environment it is 192.168.11.168).

Cradle Configuration Changes

As an example of a small Cradle system with 6 users, we can configure the ports file as such.  We’re setting ports for each possible user (6) and an extra – so thats 7 ports in each range. To make it easier setting the firewall rules – so we have less rules to setup, we’ve got all the ports in UDP and TCP specific consecutive blocks, which is different to how we have them in the Cradle Help – https://www.threesl.com/cradle/help/

CDS_UDP_PORT_NUMBER = 23960
TOOL_UDP_PORT_NUMBER = 23961
PRJMAN_UDP_PORT_NUMBER = 23962

CDS_TCP_TOOL_PORT_NUMBER   = 16161
CDS_TCP_PRJMAN_PORT_NUMBER = 16162
UTILITIES_TCP_PORT_NUMBER   = 16163-16169
WBENCH_TCP_PORT_NUMBER      = 16170-16176
PRJMAN_TCP_PORT_NUMBER      = 16177

This ports file needs to be copied to all the clients using this CDS.

Firewall Config Changes

The IT administrator can now edit their firewall rules to redirect the external IP ports to the internal CDS.  As part of these rules they can set it so that only specific remote IP addresses are permitted to access these redirected ports.

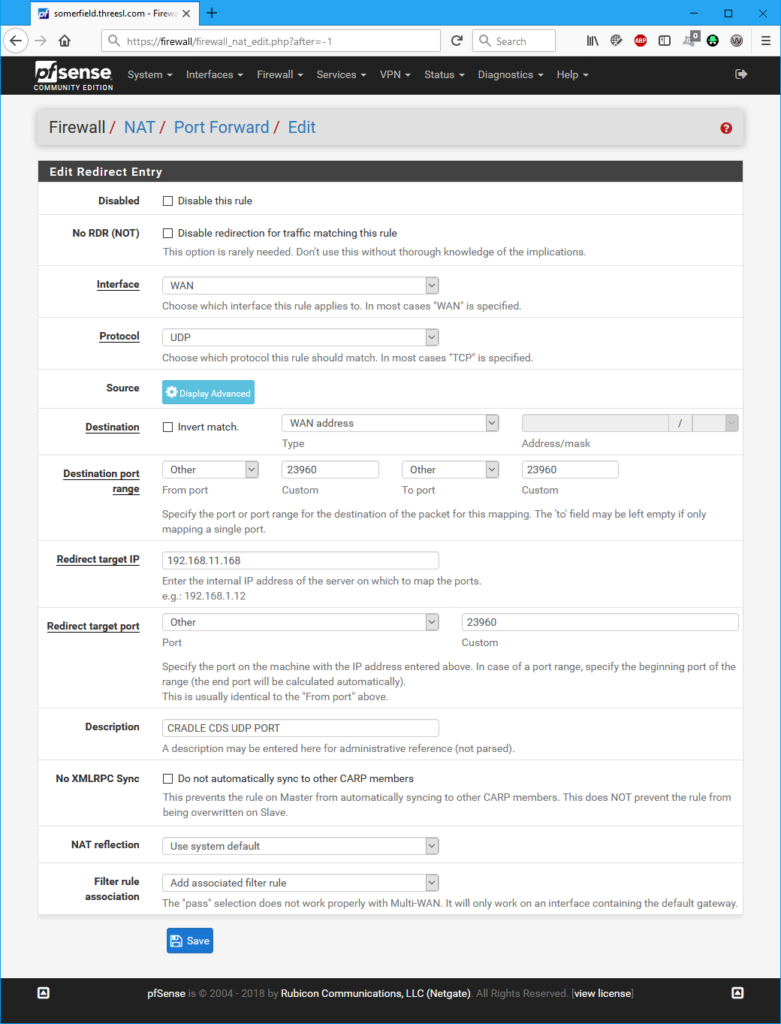
I’m using pfSense as the example firewall in this case, and adding separate rules for each Cradle Port.
pfSense Cradle NAT Rules

Through the application of Network Address Translation, the remote worker now uses their locally installed Cradle client installation and talks to the Cradle Database Server, as if it is on the Cradle site’s external IP address – which they need to configure as their CRADLE_CDS_HOST address.

Article Updated

28/06/2021 – Use of port ranges in firewall rules.

Tree Style

You can find items in a Cradle database by running a query. For example, you can use the pre-defined queries in the Quick Access Bar at the bottom of the UI. Once the query has run, the results are shown in a display style. Tree style is one of the four styles available:

A view is used to specify which parts (attributes) of the items will be shown. A display style controls how these attributes will be displayed, and the facilities that are available to you.

Tree Style

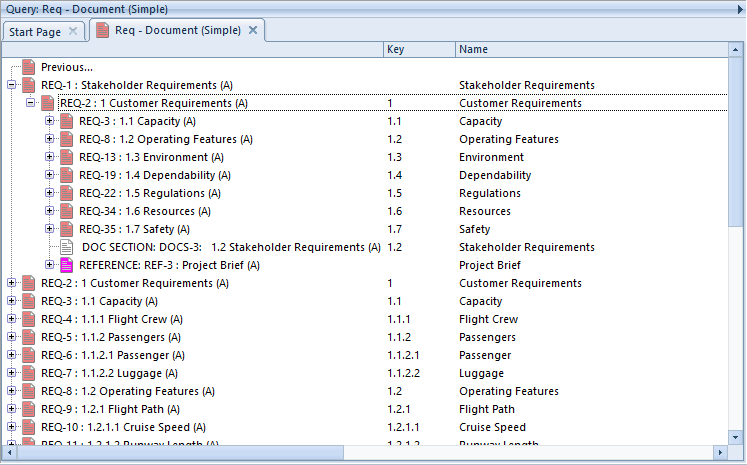
This is the second most frequently-used of the display styles after table style. It displays each item as a node in a tree, with a set of columns for the other attributes:

display items using tree style in 3SL Cradle RM SE Tool
Items Shown in Tree Style

There are two views used to display trees:

  • A view that specifies the contents of the node shown in the tree. You specify this view in the schema for the item type.
  • A view that specifies the attributes shown in columns to the right of the tree

To have items displayed in this style:

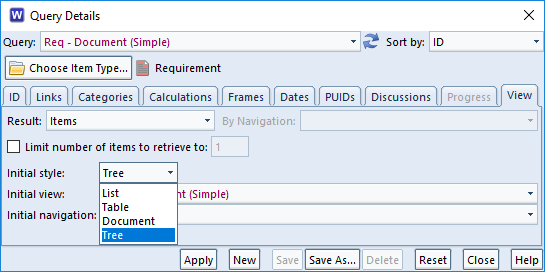
  • Specify it in the query to be run:
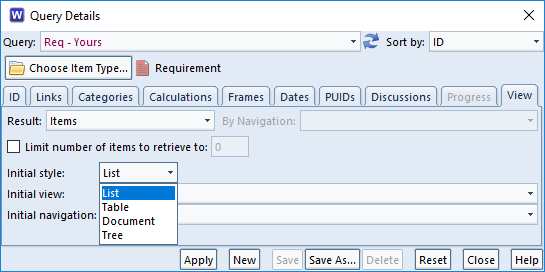
choose tree style in a query in 3SL Cradle RM SE Tool
Specify Tree Style in a Query
  • Also, select it from the Context group in the Home tab:
choose tree style in the UI in 3SL Cradle RM SE Tool
Choose Tree Style in the UI Ribbon
  • Or, right click and choose Style -> Tree from the context-sensitive menu
  • Finally, press <CTRL> and 4

Facilities

  • Use the left mouse button to select individual items
  • You can select a groups of items by selecting the first and then pressing <SHIFT> and the left mouse button to select the end of the group
  • Press <CTRL> and the left mouse button to select or de-select individual items
  • You can shrink and widen the display columns. Move your cursor to the edge of a column heading and the cursor will become a pair of arrows. Press, drag and release the left mouse button to change the column’s width.
  • You can follow cross references by expanding the tree node for the item. Cradle will find all cross references to and from the item, select which cross references to use, and display the items at the other end of these cross references as new nodes in the tree.
  • Use drag-and-drop items between trees to create cross references between the items
  • Drag-and-drop items inside a hierarchy of the same type of items to reorder that hierarchy and automatically rebuild the hierarchical numbering within it

You can expand a tree node by:

  • Click its + button
  • Select the text of the tree node and press: +
  • Select the text of the tree node, right click, and choose Expand from the menu
  • Double click on the text of the tree node

You can collapse a tree node by:

  • Click its button
  • Double-click on the text of the tree node
  • Select the text of the tree node and press:
  • Select the text of the tree node, right click, and choose Collapse from the menu

Advantages

The advantages of tree style are that it is:

  • The simplest way to explore items and their relationships
  • A convenient method to create cross references
  • The easiest way to reorganise a hierarchy of items

If you want to do anything with cross references between items, or to work in a hierarchy of items, then this is the best display style to use.

Disadvantages

The disadvantages of tree style are that:

  • It provides a limited ability to display information
  • You cannot edit information directly

Summary

Tree style is the most convenient method to work with cross references within a set of items and between one set of items and other sets of information.

Therefore, we recommend this style whenever you need to work with cross references between items and inside hierarchies.

Document Style

You can find items in a Cradle database by running a query. For example, you can use the pre-defined queries in the Quick Access Bar at the bottom of the UI. Once the query has run, the results are shown in a display style. Document style is one of the four styles available:

A view is used to specify which parts (attributes) of the items will be shown. A display style controls how these attributes will be displayed, and the facilities that are available to you.

Document Style

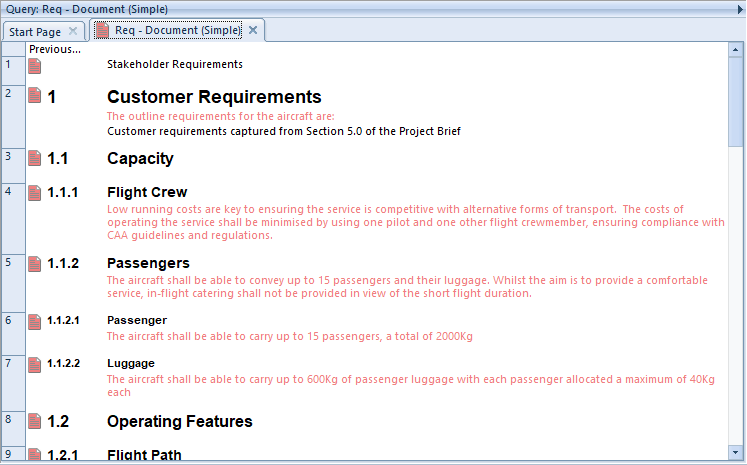
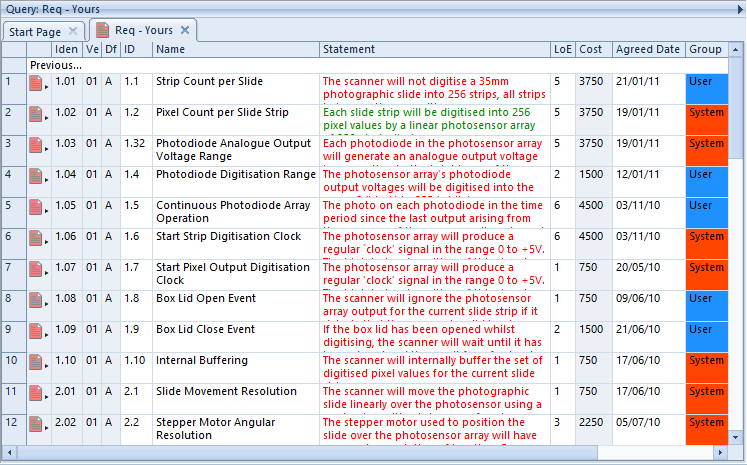
This is the second most flexible of all the display styles. It displays each item as a set of one or more rows and one or more columns (as controlled by the view), with invisible borders around each of the cells. You can edit items directly in this display style.

display items using document style in 3SL Cradle RM SE Tool
Items Shown in Document Style

This display style is similar to table style, except that:

  • The height of each item’s row is set by the information to be shown. So some rows are shallow and other rows are deep. If an attribute contains no data, its height will be close to zero.
  • Different sized fonts are used to display the first row in the view. The size of the font is based on the level of the item being shown. This level is based on the number of dots (periods) in the first attribute shown in the row. This is typically the Key, or whatever attribute you may have specified to hold the item’s hierarchical number.
  • The borders around the rows and columns are invisible

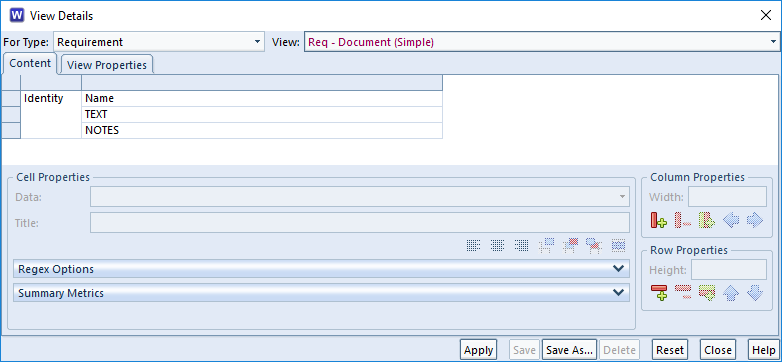
For document style, you should use views that show attributes in successive rows, rather than successive columns. For example:

view to items using document style in 3SL Cradle RM SE Tool
Arrangement of Attributes in a View for Document Style

The result is that items are displayed in a style that looks like a document, with large font for section headings and smaller fonts used for subsection headings.

To have items displayed in this style:

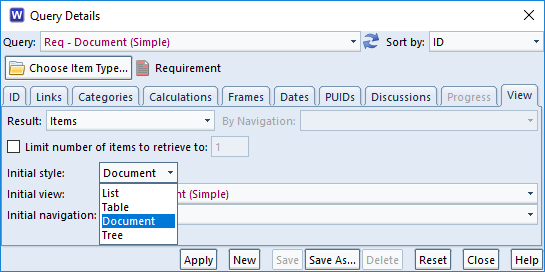
  • Specify it in the query to be run:
choose document style in a query in 3SL Cradle RM SE Tool
Specify Document Style in a Query
  • Also, select it from the Context group in the Home tab:
choose document style in the UI in 3SL Cradle RM SE Tool
Choose Document Style in the UI Ribbon
  • Or, right click and choose Style -> Document from the context-sensitive menu
  • Finally, press CTRL and 3

Facilities

Document style provides a wide range of faciltiies.

Selecting Items

  • Use the left mouse button to select individual items
  • You can select a groups of items by selecting the first and then pressing SHIFT and the left mouse button to select the end of the group
  • Press <CTRL> and the left mouse button to select or de-select individual items

Changing the Display

  • You can shrink and widen the display columns. Move your cursor to the edge of a column heading and the cursor will become a pair of arrows. Press, drag and release the left mouse button to change the column’s width.
  • You can move any row or column in the view. Move your cursor onto any cell border and the cursor will become a pair of arrows. Press, drag and release the left mouse button to move that border.
  • By default, all rows are displayed with different heights, you can increase or decrease the height of any row
  • You can sort the data in any column. Click the column heading and choose a sort order, either ascending or descending, in either a case-sensitive or case-insensitve manner (this only applies to languages that have upper-case and lower-case characters)
  • Tooltips are displayed for each column. Move your cursor into a column heading and after a second, a description of that attribute will be shown. You can enter these descriptions in the schema.
  • You can see tooltips for some attribute values. Move your cursor into a cell that displays a category with a pick-list of possible values. A tooltip appears containing a description of that category and category value. You can enter these descriptions in the schema.

Exploring Data

  • You can expand rows to follow cross references. Double-click the heading for an item’s row and that row will expand to show one new row for each item linked to the original item. Repeat this as many times as you like.
  • You will see the level of any expanded row as the number of dots in its row heading
  • You can collapse rows by double-clicking the row heading.

Editing Data

  • You can edit items directly Click inside any cell. If you have RW access to the item, Cradle locks the item so you can edit it.

Advantages

The advantages of document style are that it is:

  • Flexible. You can adjust the display and sort information.
  • Navigable. You can explore the database by expanding rows to follow cross references.
  • Editable. You can edit information through the display style.
  • Readable. All items are shown with a display height to display their entire contents.

Disadvantages

The disadvantages of document style are that:

  • It takes much longer to display than list style or tree style
  • The rows displaying information are of different heights, so you may not see many items at the same time. You may need to scroll more than in other display styles.

Summary

Document style is the second most flexible of Cradle’s four display styles, after table style. It is not the quickest style to generate, but it does provide a familiar document-like view of information and a lot of capability.

Therefore, we recommend document style whenever you want to display items in a document format. This can be very helpful for users who are more familiar with using documents, rather than data-orientated tools.

Table Style

You can find items in a Cradle database by running a query. For example, you can use the pre-defined queries in the Quick Access Bar at the bottom of the UI. Once the query has run, the results are shown in a display style. Table style is one of the four styles available:

A view is used to specify which parts (attributes) of the items will be shown. A display style controls how these attributes will be displayed, and the facilities that are available to you.

Table Style

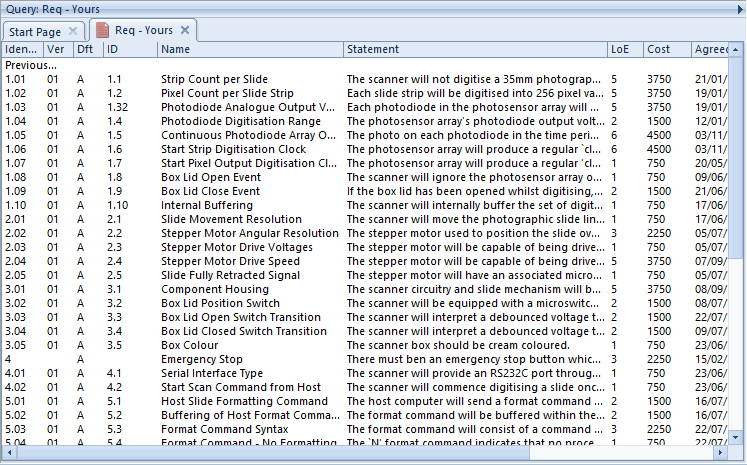
This is the most flexible of all the display styles. It displays each item as a set of one or more rows and one or more columns (as controlled by the view), with borders around each of the cells. You can edit items directly in this display style.

display items using table style in 3SL Cradle RM SE Tool
Items Shown in Table Style

To have items displayed in this style:

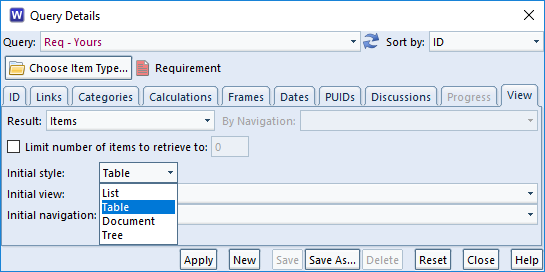
  • Specify it in the query to be run:
choose table style in a query in 3SL Cradle RM SE Tool
Specify Table Style in a Query
  • Also, select it from the Context group in the Home tab:
choose table style in the UI in 3SL Cradle RM SE Tool
Choose Table Style in the UI Ribbon
  • Or, right click and choose Style -> Table from the context-sensitive menu
  • Finally, press <CTRL> and 2

Facilities

Table style provides a wide range of facilities.

Selecting Items

  • Use the left mouse button to select individual items
  • You can select a groups of items by selecting the first and then pressing SHIFT and the left mouse button to select the end of the group
  • Press <CTRL> and the left mouse button to select or de-select individual items

Changing the Display

  • You can shrink and widen the display columns. Move your cursor to the edge of a column heading and the cursor will become a pair of arrows. Press, drag and release the left mouse button to change the column’s width.
  • You can move any row or column in the view. Move your cursor onto any cell border and the cursor will become a pair of arrows. Press, drag and release the left mouse button to move that border.
  • By default, all rows are displayed the same height, but you can increase the height of any row
  • You can sort the data in any column. Click the column heading and choose a sort order, either ascending or descending, in either a case-sensitive or case-insensitve manner (this only applies to languages that have upper-case and lower-case characters)
  • Tooltips are displayed for each column. Move your cursor into a column heading and after a second, a description of that attribute will be shown. You can enter these descriptions in the schema.
  • You can see tooltips for some attribute values. Move your cursor into a cell that displays a category with a pick-list of possible values. A tooltip appears containing a description of that category and category value. You can enter these descriptions in the schema.

Exploring Data

  • You can expand rows to follow cross references. Double-click the heading for an item’s row and that row will expand to show one new row for each item linked to the original item. Repeat this as many times as you like.
  • You will see the level of any expanded row as the number of dots in its row heading
  • You can collapse rows by double-clicking the row heading.

Editing Data

  • You can edit items in a table. Click inside any cell in the table. If you have RW access to the item, Cradle locks the item so you can edit it.

Advantages

The advantages of table style are that it is:

  • Flexible. You can adjust the display and sort information.
  • Navigable. You can explore the database by expanding rows to follow cross references.
  • Editable. You can edit information through the display style.
  • Compact. All items are shown with the same display height.

Disadvantages

The disadvantages of table style are that:

  • It takes longer to display than list style or tree style
  • The rows displaying information are all the same height, so you may have to click in a cell or expand a row border to see all of the information in some attributes

Summary

Table style is the most flexible of Cradle’s four display styles. It is not the quickest to generate, but it provides the most capability.

Therefore, we recommend table style as the best general purpose display style in Cradle. Unless you need something provided by a different display style, use table style.

List Style

You can find items in a Cradle database by running a query. For example, you can use the pre-defined queries in the Quick Access Bar at the bottom of the UI. Once the query has run, the results are shown in a display style. List style is one of the four styles available:

A view is used to specify which parts (attributes) of the items will be shown. A display style controls how these attributes will be displayed, and the facilities that are available to you.

List Style

This is the simplest of the four display styles. It shows each item as a single line of text, whose fields are controlled by the view that you have chosen:

display items using list style in 3SL Cradle RM SE Tool
Items Shown in List Style

To have items displayed in this style:

  • Specify it in the query to be run:
choose list style in a query in 3SL Cradle RM SE Tool
Specify List Style in a Query
  • Also, select it from the Context group in the Home tab:
choose list style in the UI in 3SL Cradle RM SE Tool
Choose List Style in the UI Ribbon
  • Or, right click and choose Style -> List from the context-sensitive menu
  • Finally, press CTRL and 1

Facilities

  • Use the left mouse button to select individual items
  • You can select a groups of items by selecting the first and then pressing SHIFT and the left mouse button to select the end of the group
  • Press <CTRL> and the left mouse button to select or de-select individual items
  • You can shrink and widen the display columns. Move your cursor to the edge of a column heading and the cursor will become a pair of arrows. Press, drag and release the left mouse button to change the column’s width.

Advantages

The advantages of list style are that it is:

  • The fastest display style. Your view will appear most quickly in list style.
  • The most compact display style

If you simply want to run a query as quickly as possible so you can select some items and do something with them, then this is the best display style to use.

Disadvantages

The disadvantages of list style are that:

  • It provides the fewest capabilities
  • You cannot edit information directly

Summary

List style is the simplest and most compact of Cradle’s four display styles. It is quick and simple to generate.

Therefore, we recommend this style whenever you simply want items to be shown as quickly as possible, so you can do something to them.

Using Sessions in the Cradle UI

The Cradle UI displays information inside tabs. These tabs are grouped into panes. You can design your Cradle UI with a set of panes grouped in nested rows and columns in your preferred layout. This layout is called a session. Using sessions is the easiest way to maximise your productivity with Cradle.

You can save your current layout of panes, and the tabs inside them, in a session. You can then restore this session when you login to Cradle. When you do this, Cradle will restore the panes, organise them in your preferred layout, and where possible, automatically recreate all of the tabs inside each pane by re-running queries and so on.

The result is that when you login to Cradle and specify a session, your Cradle UI will look the same as it did when you last logged-out.

This will save you a lot of time and help you to complete your work more quickly and effectively!

Working With Sessions

Using sessions is very easy:

  • You can save a session at any time
  • You can specify a session when you login.

Saving a Session

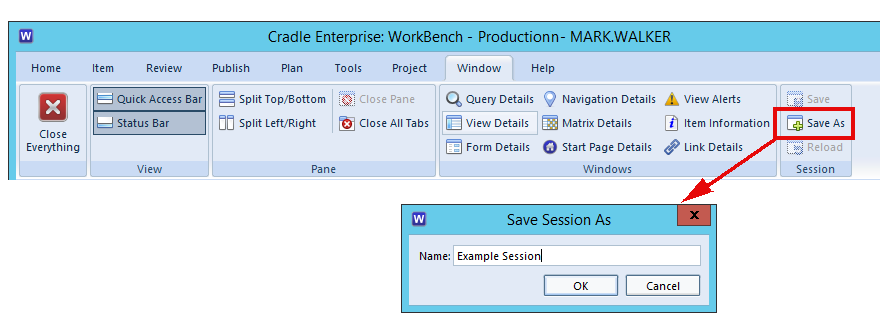
You can save your current WorkBench layout as a session by clicking Save As in the Session group in the Window tab in the UI’s ribbon:

Using Sessions in 3SL Cradle WorkBench
Save a Session

You will be asked to enter a name for the session. When you are working in WorkBench with a session, you can update the saved session to match your current layout of panes and tabs by clicking Save,

Using Sessions

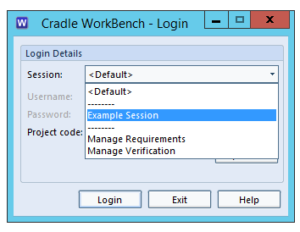
When you next login to Cradle WorkBench, you can choose your session from the drop-down list in the Login dialog:

Using Sessions in 3SL Cradle WorkBench
Specify a Session at Login

and your layout of panes and tabs in the session will be restored, re-running queries and so on as necessary.

You can also reload the session that you chose at login by selecting Reload. from the Session group in the Window tab in the UI’s ribbon.

Using Tabs in the Cradle UI

The Cradle WorkBench UI is divided into panes. Each pane is a region that can contain one or more tabs. A tab is a container with a selectable name and a rectangular area that contains the results of running a query, report, metric or graph, or a single item that is being edited. Using tabs is a way to maximise your productivity with the Cradle UI by helping you to arrange queries, items and other information, either so you can see everything at the same time, or so the information is presented in a layout that you find convenient.

Layout of a Tab

A tab is a rectangular region in the Cradle UI that has a name, a close control and a rectangular region containing the result of a query, a report, a metric, a matrix, a pivot table, or a dashboard:

Using Tabs in 3SL Cradle WorkBench
Tabs in a Pane in the Cradle UI

Tabs exist inside panes.

Each pane can contain up to 16 tabs. You can have many panes open in the UI at the same time.

When you create a new tab, it will open in the currently-selected pane. So, if you run a query, that query will open in a new tab in the current pane. If you open an item, it will open in a tab in the current pane.

Tab Names

Each tab has a name, shown above it, that is name of the query, report, metric, graph or pivot table shown in the tab, or some details of the item shown in a form.

Using Tabs

Next to a tab‘s name is a button, you can click this button to close the tab.

You can also press CTRL-W to close a tab, or choose Close Tab from the context-sensitive menu that will appear if you right-click inside a tab.

You can move a tab between panes by:

  • Put your cursor in the name of the tab to be moved
  • Press the left mouse button
  • Drag into the new pane
  • Release the mouse button

Horizontal or vertical scrollbars will appear if a tab’s contents are larger than the screen area available. You can increase the area used to display a tab by either:

  • Use the sash control to increase the size of the pane that contains the tab
  • Maximise the pane containing the tab using its pane control menu, or simply double-clicking the pane’s legend

Using Panes in the Cradle UI

The Cradle WorkBench UI is divided into panes. Each pane is a region that can contain one or more tabs. A tab is a container with a selectable name and a rectangular area that contains the results of running a query, report, metric or graph, or a single item that is being edited. Using panes is a way to maximise your productivity with the Cradle UI by helping you to arrange queries, items and other information, either so you can see everything at the same time, or so the information is presented in a layout that you find convenient.

Layout of a Pane

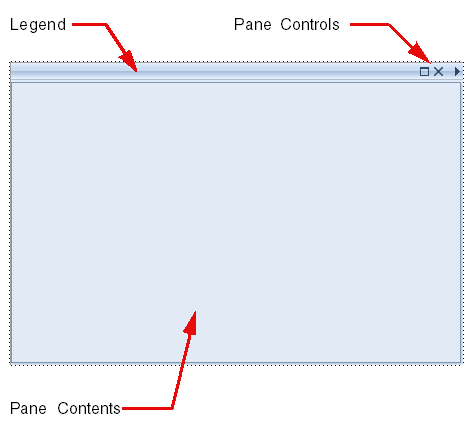
A pane is a rectangular region in the Cradle UI that has a legend and a set of controls:

Using Panes in 3SL Cradle WorkBench
A Pane in the Cradle UI

The pane’s contents are one or more tabs. Each tab contains the results of a query, report, matrix, metric, graph or pivot table, or an item in a form.

Each pane can contain up to 16 tabs. You can have many panes open in the UI at the same time.

When you create a new tab, it will open in the currently-selected pane. So, if you run a query, that query will open in a new tab in the current pane. If you open an item, it will open in a tab in the current pane.

Pane Legend

The pane’s legend appears when you select a tab inside it. The legend will be the name of the tab that you have selected.

You can double-click the legend to maximise the pane. This will maximise the pane to fill the WorkBench UI, overlaying all other panes. When a pane is maximised, double-click the legend again to minimise the pane. This will restore the pane to its original size.

Pane Controls

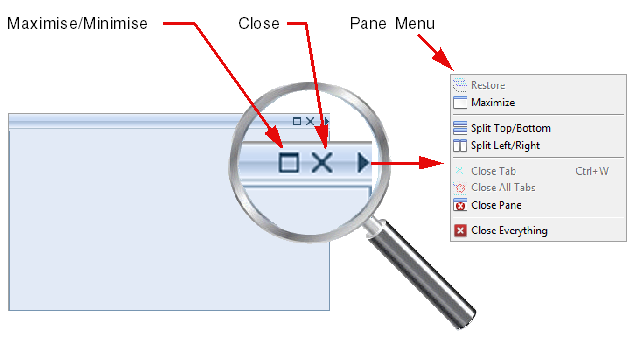
Each pane has a set of controls. These controls are the most important part of using panes to control the Cradle UI:

Using Panes in 3SL Cradle WorkBench
Pane Controls and How to Access Them

You can use these controls to:

  • Maximise the current pane, an alternative to double-clicking its legend
  • Close the current tab, if any
  • Empty the pane by closing all of its tabs
  • Close the pane, and all tabs inside it
  • Close all panes

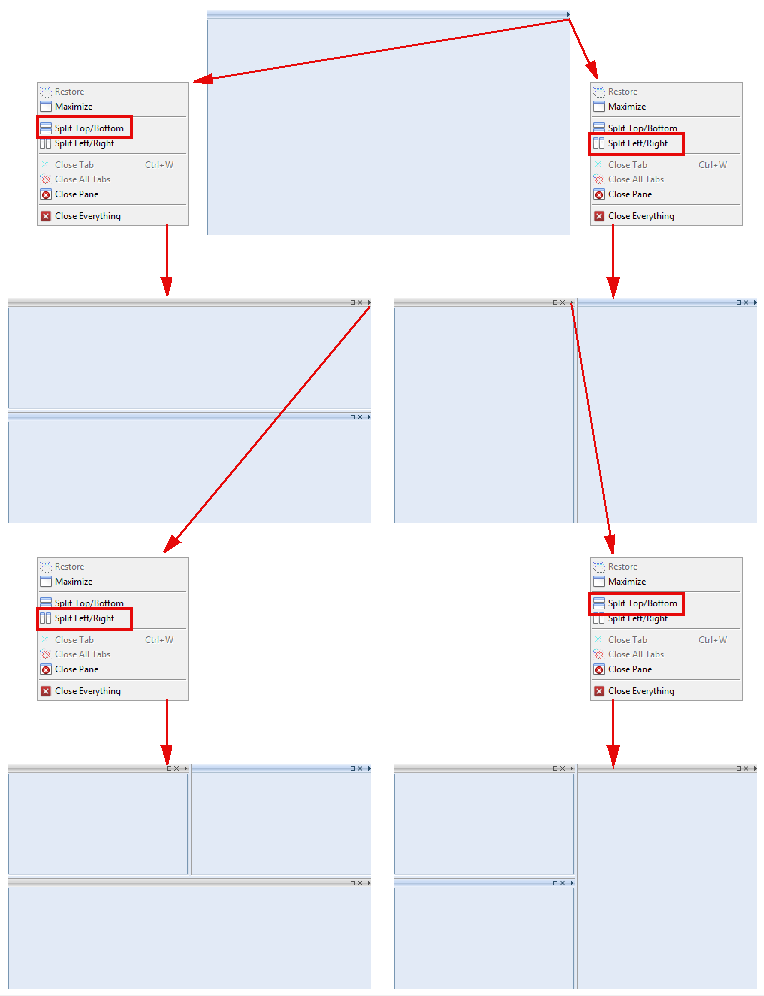
More usefully, you can also:

  • Split the pane horizontally into two panes
  • Split the pane vertically into two panes

Using Panes

You can split panes any number of times. This divides the UI into an arrangement so you can see several queries at the same time, or so you can see many items at the same time.

As an example:

Using Panes in 3SL Cradle WorkBench
Creating New Panes by Splitting

A large screen will be helpful!

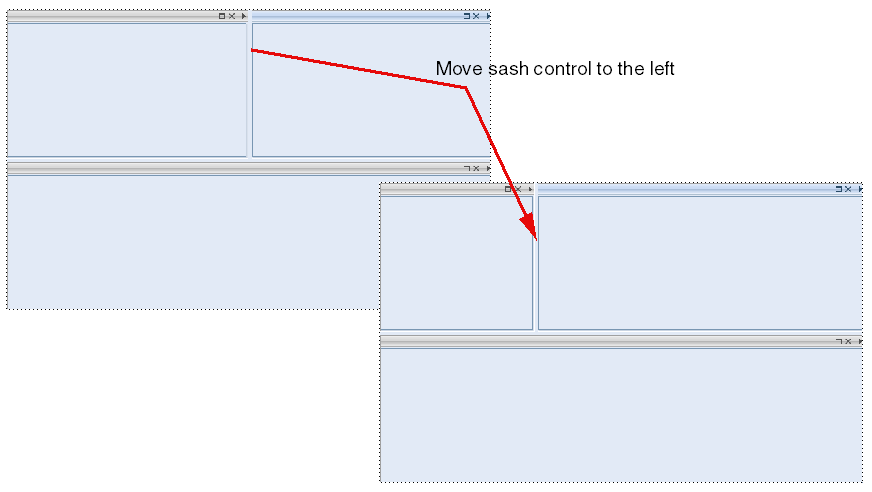
There are sash controls between panes. Move your cursor between two panes and it will change to a pair of arrows. If you press, drag and release the left mouse button, you can adjust the relative sizes of adjacent panes. This will proportionately adjust the sizes of all tabs inside these panes. For example:

Using Panes in 3SL Cradle WorkBench
Adjust Pane Sizes with Sash Controls