Customising the Quick Access Bar

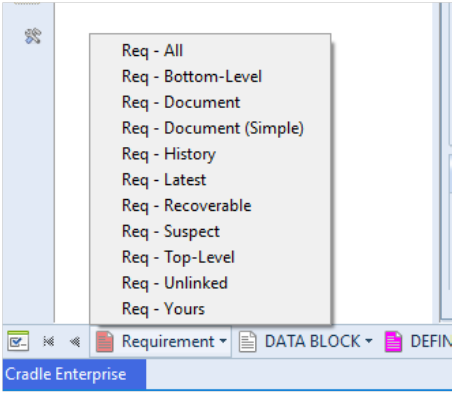
WorkBench provides a Quick Access Bar that allows you to launch queries by item type from the bottom of the WorkBench main screen. It’s intended to provide quick and easy access to all of the relevant types of information in your Cradle database.

Default Queries

By default, WorkBench is initialised to show a standard (Automatic) set of queries each ordered by the Identity attribute

  • All – Lists all items that you can access.
  • Bottom-Level – Lists all bottom-level items that you can access. Bottom-level items are items that do not have any cross references from them to other items of the same type. For example,  they have no children.
  • Document – Lists the latest instance of items that you can access and displays them as a document. For example in Document style.
  • Document (Simple) – A simplified version of the Document query.
  • History – Lists the latest instance of items that you can access and displays them in a view showing change histories.
  • Latest – Lists the latest instance of all items that you can access. There can be many instances of each item, such as many versions of the item.
  • Recoverable – Lists all items that are in a recoverable state.
  • Suspect – Lists all items that are deemed suspect.
  • Top-Level – Lists all top-level items that you can access. Top-level items are items that do not have any cross references to them to other items of the same type. For example, they have no parents.
  • Unlinked – Lists all items that you can access that don’t have cross references to or from them from any other items.
  • Yours – Lists all items that you own.
Query options from Quick Access Bar
Quick Access Bar query options

These queries may be useful as a starter set of queries. However, it is likely that you will want to tailor the queries shown in the Quick Access Bar to meet your own project needs and use the Project queries and views to display the data.

Note that all automatic queries are ordered by Identity. You might wish to order your Quick Access Bar queries by Key, especially when working with hierarchies of items.

Adding Project Queries to the Quick Access Bar

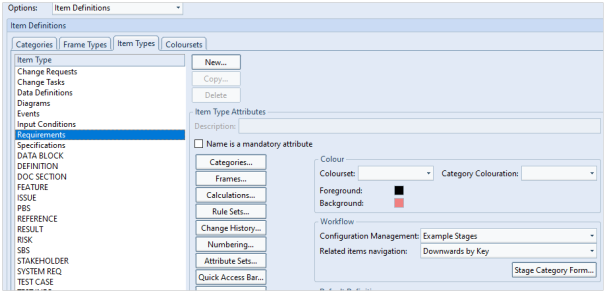
In Project Setup, you can select the item type that you wish to tailor and press the Quick Access Bar button. In this example, we will use Requirements:
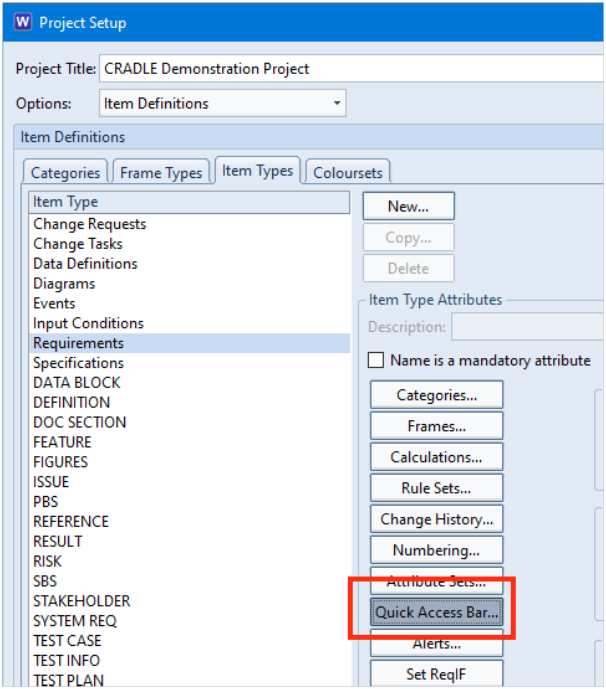
Quick Access Bar option in Project Setup
Project Setup – Quick Access Bar option

This presents you with a dialog that allows you to add up to 10 Project or System defined queries to your Quick Access Bar.

You can still show the Automatic queries by selecting the Append automatic queries checkbox:
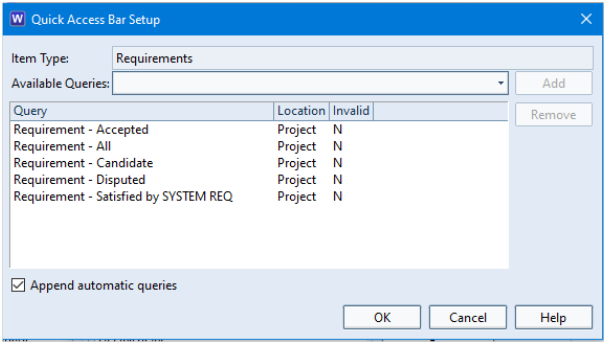
Quick Access Bar Setup dialog

Once applied, all users in the project will see the changes to the Quick Access Bar:
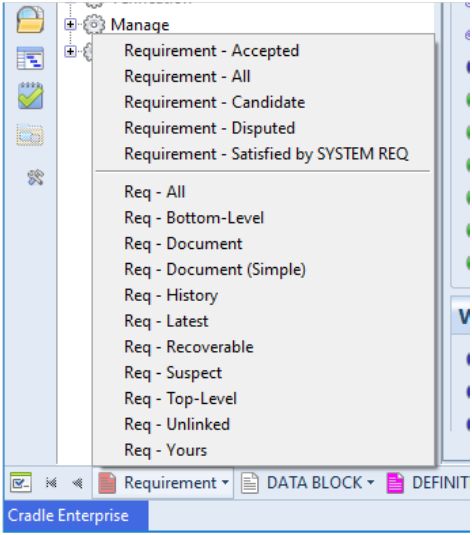
Quick Access Bar showing additional queries
Additional Queries in Quick Access Bar

These additional queries will use the view as defined in the Query Details dialog.
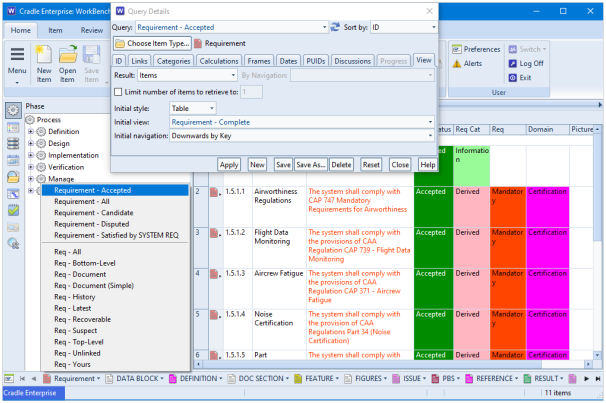
Quick Access Bar - Query Details
Quick Access Bar – Query Details

Personalising the Quick Access Bar

You may wish to personalise the Quick Access Bar for your own use to only show the item types that are relevant to you in the order that you wish them to be displayed. You can achieve this in the Preferences:
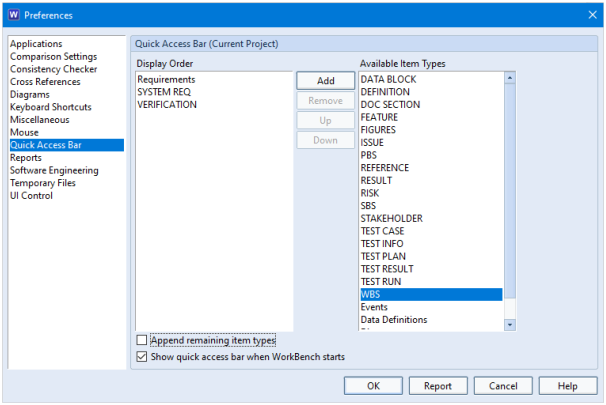
Preferences - QAB Option
Quick Access Bar options in Preferences

If you select the Append remaining item types checkbox, all other item types are still shown on the Quick Access Bar after the ones you have selected:

Quick Access Bar with highlighted
Quick Access Bar with highlighted item types

For further information on the Quick Access Bar functionality, refer to the help page https://www.threesl.com/cradle/help/7.7/#workbench/other/wrk_qab.htm.

Renumbering a Sequence of Incorrect Key Values

Scenario

You have captured a number of items into Cradle. However, the KEY attribute that defines the hierarchy has incorrect values. Do you have to open each item individually to correct this numbering?

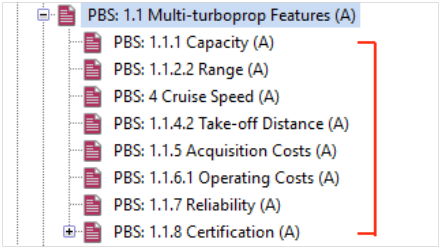
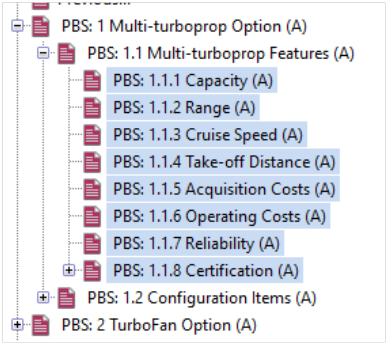
For example, the items below should have a sequence of 1.1.1 to 1.1.8:

Numbering of items in a hierarchy
Incorrect hierarchical numbering

Solution

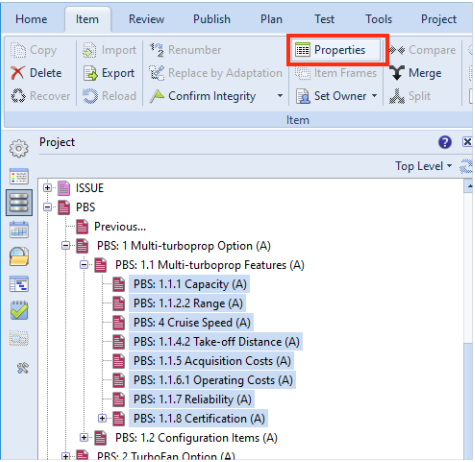
No, you can actually define the key sequence by selecting all of the items to be changed and pressing Properties:

Properties option
Properties option

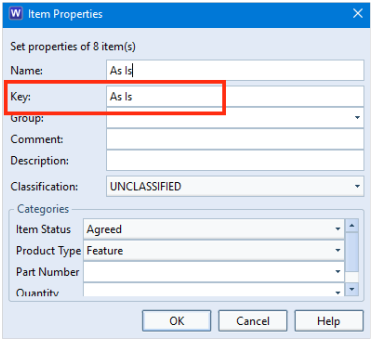
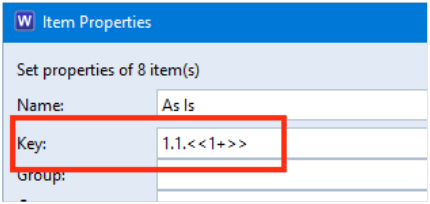
In the Item Properties dialog, you will see that the Key attribute is listed with the value As Is. This is due to the items having different values:

Item Properties dialog showing Key As Is
Item Properties dialog

In this field you can add the value sequence within chevrons <<#=>>. In this case, you could enter the value 1.1.<<1+>>:

Item Properties dialog showing Key

The result of this operation is shown below in which the Keys are now numbered sequentially as required:

Correct hierarchy numbering

Any changes to the items will be stored in the items’ histories.

Specifying Custom Number Format in Free Text Categories

In a project, you may wish to enter a supporting reference number for an item of data. For example, an Equipment Number. This number might require a given format.

Where:

Project Code –  4 alpha characters
Equipment Code – 5 numerical characters

Supporting Reference Number
Supporting Reference Number for a Project

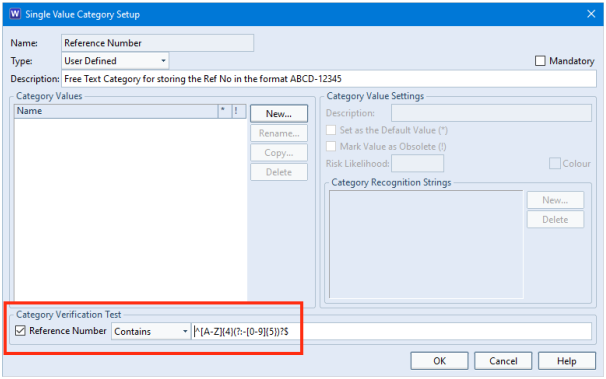
You can achieve this by creating a user-defined category with no category values defined and include a Category Verification Test using a Regular Expression.

Example Category Verification Test for Reference Number category
Example Category Verification Test

In this example, the regular expression ^[A-Z]{4}(?:-[0-9]{5})?$ can be broken down into:

Regular ExpressionDescription
^The beginning of the string
[A-Z]{4}The project code must be 4 alpha characters long in uppercase
?:-A hyphen separator
[0-9]{5}The equipment code must be 5 numeric characters
$The end of the string

Applying Category to the Item

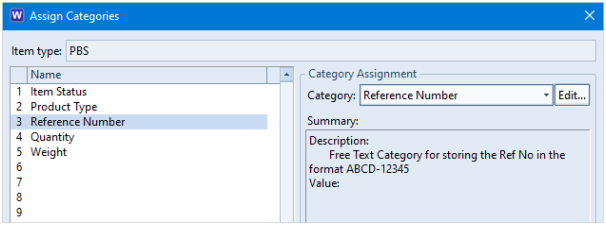
Once you have defined the category, you can assign this to an item type:

Assigning Categories
Assign Category to Item Type

Creating/Editing an Item

If you now create or modify an item of data, Cradle will present you with an error message on saving if the category value does not match what you have specified in the Category Verification Test.

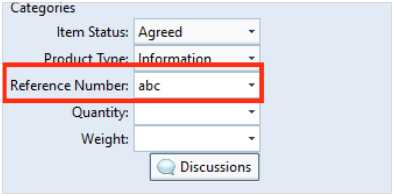
Reference Number
Reference Number in Categories
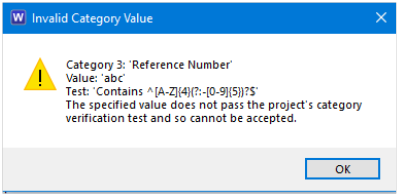
Invalid Category Value dialog

Here the validation test would fail because you have not included a hyphen separator.

Validation Test result

You will also receive an error if the incorrect case is used. E.g. demo-12345.

Invalid Validation Test

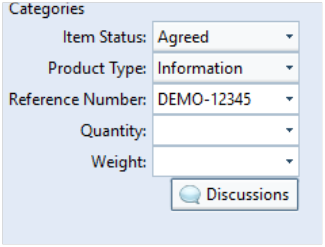
However, if you enter a value such as DEMO-12345, this would save without any warning or error message.

Example saved category

Summary

Regular expressions can be used in many areas of the tool. Using this functionality to enforce an input in free text categories can be a very useful feature.

For further information about regular expressions (regexes) please refer to the page https://www.threesl.com/cradle/help/7.7/#general/regularexpressions.htm.
Controlling the Cradle Access Mode

All Cradle users have a read-write access mode by default, and as such can create and modify information in their project databases, subject only to Cradle’s security and access control mechanisms such as privileges, classifications, skills, user types and so on.

There are no dedicated read-only user accounts in Cradle. However, there is a mechanism to specify which user accounts should be read-only and which should be read-write for a specified project.

This mechanism might be useful in protecting the consumption of your read-write connections.

Cradle User Control File (UCF)

Cradle contains a cradle_users file that is stored in the admin directory of your Cradle installation. This file allows your System Administrator to control the access mode that a user has for specified projects.

The file allows you to specify the Cradle username, the project code and the access mode separated by a space or tab characters:

Cradle-Username      Project-Code     Access-Mode

where:

  • Cradle-Username – is the Cradle username to be controlled, in uppercase or lowercase, and at most 40 characters
  • Project-Code – the project in which the username is defined, specified in uppercase or lowercase, and at most 4 characters
  • Access-Mode – the access mode to be assigned whenever anyone logs in to the specified project with the specified username, as:
    • R – the username is always to be read-only
    • W – the username is always to be read-write
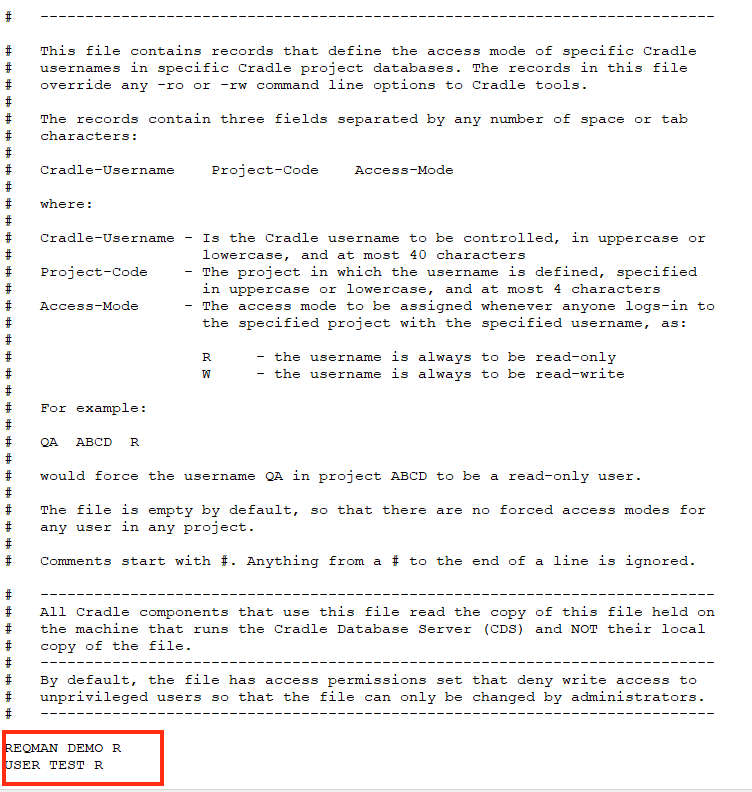
    Example cds_users file
    Example cds_users file

    The entries in this file override any -ro or -rw command line options to Cradle tools.

    This file is empty by default, so all users would have the ability to connect to databases read-write unless specified otherwise.

Using a Form for Each Workflow Stage

Example Scenario

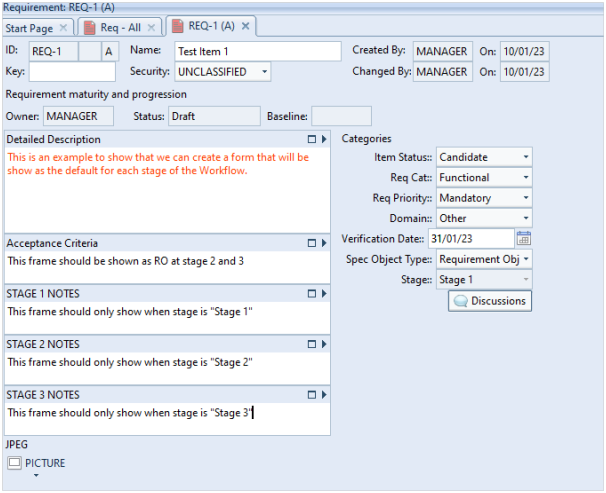
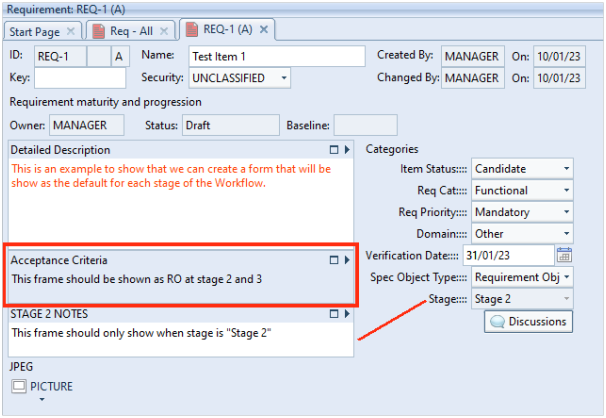
Cradle items can contain many frames, categories and other attributes that might not necessarily be relevant or required to be shown at different stages of your workflow. An example of which is shown below:

Item showing stage frames

The example provides frames that should only be shown at the relevant stage in the workflow and the Acceptance Criteria, we decided that we wish to show this information at all stages but displayed read-only at stages 2 and 3.

Defining a Stage Category

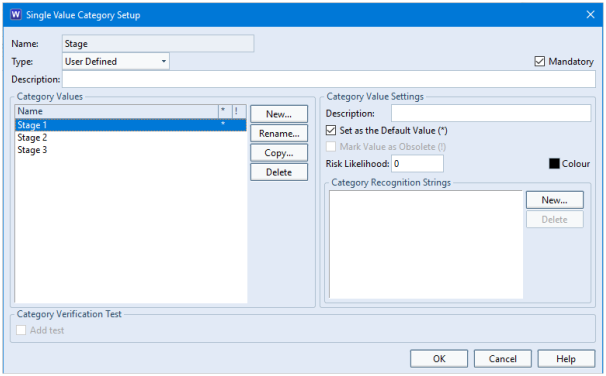
To start with, create a category to base the workflow on. This must be set as mandatory and have a default value set.

Setup category values

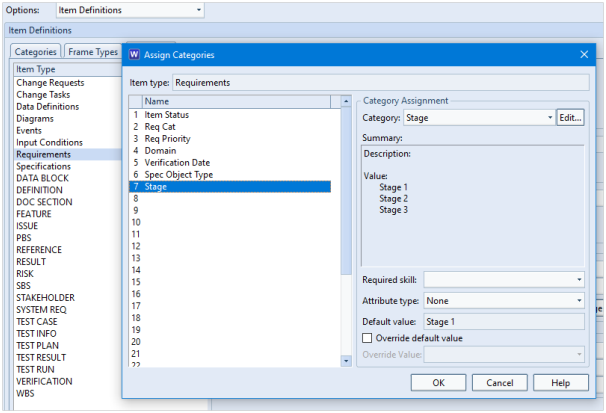
You can then assign this category to the item type. In this example we have used Requirements:

Assign Category
Assign category to item type

Defining the Workflow

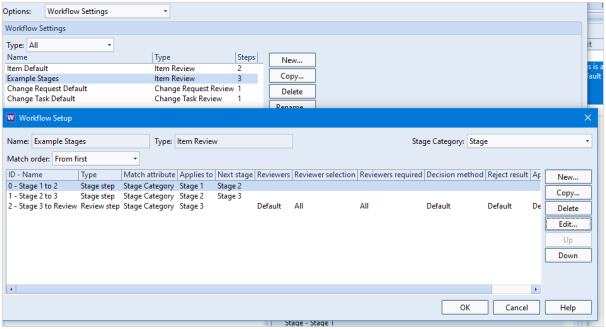
In the Workflow Settings, create a workflow that uses the Stage category to advance to the next stage of the process. In this example, we demonstrate a very simple workflow that advances from Stage 1 to Stage 2 and then Stage 2 to Stage 3. The 3rd level shown here is to then advance to formal review:

Show workflow stages

You can then set this as the default workflow for the item type:

Set default workflow

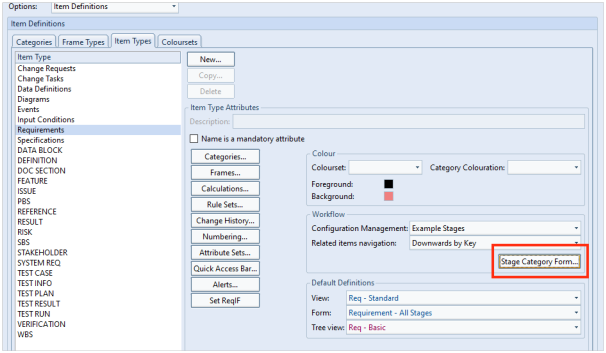
Note that the Stage Category Form… button becomes active. We will come back to this later as firstly you need to create a form for each stage.

Creating Forms

Using the Form Details dialog, create a form for each stage of the workflow.

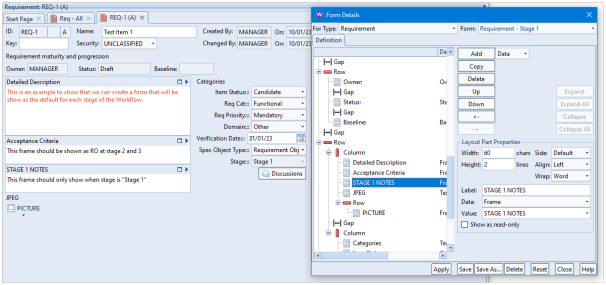
Stage 1 Form

The Stage 1 form in this example should show the frame STAGE 1 NOTES but not STAGE 2 NOTES or STAGE 3 NOTES.

Stage 1 form
Stage 1 form

Stage 2 Form

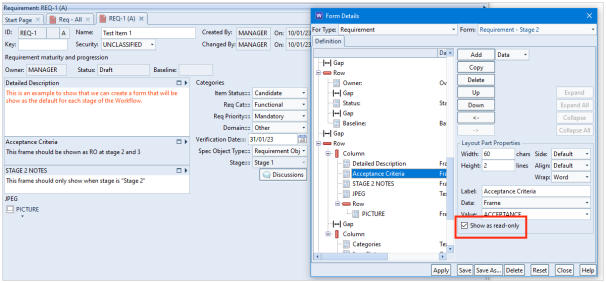
The Stage 2 form in this example should show the frame STAGE 2 NOTES but not STAGE 1 NOTES or STAGE 3 NOTES. You can also set the Acceptance Criteria frame to only be shown read-only as in the example below:

Stage 2 form
Stage 2 form

Stage 3 Form

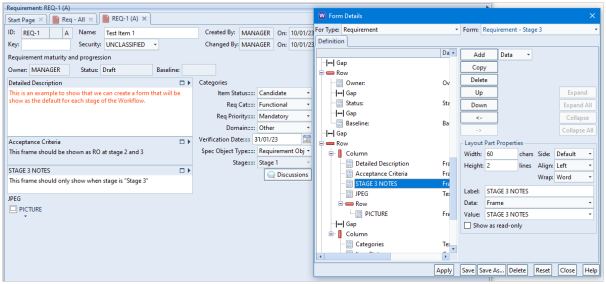
The Stage 3 form in this example should show the frame STAGE 3 NOTES but not STAGE 1 NOTES or STAGE 2 NOTES. You can also set the Acceptance Criteria frame to only be shown read-only as in the example below.

Stage 3 form
Stage 3 form

Setting the Stage Forms

You can now return to Project Setup and press the Stage Category Form… button:

Project Setup Stage Category Form button
Stage Category Form button in Project Setup

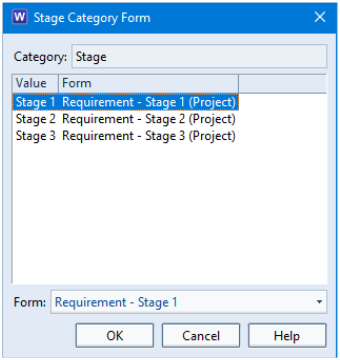
This will allow you to specify the form to be used at each stage of the workflow.

Stage Category Form dialog

Advancing the Item

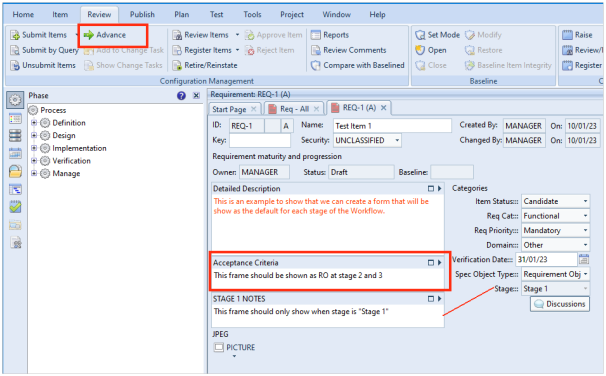
When you first create the item, the Stage category is set to Stage 1 as this is the default value for the item. You can see here that the STAGE 1 NOTES frame is shown and the Acceptance Criteria is read-write:

Advance option
Advance option in ribbon

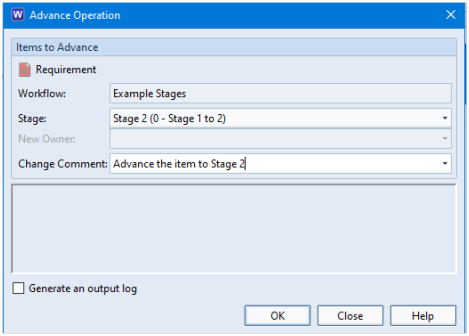
Pressing the Advance… button closes the item and changes the Stage value to Stage 2 once confirmed in the Advance Operation dialog:

Advance Operation dialog

When you open the item again, you will see that the Stage category is set to Stage 2 and will use the Stage 2 form that shows the STAGE 2 NOTES frame and the Acceptance Criteria is read-only:

Item showing stage 2
Item in form showing stage 2

Advancing the item again uses the form that has been created for Stage 3 and so on.

Summary

WorkBench allows you to create a specific form for each stage of your workflow. This can be particularly useful if the frames, categories or attributes only need to be shown at certain stages of your process. It would simplify the user interface for the users that are modifying the items as they would not be presented with information that might be irrelevant to their task.

Simplifying your WorkBench Environment

WorkBench is an extremely flexible and customisable tool which can then result in user complexity as it provides such a wide range of displays and outputs for your project data:

  • MANY definition files to show queries and views of how you want to see your data
  • MANY types of reports and documents tailored for your required outputs
  • Different outputs/views of the project required at particular stages

With so many features available to users, it is important to understand how we can manage to reduce the complexity of the tool for them by using the Phase Hierarchy and/or Start Pages:

WorkBench Environment
Simplifying your WorkBench environment

We can reduce tool complexity by the use of the Phase Hierarchy and/or Start Pages.

Phase Hierarchy

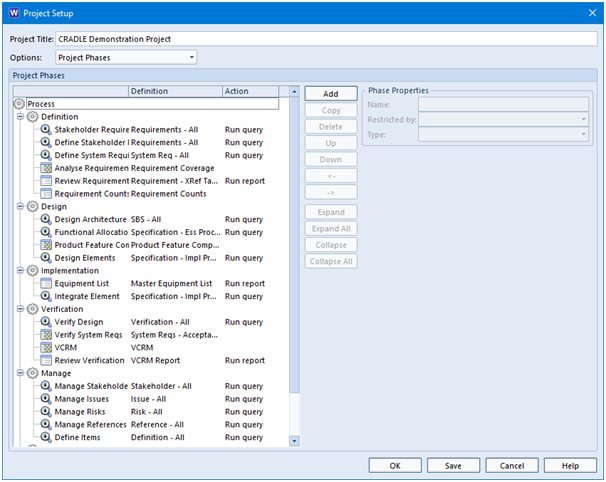
The phase hierarchy is an order of elements that can be grouped together under different folders to describe the process or project lifecycle of your project. You can think of these as phases, activities or tasks.

Creating a phase hierarchy is the task of a Project Administrator who needs PROJECT privilege and is created in Project Setup.

Each element of a phase can run an operation in an organised structure which is shown by expanding folders such as:

  • Running saved queries
  • Opening an item/set of items
  • Expanding a tree
  • Running a matrix
  • Running a metric
  • Producing a report
  • Producing a graph
  • Producing a draft document (Document Publisher)
  • Executing an external command
Phase Hierarchy
Defined Phase Hierarchy

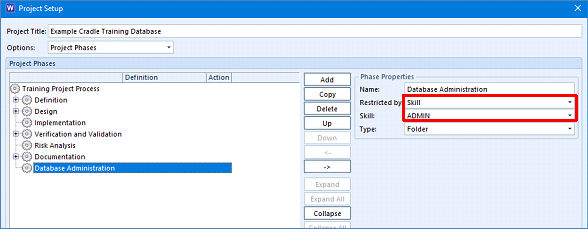
These phase operations are for all users of the project. However, you can restrict operations to a particular team or a particular skill:

Phase hierarchy showing skill

The phase hierarchy is also used in the Web Access tool.

Please note that the phase hierarchy feature is not available in single-user products.

Start Pages

Whereas a phase hierarchy defines the whole process and the activities to be performed, start pages could help to automate the steps to perform each activity for a particular user or set of users.

Start pages also allow you to open a specific WorkBench dialog or run a tool such as Document Loader that will simplify usage considerably as your users would have all relevant operations in an organised page without having to navigate through all of the menus, ribbons and dialogs.

These are organised in:

  • Labels
  • Headings
  • Actions / multiple actions

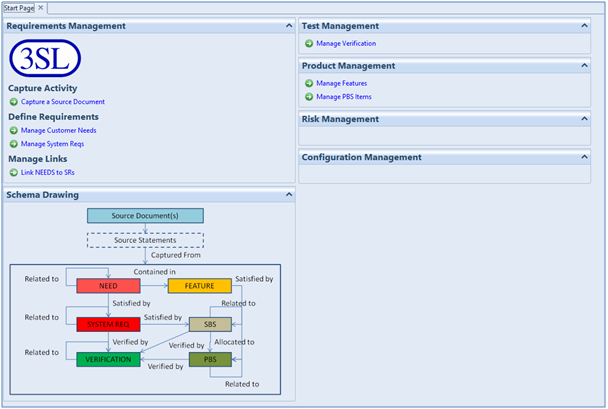
You can also add images to your start page which can be very useful in customising the interface for your project:

Start page
Example Start Page

Start pages can also allow you to run multiple operations with a single click.

You can define multiple start pages for a specific set of tasks and for multiple sets of users.

Start Page Details option

Summary

The phase hierarchy and start pages allow you to simplify the user experience of WorkBench.

The phase hierarchy defines a set of operations in folders which can be filtered for specific sets of users. This feature is not available in single-user products.

Start pages can be more personal and will quickly allow you to complete a task or create an output without having to navigate the WorkBench menu, ribbons and dialogs and saved definition files.


User Lists and Alerts

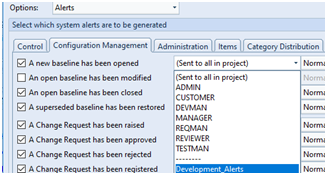
User Lists are a very useful Cradle feature. They provide the ability to specify groups of users that are involved in Configuration Management workflows.

Using User Lists for Alert Recipients

However, did you know that User Lists can also be used to specify groups of users who are to be alert recipients.

Alerts could be invaluable in keeping users automatically informed about important events occurring in the Cradle database, e.g.:

  • Items have been modified or a specific category changed
  • Project Setup has been changed
  • An item has been submitted for review
  • There has been a reply to a discussion that you are involved in
  • An item linked to an item owned by your team has changed
  • etc. etc

Setting up a User List

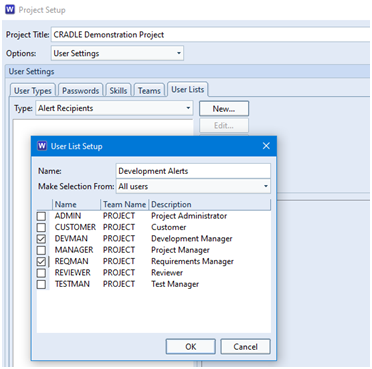
In Project Setup, you can setup the list of users that you wish to receive the alerts.

Setting up User Lists
Setting up user lists

Then, you can specify this User List as the recipient of the specified alerts:

Choosing user lists for alert recipients
Select User List for Alerts

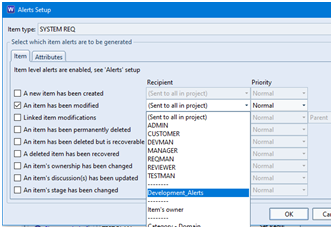
You can also apply this to item-specific alerts:

Using user lists for alert recipients
Item specific alert user lists

Using this functionality, you can ensure that relevant groups of users are informed of various events without having to send to all users.


Checking Database Integrity

Data integrity refers to the accuracy, completeness and reliability of data stored within your Cradle database. Checking database integrity is important as it guarantees both the traceability and searchability of your data. It also increases the performance and stability of your data. Maintaining the integrity of your data is essential. As you collect more and more data within  your Cradle project, it is a priority to maintain the integrity of this data, otherwise the data is worthless.

Error checking ensures that your Cradle data hasn’t been compromised, e.g. during upgrades/imports etc. We recommend that integrity checks are done on a regular basis.

In Cradle, there are a couple of ways to check the integrity of your database:

Please note that these checks must only be run when there are NO other users active in the database. If you are in doubt as to whether you are the only user active in the database, then DO NOT run these checks. If you do, damage can occur.

Item Integrity

The Item Integrity option allows you to perform integrity checks on your Cradle database. This option is available from the Project tab in WorkBench:

Screenshot of the Item Integrity dialog
Item Integrity dialog

The Frame Version Checks detect missing versions of any frames or missing records in any version of any frame for the item type specified. Errors  can be fixed using the Fix button.

There are many Item Checks which are explained here.

Many of these checks can be made subject to one of the following scopes:

  • Superseded or retired – Selects items with a status of S (Superseded) or T (Retired)
  • Latest baseline – Selects items with a status of B (Open Baseline)
  • Deleted – Selects items with a status of D (Deleted)
  • Current –  All current items

If you want to produce a report of the item integrity check, ensure to select the Generate a report checkbox.

Cross Reference Integrity

The Cross Reference Integrity Check option checks the cross references in your Cradle database.

Screenshot of the Cross Reference Integrity dialog
Cross Reference Integrity dialog

The current set of cross references is scanned to find any cross references that are invalid. Any cross reference is only counted once in these checks. So if a cross reference is dangling and also invalid, it will only appear once in the counts.

The Cross Reference Checks are explained here.

When the integrity check has been ran you have the following options:

  • Fix – Fix the cross references
  • Export – Export the group to a CSV file
  • List – List the group individually
  • Delete – Delete the cross references from the group

The Fix and Delete options for privileged users must only be run when there are no other active users in the database. If you are in any doubt, do NOT run these operations.

If you want to produce a report of the cross reference integrity check, ensure to select the Generate error report checkbox.

Additional Frames for Change Requests and Change Tasks

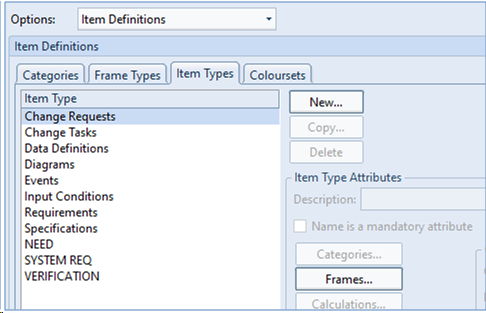
Additional frames for Change Requests and Change Tasks can be defined within WorkBench Project Setup.

The Configuration Management System provides a formal mechanism to make changes to items in baselines. The formal change mechanism is based on:

  • Change Requests (CHRs) which are concerned with general statements of the issue to be addressed, or the problem to be solved, or the defect to be corrected
  • Change Tasks (CHTs) which are concerned with the mechanics of implementing and effecting the change(s) required by one or more CHRs

Both CHRs and CHTs are distinct types of items in the Cradle database and can contain any number of frames. As with standard item types, CHRs and CHTs are provided with some default frames to populate when raising either the CHR or CHT. These are TEXT and NOTES where TEXT is a mandatory frame as this provides the detail.

However, you can also specify in Project Setup whether these item types have any additional frames defined. This can be:

  • Text
  • Graphic
  • Word
  • PDF

or any other format defined as a frame type:

Project Setup
Project Setup showing Item Types tab


Frame Setup dialog
Frame Setup dialog for Change Requests


You can also specify the frames to be mandatory so that the CHR or CHT cannot be raised until those frames are populated. As you can see in the example above the Mandatory checkbox is selected for the JUSTIFICATION frame.

This allows you to ensure that all information is provided for your formal changes.

Filtering Cross References in a Query

Filtering cross references in a query is easy within Cradle.

Showing Cross References in a Query within Cradle

In this example we will create a query that shows links between all system requirements linked to all verifications.

  1. Create a query that shows all system requirements
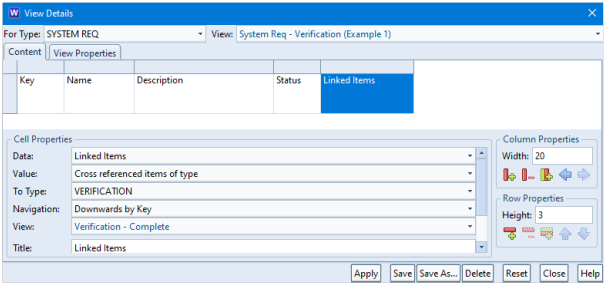
  2. Then create a nested view which shows links to verification items
View Details dialog filtering cross references
View Details Dialog

This will display as shown below:

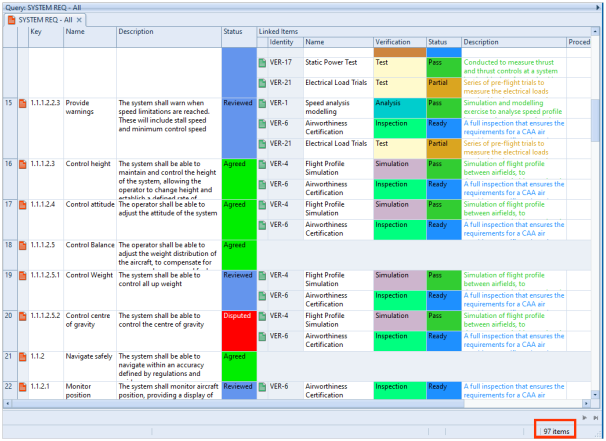
Query showing linked items

In this example 97 items are returned.

Show only Items that have a Linked Item

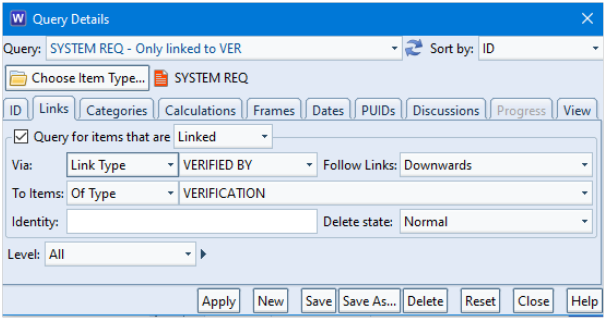
To only show items that are linked to one or more verification item, edit the Query Details dialog:

Query Details filtering cross references
Query Details dialog showing Links

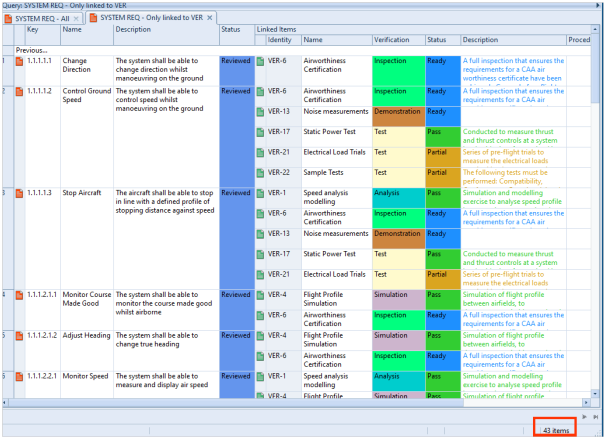
which displays as follows:

Query showing linked items
Query showing only items that are linked

As you can see the list of items has now reduced to 43.

Show Items where Linked Item has a Category set

To only show items where the verification has a PASS value set in a category, a query is created.

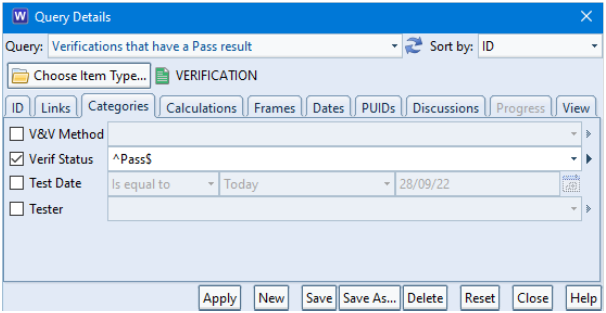
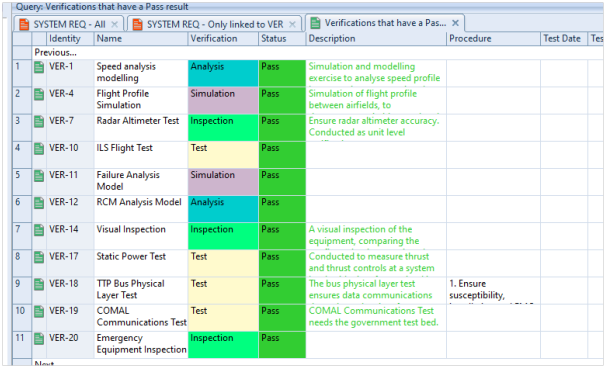
  1. Create a query that only shows verifications that have a Pass value set:
Query Details showing category set
Query Details dialog showing Category set to Pass
Query showing passed items

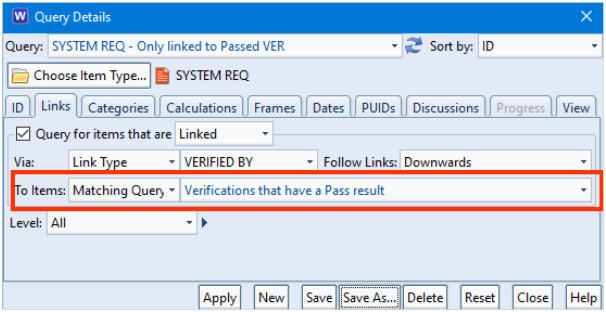
Refer to this query in the Links tab of the Query Details dialog. Note that instead of using To Items set to Of Type, we have chosen Matching Query:

Query Details filtering cross references
Query Details showing Matching Query

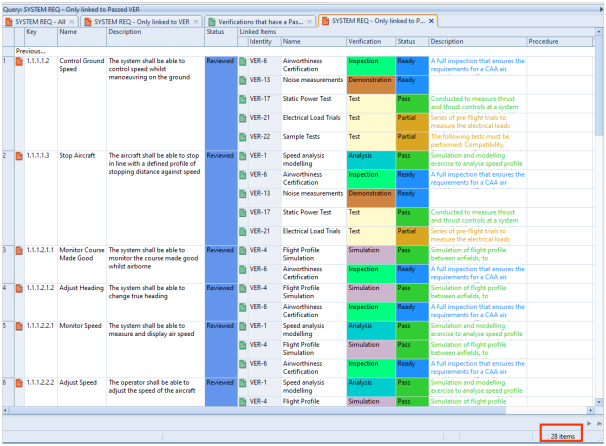
You can now see the list has reduced to 28 items. These being the system requirements that have a Pass for one or more of the linked verifications.

Query showing passed linked items