Supply Chain Management

How to use Cradle for Supply Chain Management

Managing the requirements to product of  any one supplier.

Any successful project must start by carefully managing its requirements. This follows for every link in the supply chain thus ensuring the full life cycle is efficiently and completely covered. Cradle abilities in Requirements Management and Systems Engineering supports that vital role, retaining the crucial links in managing the product’s development.

Needs, Roles, Requirements, Wants, Restrictions, Drawings.

Whatever you call the pieces of information you handle, you can create an item type to hold this information. You can categorise and add attributes and details to match your business definitions. You can add frames to hold pictures, drawings, or URLs. No need to bend your process to meet the tool, configure the tool to match your working practice.

Managing the links between suppliers

Cradle can also be used to manage contractual compliance at each level in the supply chain. That is, a customer uses Cradle to define their commercial, technical, environmental, health & safety requirements and publishes them as contractual documents.
A supplier can load these documents into Cradle, automatically parse them into their component pieces. They can then develop responses and then generate the completed response document from Cradle.
The customer receives the response documents from candidate suppliers and loads them into Cradle, automatically splitting them into their component pieces – e.g. paragraphs – and linking each supplier ‘answer’ to each of their requirements (the questions). See Document Loader. Then Cradle can help to score the suppliers’ responses.

Once a supplier has been chosen, acceptance criteria, validation methods and validations can be added to the requirements and used to manage the supplier’s fulfilment of the contract.  A formal response is then produced using Document Publisher.

Whatever the level

The handy thing is that the above applies at every level in the supply chain. A company that is a ‘supplier’ in the above can use the Cradle database that they have produced to be a ‘customer’ to their suppliers, one level down the supply chain.

Item Lists in Document Publisher

Named Item Lists in Document Publisher

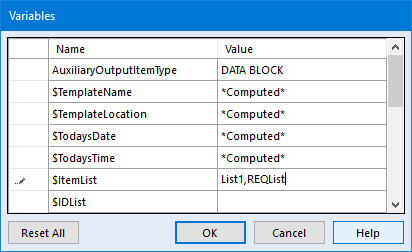
When working with large datasets it is sometimes convenient to cache the returned items for re-use in multiple tags. Document Publisher makes this possible using named items lists. These are created from the User Variables dialog.

User Variables Dialog Showing Item List Variable
User Variables Dialog

Creating an Item List

To create an item list you need to:

  1. From an open template select Tools > User Variables
  2. This produces the Variables dialog. Locate the predefined $ItemList entry
  3. Add a new entry in the Value column. This is a comma separated list of all the named item lists in your template
  4. Press OK to save the variable and your item list is now ready to use in a tag

Populating an Item List

Once you have generated a suitably named list you must create a Paragraph Group tag to populate the list.  For further information on how to create a Paragraph Group tag please click here. No output is to be generated from this tag, its sole purpose is to fill the item list for subsequent tags to use.

  1. Create the Paragraph Group tag at an appropriate place in the document, this must appear before the tags which are to use the item list
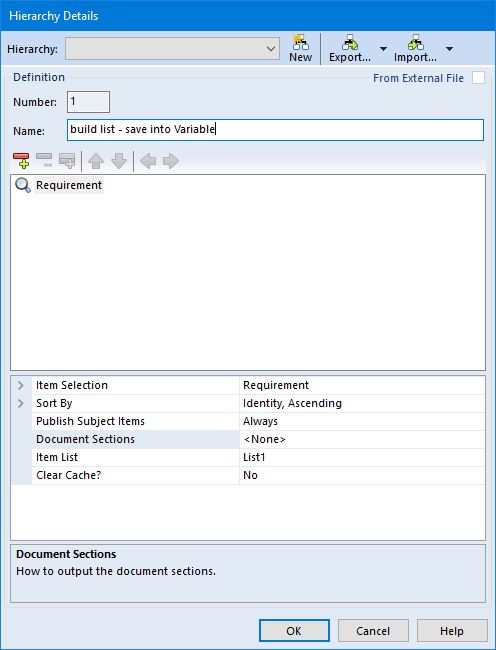
  2. Within Tag Properties find the Hierarchy property and click … to create a new hierarchy
  3. Edit the hierarchy and set the appropriate item selection(s)
  4. For each node set the Document Section property to <None> so that no output will be generated
  5. Select your newly created item list in the Item List property
  6. If the same list is being filled multiple times then set the Clear Cache property depending on if you want to refill the list from scratch or append to the existing list
  7. Press OK to save the hierarchy
Hierarchy Dialog showing Item List
Hierarchy Dialog

Please note that duplicate items are automatically removed from item lists as they are filled.

Using an Item List

Once a Paragraph Group tag has been setup to fill your item list, it can be used by any tag appearing after it in the template document.

  1. Create a Paragraph Group or Table tag at an appropriate location in your template
  2. Set the tag‘s item selection to match what information is stored in the item list
  3. Optionally, create a hierarchy to follow from the items stored in the list
  4. Optionally, override the Sort By property if it needs to be different from the item list sorting order
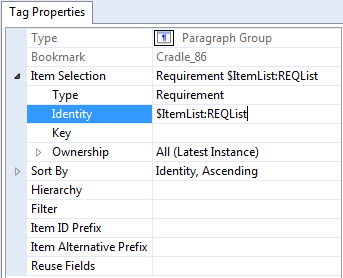
  5. Expand the item selection and set the Identity property as shown below, using the special value $ItemList followed by a colon and then the name of the list to use it
Tag properties showing $ItemList
Tag Properties

Referencing an Item List in a Filter

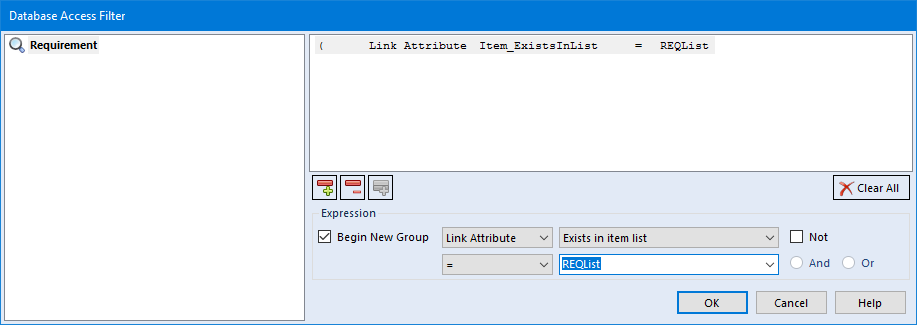
There are two special filter properties that can be used to check for the existence of items stored in an item list. These are available in the Filter dialog as Link Attributes:

  • Exists in Item List – where the filter expression will evaluate to true if the item exists in the named item list
  • Is Linked to Item in Item List – where the filter expression will evaluate to true if the item is linked via a specified link type to an item that exists in a named item list
Database Access Filter Dialog showing $ItemList
Database Access Filter Dialog
Article Updated 04/02/2019 – Incresed image sizes

Item Attributes

Item Attributes

Items have attributes that describe the item and store its data. Item attributes are used to sort, categorise and group items. They also hold the unique data forming the main purpose of the item. There are three main kinds of attribute:

    •  Predefined – used to manage items, and include attributes such as name, number, version, owner, security classification and last modification date.
    •  Categories – small amounts of data as free text, single value picklists or multiple value picklists, or abstract data types such as dates or reals. These are also primary database indexes.
    • Frames – attributes for storing large amounts of data, as text or binary. These can be queried but are not primary indexes.


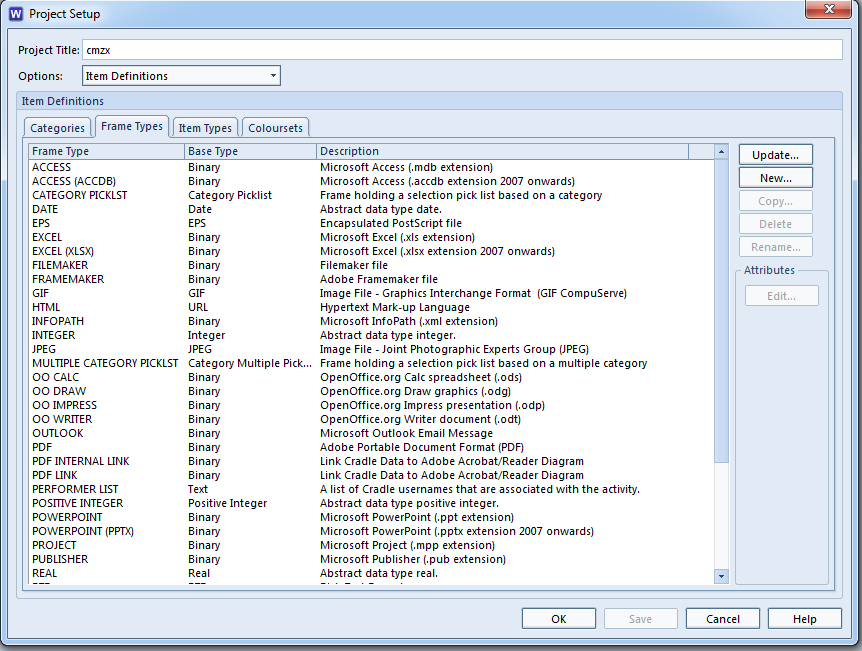
  • The predefined attributes are always present. You can inspect their values, query the database to retrieve items based on the values of these attributes, and in some cases, directly set the values of the attributes. for example The key, group, comment or description. Other predefined attributes are central to Cradle’s access control mechanisms and the Cradle configuration management system (CMS). These are set by Cradle, for example modified date or status, they cannot be directly modified. You cannot remove predefined attributes from an item.To change the item’s user definable attributes, you will need to go to Project Setup and in Options select Item Definitions as shown below
    Attributes
    Project Setup – Item Definitions


  • Here you will be able to add, modify and remove an item type’s attributes. For example if you wanted to add a picture to an item type, you could pick the JPEG frame type. If you needed to add CAD drawing file, you would define a frame type to hold the data and then add an instance of this to each of the item types needing to store this information.

Hierarchical Numbering

The hierarchical number describes an item’s position in the hierarchy. It is usually stored in the Key attribute but it can be stored in a category if you wish. Hierarchical numbers are not fixed. They can be changed and reorganised.

  1. A prefix (this is optional)
  2. A separator
  3. A number

The hierarchical separator can be:

  • A dot or period (this is the default), e.g. fred.1.2.3
  • A hyphen, e.g. fred-1-2-3
  • A slash, e.g. fred/1/2/3
  • For further information regarding attributes please click here
Article Updated 04/02/2019 – Expaned on how the key attribute is special to control hierarchies

Backups – Keep Your Data Safe!

Backups are an essential part of implementing any tool, and particularly Cradle. There are two types of backups that you should consider, each with its own strengths.

What Needs to Be Backed-Up?

A Cradle system can contain many databases. Each database is stored in a single directory. Naturally, you will want to backup all, or at least most, of these database directories.

The project register held in the files proj_reg.* in the root of your Cradle installation:

  • Linux: $CRADLEHOME
  • Windows: %CRADLEHOME%

reference all of your databases. If you lose these files, or if they are damaged, you will not be able to login to any of your databases. If this ever happens, contact 3SL as we can rebuild these files for you!).

All information related to a database is stored in that database’s directory. But there is some information that is specific to each Windows/Linux user. This information includes the users’ preferences, and any Personal scope definitions (queries, views, forms and so on) that they may have created.

The users’ personal information is stored in:

  • Linux: $CRADLEHOME/admin/definitions/personal
  • Windows: %CRADLEHOME%\admin\definitions\personal

You should consider backing these up.

Finally, you may have changed some of the configuration files to configure Cradle for your IT environment. For example:

  • Cradle startup file, cradle.ini, or .cradlerc on Linux
  • CDS and CWS configuration files in the ‘admin’ directory in the Cradle installation on the server: cds_hosts, cds_users, cws_config
  • External Command Interface configuration file, eci_config
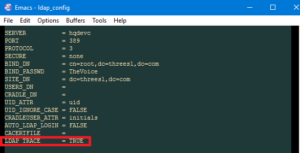
  • LDAP and tracing configuration and options files, help in directories called ldap and trace

You may decide that it is easiest to simply backup the entire admin directory and the Cradle startup file in the executables directory.

You should backup all of these files. If you ever need to re-install all of Cradle, then it is easy to use the backup of these files to restore all your configuration work.

Types of Database Backup

There are two types of database backup:

  • Image backups, that simply backup the database’s directory, containing all of the database tables and definition files
  • Export backups, that perform a full Cradle export on the database, exporting every piece of information into Cradle format. All Cradle versions are guaranteed to be backwards-compatible such that any version of Cradle can import an export file produced by the current version of Cradle, and also any earlier version of Cradle.

We recommend that you run both types of backup.

Image Backups

Image backups are a backup of all of the files and directories in a database.

It is easy to backup your databases if all of the databases have a common root directory. For example, you could store your databases in directories such as:

  • /Databases/Active/Test
  • /Databases/Active/Production
  • /Databases/Active/New-Product

In this case, you could also backup /Databases/Active to backup all of the databases at the same time.

You will already backup information on your servers. So it should be easy to add the Cradle database directories to your existing backup system.

If you want to backup databases directly, then we recommend using tar and gzip on Linux (they are also available for Windows) or either WinZIP or 7-zip on Windows. On Linux, you would use commands such as:

cd /Databases/Active
tar cf test.tar ./Test
gzip test.tar

You may find your system can combine these utilities into one command.

Characteristics

The advantage of an image backup is that it is quick.

The disadvantages of an image backup are that it is impossible to restore an individual item or cross reference from the backup. An image backup contains entire database tables. So the smallest thing that you can recover from an image backup is an individual database table, not an item of information (which is a rows in one or several tables).

Export Backups

Cradle includes a utility called c_io that can perform exports and imports of any, some or all of the data in a database.

For example, the following c_io command will export all of the data in the demonstration database DEMO that is part of all Cradle systems:

c_io -login MANAGER,MANAGER,DEMO -export /tmp/export.exp -type all

You can perform incremental exports using options:

  • -from yyyymmdd
  • -to yyyymmdd

You can also use the -log option to produce a log file that summarises everything that has been written into the export file.

Characteristics

The disadvantage of an export backup is that it is slow.

The advantage of an export backup is that you can restore any single item or cross reference or definition file from the export.

Resilience and Data Integrity

Of course, you should ensure that your backups are stored on a different server to the server that runs Cradle. Ideally, you should have off-site backups as well.

For those of you who trust your data to third parties, you can store it on a remote server… there are many so-called ‘cloud’ services available.

If you decide to use a third party, please check their terms and conditions. For example, DropBox claims intellectual property rights over everything that you deposit with them. This is not a good idea for your company’s private data!

Backup Frequency

We recommend that you run:

  • Image backups twice each day. Take the first backup at lunchtime, to capture the work that everyone has done in the morning. Take the second backup in the evening, to capture the work that everyone has done in the afternoon.
  • Export backups once each day. You can run the export backup in the evening when no-one will be working.
  • Image backups of the administration files every day, or every week. They are small and the backup will run very quickly.

Defining a Heading Tag in Document Publisher

In Document Publisher you can define headings in several ways; this post will show how to define the Heading tag.

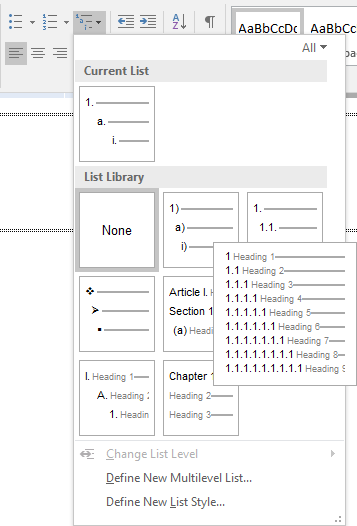
Before starting, Word’s Multilevel List needs to be set; use the list which has Numbering and Heading set:

Multilevel List options
Word Multilevel List options

This will give the user a Heading style which numbers the names of the items output.

Add a ParagraphGroup tag and create your Hierarchy table and set the Key or Identity in the Item Selection.

Default Settings for the Heading Tag

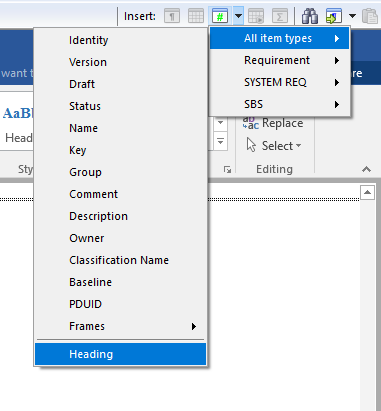
Placing cursor at the end of the word ParagraphGroup in the tag but before the bookmark, click on the arrow for the Field tag button and select the All item types option and then down to Heading tag option at the bottom.

Heading field tag
Selecting the Heading field tag

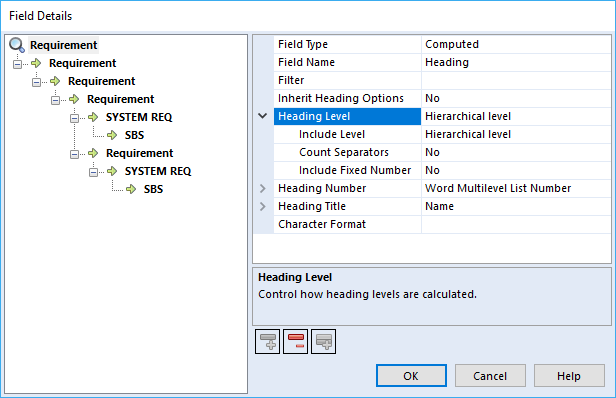
The Field Details UI will look like this when it opens:

Field Details User Interface
Field Details User Interface with the default settings

This is where the user sets the Heading tag options for each row, starting with the top row. Leaving all the options as set for each row will give the user the following output:

1  Stakeholder Requirements
1.1  Customer Requirements
1.1.1  Capacity
1.1.1.1  Flight Crew
1.1.1.1.1  Corrective Maintenance (Air)
1.1.1.1.1.1  Fault Monitoring System
1.1.1.1.1.2  Pilot
1.1.1.1.1.3  Co-pilot

Basing the Heading Level on the Item Attribute Key

The user may require that the sections start with a different number for example they may wish to use the key instead for the Heading tag.

The Word’s Multilevel List is not needed to be set for this option as the numbering is set by the Key.

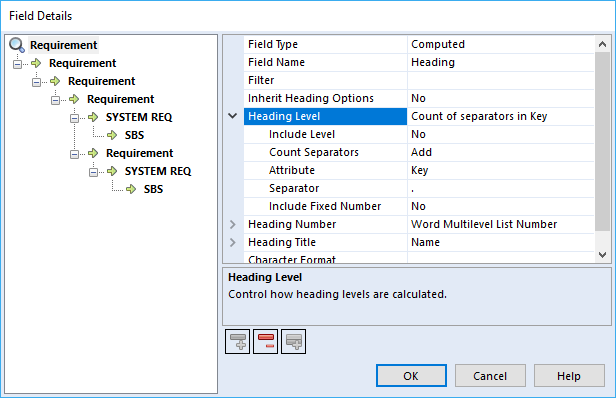
Setting the Include level to No and Count Separators to Add and the Attribute to Key, the type of Separator will now not use the Hierarchy Level in the output but base the numbering on each items Key.

The user can set each of the other rows to the same settings as the top row by select the row, clicking the Remove Field button Remove Field Button and then the Copy Field button Copy Field.

The Field Details UI
The Field Details using the Key not the Hierarchy Level

This will give the user the following type of output; remember the Key starts at 0 but the Heading numbering in the Heading Styles starts at 1:

1  Stakeholder Requirements
2  Customer Requirements
2.1  Capacity
2.1.1   Flight Crew
2.1.2  Corrective Maintenance (Air)
2.1.3  Fault Monitoring System

Using the Separator Option

This option allows the user to change to which separator is used within Key or attribute the user has decided to use

Using the include Fixed Number Option

The user can use an Include Fixed Number of separators and Add or Subtract the number of separators for a different output. If the user sets it to Add and the Fixed Number to 2, it will add 2 separators to the key and the output will look like this:

1.1.1  Stakeholder Requirements
1.1.2  Customer Requirements
1.1.2.1  Capacity
1.1.2.1.1   Flight Crew
1.1.2.1.2  Corrective Maintenance (Air)
1.1.2.1.3  Fault Monitoring System

If the user set it to Subtract and the Fixed Number to 1 the output will look like this:

1  Stakeholder Requirements
2  Customer Requirements
3  Capacity
3.1  Flight Crew
3.2  Corrective Maintenance (Air)
3.2.1  Fault Monitoring System

Note: Don’t use subtract on rows where the key is only a single digit as the numbering will not be output, showing up like this:

Stakeholder Requirements
Customer Requirements
Capacity
1    Flight Crew
2    Corrective Maintenance (Air)
3    Fault Monitoring System

Using the Hierarchical Level with an attribute

The user can use the Hierarchical Level with the Key which will add the key to the level in the hierarchy and the output will show like this:

1.1  Stakeholder Requirements
1.1.1  Customer Requirements
1.1.1.1.1  Capacity
1.1.1.1.1.1.1   Flight Crew
1.1.1.1.1.1.1.1  Corrective Maintenance (Air)
1.1.1.1.1.1.1.1.1  Fault Monitoring System

The other attributes the user can use to the set the level with or without the Hierarchical level are Identity, Group and a Category. When Category is selected a new option shows to let the user pick the category they wish to use.

Using the Heading Title Option

The Heading Title option allows the user to use different sources to name the item being output. The option include:

  • <None>
  • Static text
  • Identity
  • Key
  • Group
  • Name
  • Comment
  • Description
  • Category
  • Frame

The Category and Frame options allow the user to select from a new option which category or frame they would like to use.

Using the Strip Prefix

This option allows the user to remove any specified text from the attribute during output. For example, the items Key may be REQ-1.1 and the user only requires the 1.1. The user would enter REQ- in the Strip Prefix option to have it removed.

Using the Character Format Option

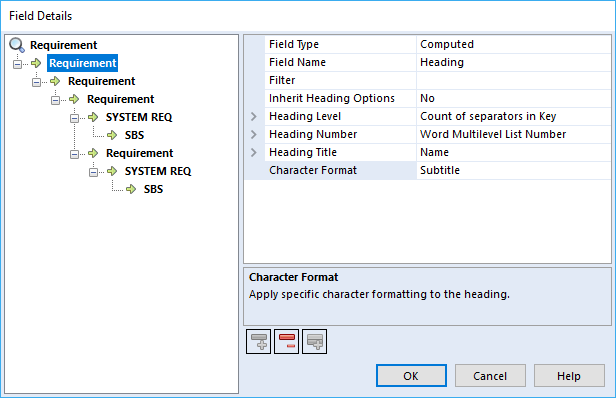
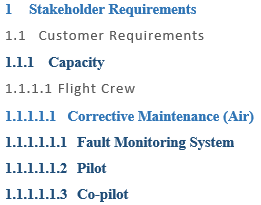
This option allows the heading style to be overridden but not the numbering. If the user decides that the second and fourth levels should look like the style Subtitle, it will have the font, size and colour of Subtitle but still the numbering set to Heading 2.

Field Details Character Format Option
Field Details Character Format Option using the Subtitle style

Using this option the output would look as below:

Character Formatting using Subtitle
Shows the second and fourth rows with the Subtitle style

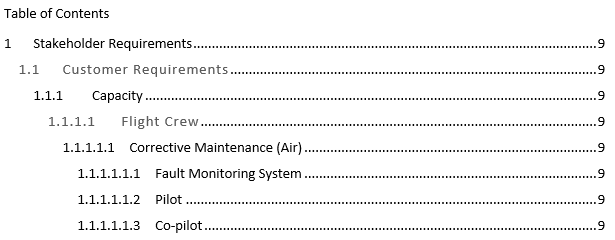
This style will also be reflected in the Table of Contents:

Character Formatting in the TOC
Character Formatting in the Table of Content

Split Items in WorkBench

Creating Multiple Items From One Original

As a project progresses a requirement can grow from being atomic to containing multiple phrases and components. From an implementation or verification point of view this makes work increasingly difficult.  It is necessary to split items like this into smaller parts. Making them into hierarchical items ensures clear and concise elements. However, it would be laborious to cut and paste the individual elements into new items and create the links back to the parent.

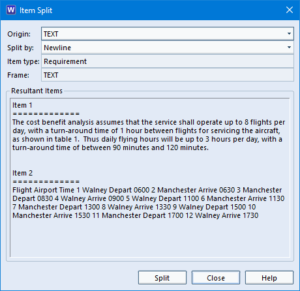
The Split utility is an operation available for requirements, system notes and specifications. It splits an item’s text frame into several parts and creates a new item in the database for each of these parts according to a user-selected regular expression as one of:

  • Newline
  • 1) / 2} / 3.
  • 1.2 / 2-3
  • a) / b}
  • i) / iv} / ix.
Screenshot showing the item split dialog
Item split dialog

Each of the new split items is a copy of the original item and they are cross referenced back to the original item with a specific link type. The frame content of the original item is unaffected by the split. If change history is enabled for the item type an entry is placed in the change history log.
Note: The CREATE_ITEM privilege is required to use the split option.
The Frame Setup dialog in Project Setup allows you to set the destination item type, destination frame and the link type to be used when linking the split items back to the original item.

The reason you would split an item instead of copying the item, is the split items text frames can be broken down into multiple items.

If you re-split an item using a different link type new items are created.

If you re-split an item using the same link type which would result in fewer items, all existing items are updated and any additional items are deleted.

Lastly if you re-split an item using the same link type which would result in more items, all existing items are updated and any new items are added.

Article Updated 04/02/2019 – Updated information

Quick Data Analysis

What percentage of our windows are mandated to use safety glass?

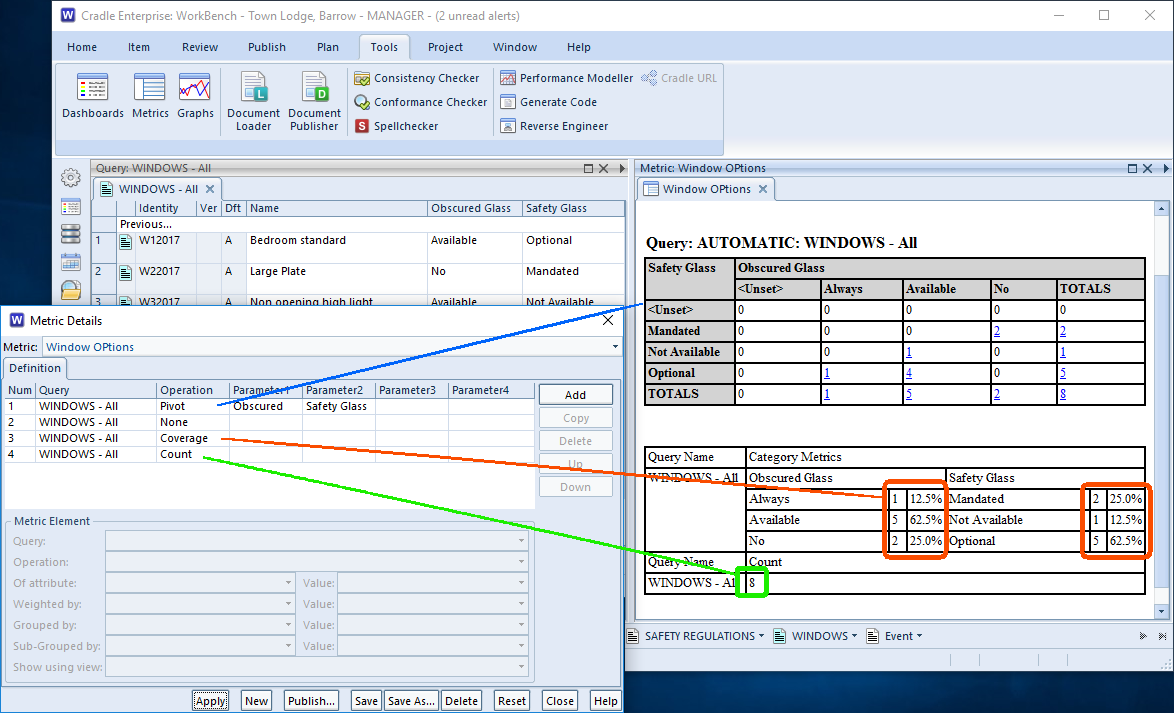
With a change in the overall cost for safety glass this may be one of the questions asked at the board level. You may now be tasked to provide some quick data analysis. Cradle provides a metrics module which can provide a range of data analysis options.

In this case, applying the coverage metric to the windows in the database, it can be seen that 25% of the windows in the range mandate safety glass. A further 62.5% have it as an option. Therefore, from a costing point of view, the firm must revisit the pricing of a quarter of their range.  Additional work will be needed for those customer or location based offerings.

Showing a simple use of metrics
Simple Metrics – Illustrating quick data analysis

Why windows? We produce biological markers for flu viruses!

For illustration, hopefully this is a simple topic understandable by all. It is an example of quick data analysis. With such a diverse range of customers and industries, it would not be possible to pick a universal example. Metrics that find mean or highest values would not make sense for the above pick-list values, but would be really useful for analysing test results. Read on to discover the full range of metric options in Cradle’s data analysis.

Merging Items Together

Merging Items

One or more requirements or system notes can be merged into either a new item or an existing item. Merging items combines their frames, concatenating frames that appear in two or more of the source items. Cross references are created between the requirements being merged and the merged result.

You can control the effect on the item’s key, origin, reference and category codes. The merged item can be cross referenced to everything that the sources were, as well as to the sources themselves. The source requirements can be deleted after the merge (if you have read-write access to them) if required.

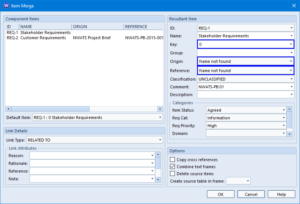
When multiple items are merged, conflicts arise when their components differ. Fields in the Item Merge dialog with a blue border show conflicts between the selected items. The Options section in this dialog helps define how such conflicts can be resolved.

Dialog produced when merging items
Item Merge dialog

Click here to see the steps on how to merge your requirements/system notes.


Using WorkBench Sessions

Would you like to save the state of your WorkBench environment so you can restore to this state again?

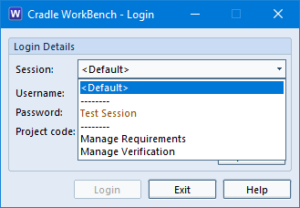
If you do, try using WorkBench sessions. You can use a session to save the state of your WorkBench environment so you can return to the same point each time you login by choosing the required session from the Login dialog.

What is a Session?

Sessions store information about your WorkBench environment, such as:

  • Current project
  • Currently set navigation in the primary WorkBench window
  • Current window dimensions
  • Currently opened definitions (only if saved definitions)
  • Currently set navigation for each query pane

Saving a WorkBench session preserves the size and position of the main screen and which queries are active. Then next time you login to WorkBench you can choose the session to use.

How can I Save WorkBench Sessions?

To save a session select Save or Save As from the WorkBench Window tab. You can then enter a name for the session before confirming.

How can I Restore WorkBench Sessions?

To restore a session select Reload from the Window tab. Once you confirm the session is restored to how it was when you logged in initially.

How to Select a Session on Login

From the Login dialog there is a Session menu. From here you can choose the session you want to use when you login.

Select a session upon login
Sessions option in Login dialog