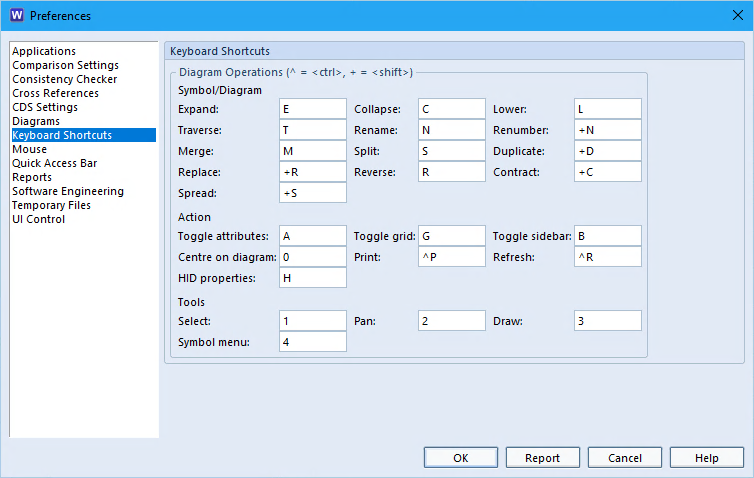
There are the usual operating system shortcuts such as <ctrl> + C and <ctrl> + V to cut and paste text. Users can see and set the additional Cradle keyboard shortcuts in their user preferences.
These preferences are first drawn from the system wide cradle.ini/cradle.rc file. If you alter any of them for your own needs, they are saved in your personal user preferences as a difference between the system setting and you chosen value. Thereby balancing consistency between users, whilst allowing flexibility when needed.
This menu is selected from the tab Home -> Preferences
Cradle Keyboard Shortcuts
Keyboard
The Cradle shortcuts are mainly based around diagram drawing operations. This can speed up productivity considerably. For example; you don’t have to keep moving your mouse cursor to a menu, just to switch between say drawing and selecting.
More information about keyboard shortcuts can be found in the Cradle Help . Similarly the reset of the user preference details can also be set in the same dialog.
In our article Email Alerts! In Cradle we discussed using Mailsend utility so you can use SMTP rather than MAPI to send emails alerts. We touched briefly on the configuration within Cradle of using the utility. In this post, we’ll be expanding on that. Providing an example of a Mail Relay within the Cradle environment rather than talking directly to a company SMTP server.
Why use a relay?
Mailsend
So why shouldn’t we configure all the Cradle clients to talk directly through Mailsend to a company mail server? For starters, the company mail server may be locked down to only accept SMTP emails from specific hosts, and so wouldn’t accept SMTP connections from every Cradle desktop client.
Using a relay means that the company mail server only needs to accept SMTP connections from a single host, the mail relay, as all the Cradle Mailsend desktop clients talk via the relay.
So, how do we setup a relay
Its as simple as installing the relay software and configure it. Currently we use Postfix in installations where we need a relay as we’re usually using Linux as a Cradle Database Server. Postfix is a package available on most/all Linux distributions.
Then its just a case of configuring it to accept incoming connections from the Cradle desktop clients. We lock this down to a subnet of IP addresses. Then set the relay host to being the company mail server which will deliver the email alerts. In this example we’re using Postfix to Cradle clients on 2 subnets, and the localhost. The cradle.ini/cradle.rc files then points to the relay host and not the company mail server.
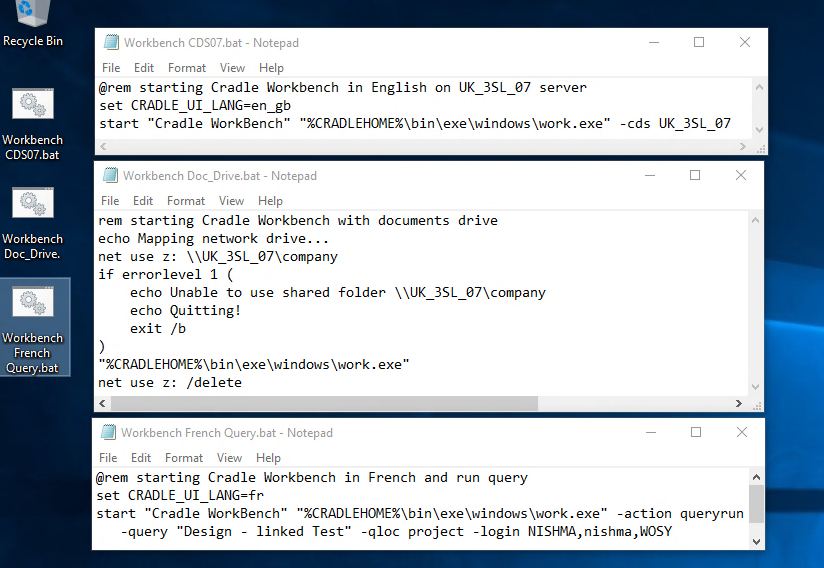
There are a number of options that you can use when starting tools. WorkBench for example can be started connecting to a specific CDS. Sometimes, specific environment variables must be set. This is where using a Windows batch file startup is useful.
Windows Batch Files
A batch file is a short script, a list of commands that are run as if you had executed them from the command line. It could be that you want to connect to a company driver, run WorkBench and then exit. You may want to run a specific query on a specific project with the UI in a particular language.
Command Batch Files
Examples
Run WorkBench in English connecting to a particular server.
@rem starting Cradle WorkBench in English on UK_3SL_07 server
 set CRADLE_UI_LANG=en_gb
 start "Cradle WorkBench" "%CRADLEHOME%\bin\exe\windows\work.exe" -cds UK_3SL_07
Or you can run WorkBench, with the company documents drive connected.
rem starting Cradle WorkBench with documents drive
 echo Mapping network drive...
 net use z: \\UK_3SL_07\company
 if errorlevel 1 (
 echo Unable to use shared folder \\UK_3SL_07\company
 echo Quitting!
 exit /b
 )
 "%CRADLEHOME%\bin\exe\windows\work.exe"
 net use z: /delete
You can even, run WorkBench, logging in and showing a query with a French UI.
@rem starting Cradle WorkBench in French and run query
 set CRADLE_UI_LANG=fr
 start "Cradle WorkBench" "%CRADLEHOME%\bin\exe\windows\work.exe" -action queryrun -query "Design - linked Test" -qloc project -login NISHMA,nishma,WOSY
Once you save the batch file, you can execute it from the File Manager, or a Shortcut, or as we’ve illustrated by double clicking the icons on the desktop.
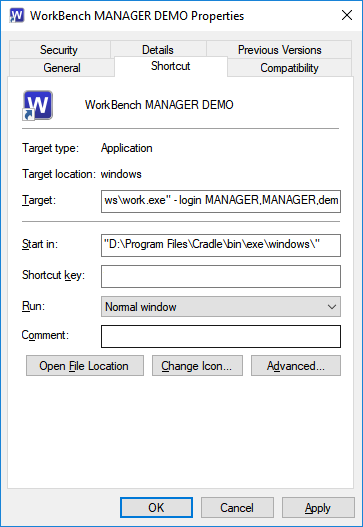
Shortcuts
Windows desktop shortcuts can be created to directly run WorkBench. You’ll be able to set all the command line options, but won’t be able to do anything like connecting a drive.
Simply drag the WorkBench icon from the Windows ‘Start menu‘ onto your desktop. Right click and select Properties then add any options to the command line in the Target field. This example shows how we log into the DEMOproject really quickly.
WorkBench shortcut
Command Line Options for WorkBench
If you run WorkBench from the command line with a -help option,
C:\”%CRADLEHOME%\bin\exe\windows\work.exe” -help
you’ll be shown all the values that can be entered into a command line call.
WorkBench Command Line Options
usage: work.exe [options]
options are:
   [-cds]
   [-display ]
   [-login ,,]
   [-noldap]
   [-nobanner]
   [-ro]
   [-action {itemview | queryrun}]
   for itemview:
      -pduid [-version ] [-draft ]
      [-form -floc ]
   for queryrun:
      -query -qloc
      [-view -vloc ]
   where loc is one of:
      system automatic project usertype team user personal
   [-errorstack]
   [-ver]
   [-help]
These values can be used in a direct shortcut , or in the command entered into he batch file.
The easiest description of a baseline is, a holding area for information owned by the project, i.e. how the database/items were at a particular point in time. There are both items and cross references in a baseline. The more cross references you have the larger the files will be. This means that if you do have many Baselines, you could find significant space being used on the server.
Are Baselines Taking Up a Lot of Server Space?
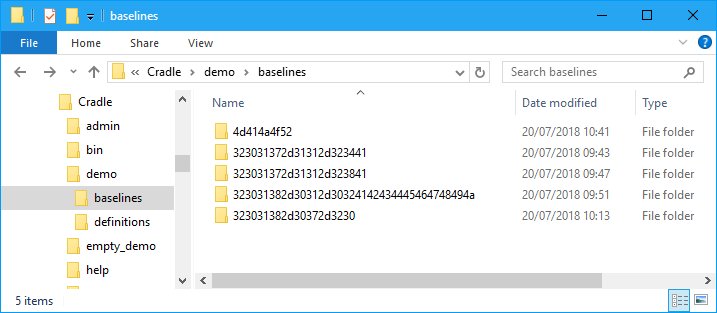
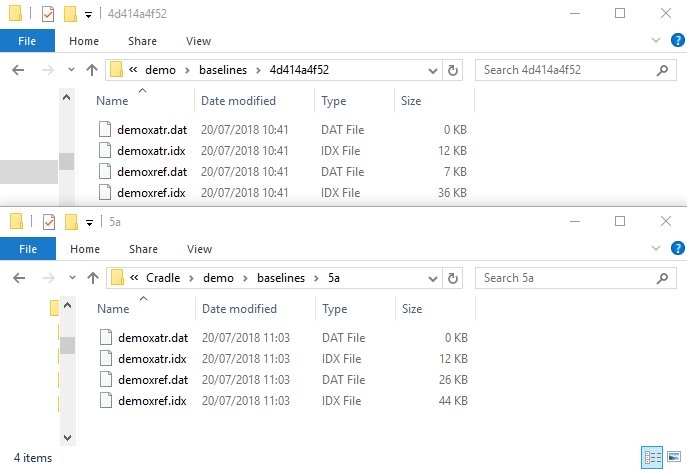
In our latest release of Cradle 7.4, cross references are separated from the other files when a baseline is closed. The cross references in each one are now placed in separate uniquely identified folders. Each folder has an alphanumerical identity, dependent on the length of the name for the baseline. This is twice the length of the baseline name.
The Baseline Folders containing the Cross Reference folders.
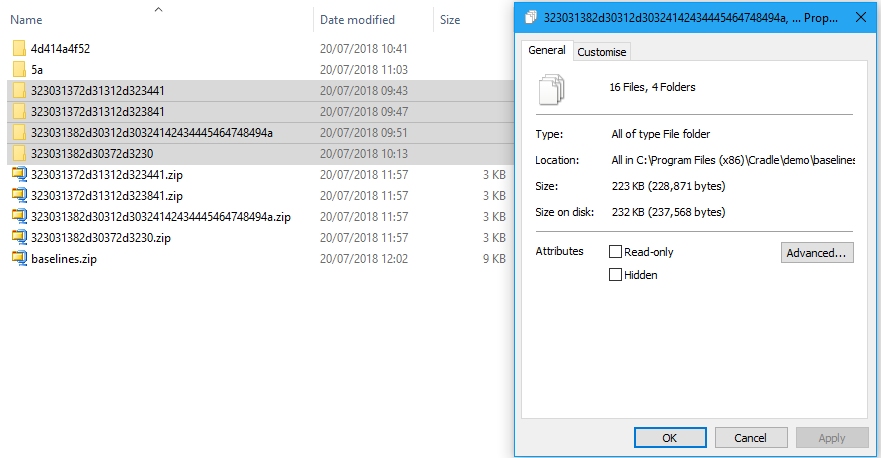
Inside each of these folders are 4 files containing the cross references and their attributes. The files will be different sizes depending on the number of cross references that existed at the time the baseline was taken.
Baselines Cross Reference Folders
Folder Maintenance.
As these are individual baselines, a user can then zip these folders and remove them from the Baseline folder. Taking the four older folders, they total approximately 232KB on disk. If a user zips each folder it comes to 3KB each. If zipped into 1 file it comes to 9KB and so a saving of over 220KB.
Baselined Cross Reference Folders after zipping
Most databases are much later than this and so the space saving could be much larger. The user could also move the zipped files to a different server if required and so saving more space.
The only downside to doing this, is that if a user wishes to use Baseline Mode to see the cross references in a baseline, they will not instantly be there. Therefore, should the cross references be required in the future, just unzip the file into the original folder. Once the file is unzipped, a user can set the Baseline Mode and they will see the old cross references.
Related Articles
For a longer more in depth description of Baselines and Configuration Management click here.
Your company is using Cradle, but you’re a remote worker – how do you connect to the Cradle Database Server (CDS)?
With Network Address Translation – the IT administrator, where the CDS is located, can modify their firewall to redirect specific external ports to a local server.
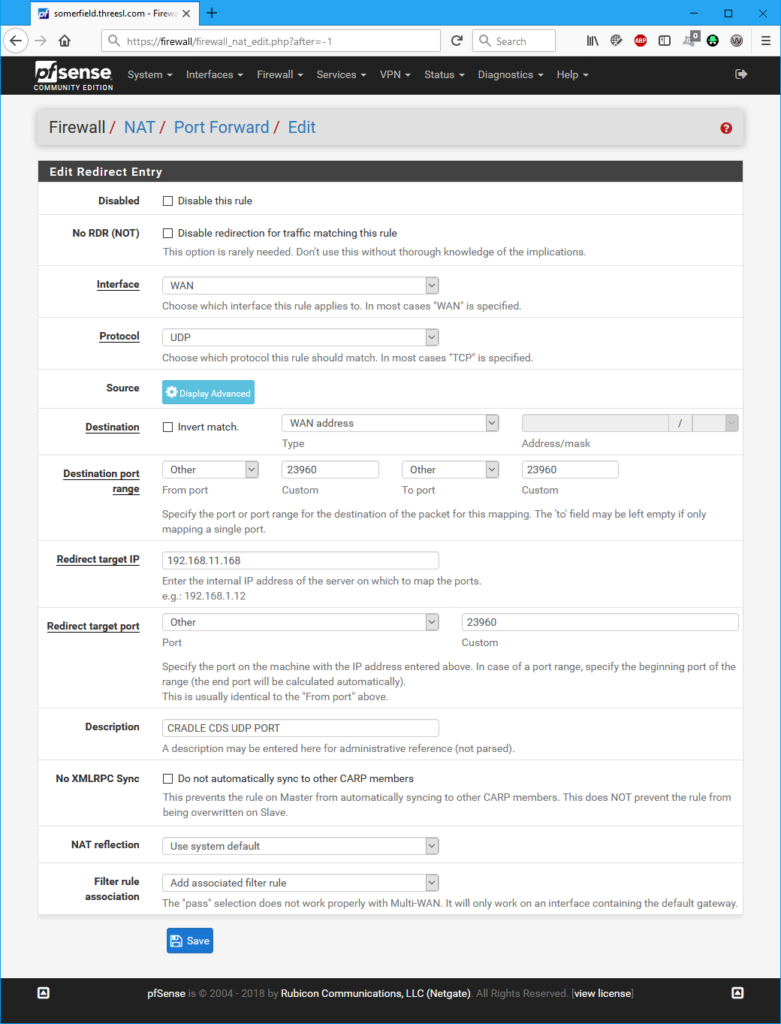
Make a note of the internal IP address of the CDS – we’ll use CDS_IPADDR later in this post to reference this address. (In this test environment it is 192.168.11.168).
Cradle Configuration Changes
As an example of a small Cradle system with 6 users, we can configure the ports file as such. We’re setting ports for each possible user (6) and an extra – so thats 7 ports in each range. To make it easier setting the firewall rules – so we have less rules to setup, we’ve got all the ports in UDP and TCP specific consecutive blocks, which is different to how we have them in the Cradle Help – https://www.threesl.com/cradle/help/
This ports file needs to be copied to all the clients using this CDS.
Firewall Config Changes
The IT administrator can now edit their firewall rules to redirect the external IP ports to the internal CDS. As part of these rules they can set it so that only specific remote IP addresses are permitted to access these redirected ports.
I’m using pfSense as the example firewall in this case, and adding separate rules for each Cradle Port.
Through the application of Network Address Translation, the remote worker now uses their locally installed Cradle client installation and talks to the Cradle Database Server, as if it is on the Cradle site’s external IP address – which they need to configure as their CRADLE_CDS_HOST address.
Article Updated
28/06/2021 – Use of port ranges in firewall rules.
Cradle Toolsuite is compatible with both 2013 and 2016Office 365. To see all Toolsuite compatibility see this page. Toolsuite should work with Office 365 the same as with a normal Office install. Occasionally there are problems due to issues with Office 365 not always with Toolsuite.
Document Loader, Document Publisher and Spellchecker make up Toolsuite
Office Updates
Recently there was an issue with an update to Office 365 which stopped our InstallShield correctly detecting the installed version. This issue has been fixed by changing our detection routine in a patch release. If you are seeing this issue with your original install files, please download the latest files and try again. Unfortunately this could happen again as we have no control over these updates. All 3SL can do is update our routines as and when this comes to our attention.
Occasionally when Office is updated and when newly installed, it requires you to Accept new terms. If you have not done this then you will see an Error when trying to start Toolsuite applications.
Error instartup: Object reference not set to an instance of an object
Windows 10 Updates
Since a Windows 10 update earlier this year everything is running slower on may different Microsoft™ Windows flavours. Word can open slower and this can cause issues if you are trying to publish a document. There is no work around for this except to keep trying to publish. Check this blog for more information but the summary so far is:
With Windows 10 on newer silicon (2016-era PCs with Skylake, Kabylake or newer CPU), benchmarks show single-digit slowdowns, but we don’t expect most users to notice a change because these percentages are reflected in milliseconds.
Aklso on Windows 10 on older silicon (2015-era PCs with Haswell or older CPU), some benchmarks show more significant slowdowns, and we expect that some users will notice a decrease in system performance.
Windows 8 and Windows 7 on older silicon (2015-era PCs with Haswell or older CPU), we expect most users to notice a decrease in system performance.
Windows Server on any silicon, especially in any IO-intensive application, shows a more significant performance impact when you enable the mitigations to isolate untrusted code within a Windows Server instance. This is why you want to be careful to evaluate the risk of untrusted code for each Windows Server instance, and balance the security versus performance trade-off for your environment.
Connection or Server Issues
Occasionally the Microsoft server or the connection is down (DownDetector) and this can also cause issues with the Office and Toolsuite. There is no work around for this except patience. Once the connection/server is fixed and up and running you should have no issues with Toolsuite.
Subscription and MSI installs
Having a mix of subscription and Microsoft Installer based MS Office installs can cause detection issues during a Toolsuite install. For example the user has a click-to-run Office 2013 installed but a Microsoft Installer version of MS Project or Visio™. This has been fixed by altering how we detect the architecture of the Office applications.
Mixed Office Versions
It is recommended in our install guides not to have mixed Office environments. For example you may have MS Office 2010 but Project 2016. These type of environments can cause install issues. Even once an install is successful there can be application issues including the loading and publishing documents.
Hack Green “Secret” Nuclear Bunker is no longer a secret. (Although some Sat Navs still have difficulty finding it!). The level of secrecy and ‘need to know’ that was maintained during the cold war is quite incredible. For most of us it’s not every day that we work with information that is that high in confidentiality. However, it is much more common that we deal with different levels of information depending on our role within a company. This could be personal information that may have a GDPR aspect, or financial information to which we are not privy, or confidential design information which as a sub-contractor we are not allowed to see.
When managing a project it is important to ensure each team member is only shown information that they are authorised to see.
Cradle provides many ways to control which information can be seen by each team member’.
Classification – This is a top level filter. You may only see items that match or are lower than your own classification.
Ownership/Privileges – A team hierarchy and the allocation of user privileges ensures that users can only access appropriate sets of information.
Item Types/Skills – If a user defined item type is assigned a skill, and a user does not posses that skill they are unable to see any items of that type.
Frames/Skills – Frames within an item can be restricted to users with a particular skill.
Categories/Skills – Categories can be hidden from direct view for users without a skill.
It is impossible to print a single document and allow some staff to see some pages and some pictures and others to see different ones. However, when you arrange your project in a tool, this control can be achieved quite easily. If you’d like advice on setting up Cradle to meet your needs, check out the help pages, if you are under maintenance contact support@threesl.com for advice or sign up for a training course.
Cradle Latest Version
If you’ve not tried the following features yet, here are some highlights from the blog.
Start page enhancements. Creation of Start Pages is even faster with a copy facility for panels and entries. This is helpful when you want to list a number of very similar commands and just tweak each one. Start Pages are a good way to customise your user interface and provide the necessary commands to a user as soon as they open WorkBench. It is possible to create different pages for different users or types of user. We know that sometimes Cradle’s comprehensive nature can be a little overwhelming for the occasional user. Using start pages to ensure your teams are shown the most appropriate set of actions for their daily work, removes any confusion. Combined with a phase tree to arrange stages/areas of your project end users can be guided to the information they need quickly and efficiently.
Split xrefs – We have to admit that this may not be the most exciting enhancement for many users, but for those that frequently create baselines it provides a speed enhancement and disk management benefit. The state of the cross references in a project are recorded each time a baseline is taken. Now they are created in separate directories, in a smaller file format. If you don’t intend to use Baseline Mode earlier directories could even be archived off from you main storage.
Charity
Discount code
There is still time to use the special “Secret (not!) Birthday Discount” offer of £30 off single user prices and licences. Or those buying Cradle Enterprise licences can choose to donate £30 per licence bought to a charity of their choice. Ts&Cs apply
Review Us!
If you are using Cradle in your projects, or if you have recently evaluated Cradle, please consider reviewing 3SL and Cradle on Capterra. It only takes 2-3 minutes, and we would really appreciate your feedback.
Social Media
Twitter
Penn State Inspiration
We love keeping an eye on what’s new with our customers and what’s changing in the engineering community. Strange that inspiration for better data controls should come from Mayonnaise…..
And on a lighter note we celebrated our neighbouring county’s special day with a cuppa! Yorkshire Day
YouTube
If you’d like to watch some explanatory and how-to videos about Cradle don’t forget to check and follow our YouTube channel here.
Many of us spend long periods of time working at our computer screens. Consequently, eye strain can become a serious problem. Also, we can sometimes be more productive if we can maximise the amount of information shown. Hence, changing the text size used in the Cradle UI can help in both of these cases, and in several other situations as well.
Maximised Data Display Area
Read articles covering how to maximise the screen area available to display information or drawings.
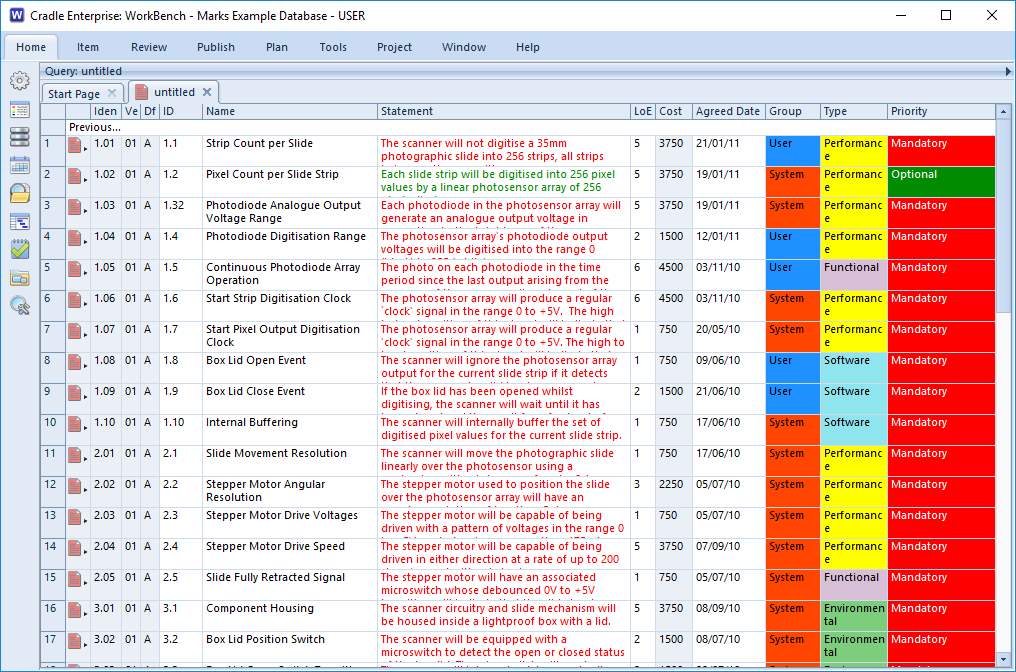
For comparison, if you use all of the tips described in that other blog post, the UI will have a maximised data display area and will appear like this:
Display in Normal Text
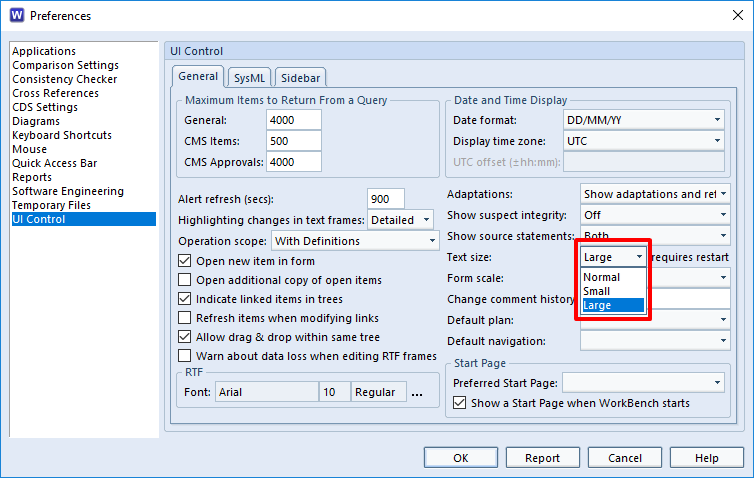
Increase Text Size
You can increase the size of text used in the UI by setting the Text size user preference to Large:
Set Large Text Size
You must re-start WorkBench after making this change.
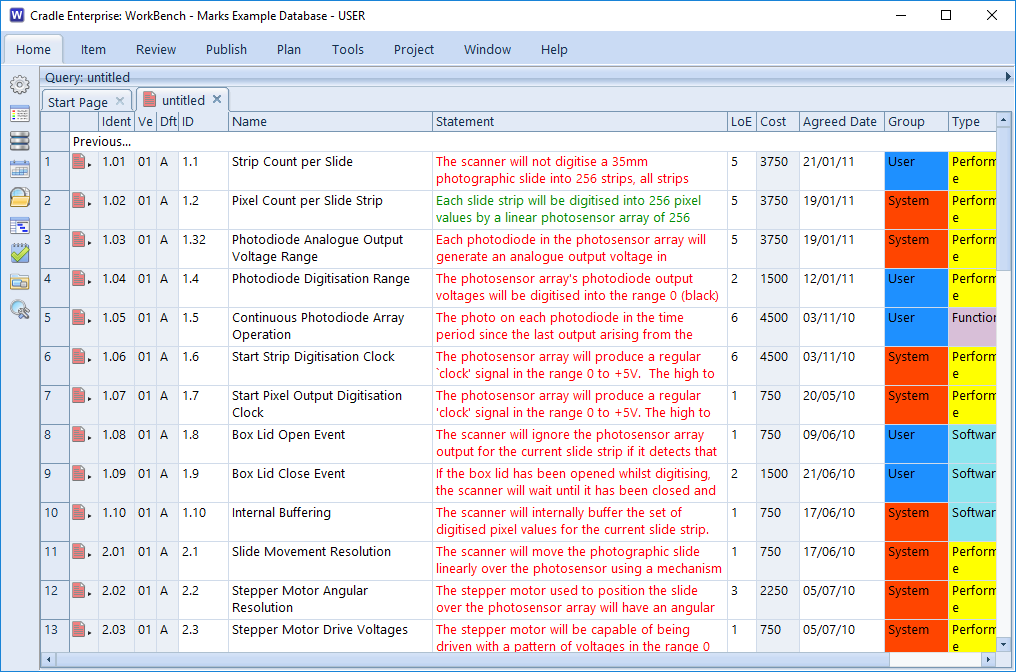
Using the larger text, the above query and view will be shown like this:
Display in Large Text Size
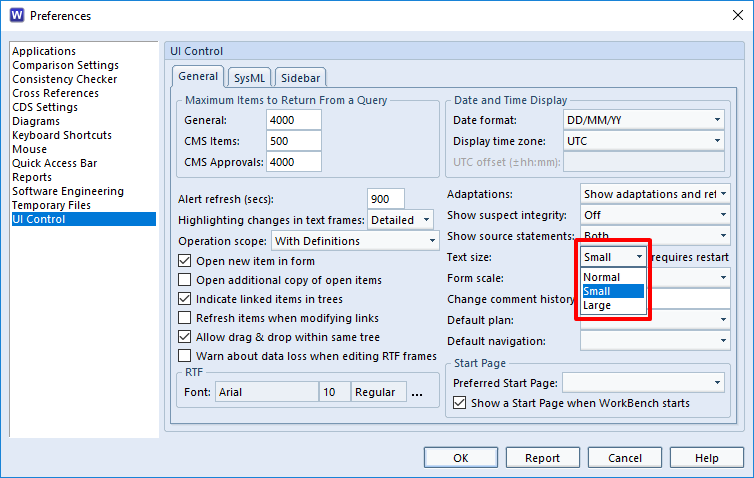
Decrease Text Size
You can decrease the size of text used in the UI by setting the Text size user preference to Small:
Set Small Text Size
You must re-start WorkBench after making this change.
Using the smaller text, the above query and view will be shown like this:
Display in Small Text Size
Uses
Cradle provides several options to maximise the screen area used to display information. You can change a user preference to change the size of text used throughout the UI.
You can use these in combination to:
Simply see bigger text and reduce the risk of eye strain
Reduce the risk of eye strain and also maximise the display area so you do not reduce the amount of information shown in the UI
Use smaller text because you are using a low display resolution and Cradle is using text that is needlessly large for your display
Reduce the size of text and also maximise the display area because you have a large screen and good eyesight and you must have the maximum possible data visible, particularly when you are using multiple panes to display multiple sets of information at the same time
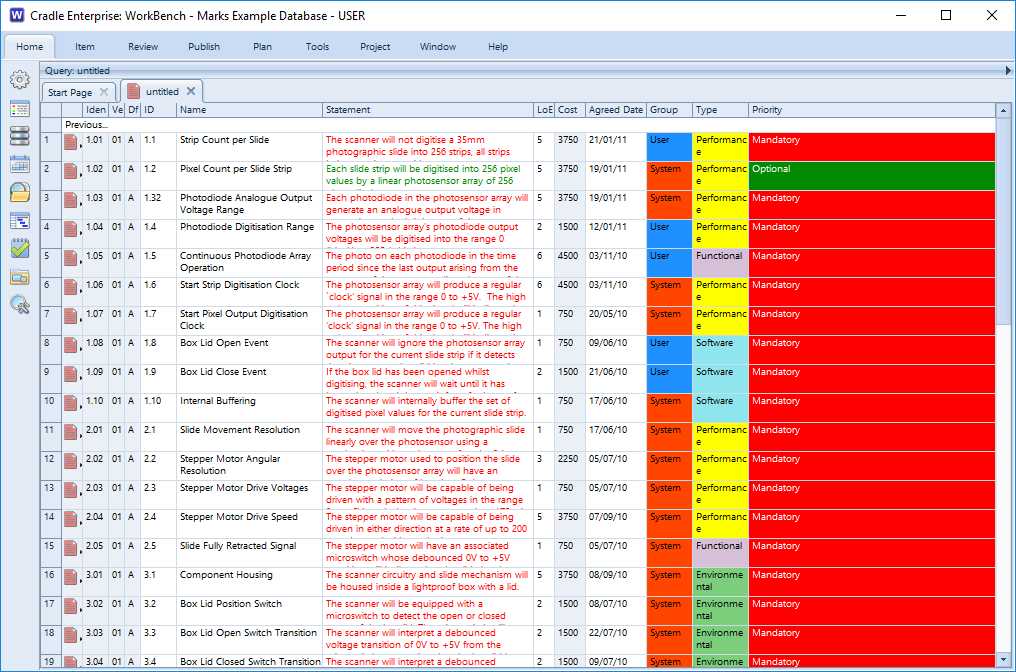
You can find items in a Cradle database by running a query. For example, you can use the pre-defined queries in the Quick Access Bar at the bottom of the UI. Once the query has run, the results are shown in a display style. Tree style is one of the four styles available:
A view is used to specify which parts (attributes) of the items will be shown. A display style controls how these attributes will be displayed, and the facilities that are available to you.
Tree Style
This is the second most frequently-used of the display styles after table style. It displays each item as a node in a tree, with a set of columns for the other attributes:
Items Shown in Tree Style
There are two views used to display trees:
A view that specifies the contents of the node shown in the tree. You specify this view in the schema for the item type.
A view that specifies the attributes shown in columns to the right of the tree
To have items displayed in this style:
Specify it in the query to be run:
Specify Tree Style in a Query
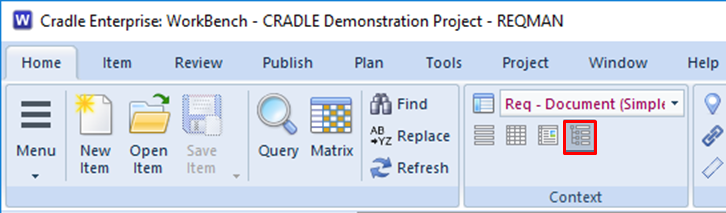
Also, select it from the Context group in the Home tab:
Choose Tree Style in the UI Ribbon
Or, right click and choose Style -> Tree from the context-sensitive menu
Finally, press <CTRL> and 4
Facilities
Use the left mouse button to select individual items
You can select a groups of items by selecting the first and then pressing <SHIFT> and the left mouse button to select the end of the group
Press <CTRL> and the left mouse button to select or de-select individual items
You can shrink and widen the display columns. Move your cursor to the edge of a column heading and the cursor will become a pair of arrows. Press, drag and release the left mouse button to change the column’s width.
You can follow cross references by expanding the tree node for the item. Cradle will find all cross references to and from the item, select which cross references to use, and display the items at the other end of these cross references as new nodes in the tree.
Use drag-and-drop items between trees to create cross references between the items
Drag-and-drop items inside a hierarchy of the same type of items to reorder that hierarchy and automatically rebuild the hierarchical numbering within it
You can expand a tree node by:
Click its + button
Select the text of the tree node and press: +
Select the text of the tree node, right click, and choose Expand from the menu
Double click on the text of the tree node
You can collapse a tree node by:
Click its – button
Double-click on the text of the tree node
Select the text of the tree node and press: –
Select the text of the tree node, right click, and choose Collapse from the menu
Advantages
The advantages of tree style are that it is:
The simplest way to explore items and their relationships
A convenient method to create cross references
The easiest way to reorganise a hierarchy of items
If you want to do anything with cross references between items, or to work in a hierarchy of items, then this is the best display style to use.
Disadvantages
The disadvantages of tree style are that:
It provides a limited ability to display information
You cannot edit information directly
Summary
Tree style is the most convenient method to work with cross references within a set of items and between one set of items and other sets of information.
Therefore, we recommend this style whenever you need to work with cross references between items and inside hierarchies.
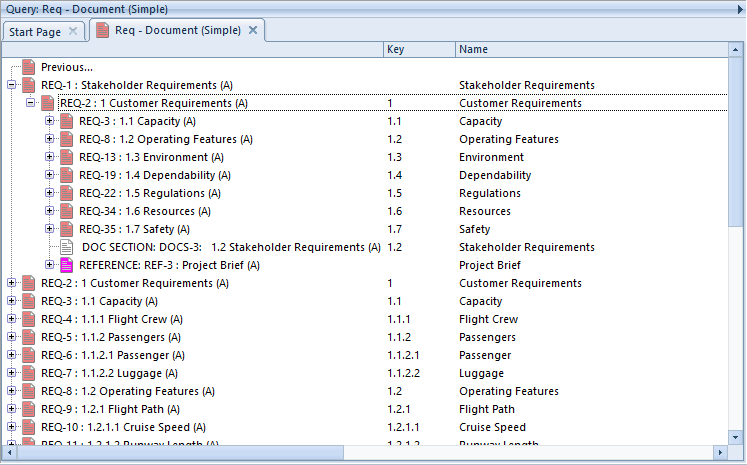
You can find items in a Cradle database by running a query. For example, you can use the pre-defined queries in the Quick Access Bar at the bottom of the UI. Once the query has run, the results are shown in a display style. Document style is one of the four styles available:
A view is used to specify which parts (attributes) of the items will be shown. A display style controls how these attributes will be displayed, and the facilities that are available to you.
Document Style
This is the second most flexible of all the display styles. It displays each item as a set of one or more rows and one or more columns (as controlled by the view), with invisible borders around each of the cells. You can edit items directly in this display style.
Items Shown in Document Style
This display style is similar to table style, except that:
The height of each item’s row is set by the information to be shown. So some rows are shallow and other rows are deep. If an attribute contains no data, its height will be close to zero.
Different sized fonts are used to display the first row in the view. The size of the font is based on the levelof the item being shown. This level is based on the number of dots (periods) in the first attribute shown in the row. This is typically the Key, or whatever attribute you may have specified to hold the item’s hierarchical number.
The borders around the rows and columns are invisible
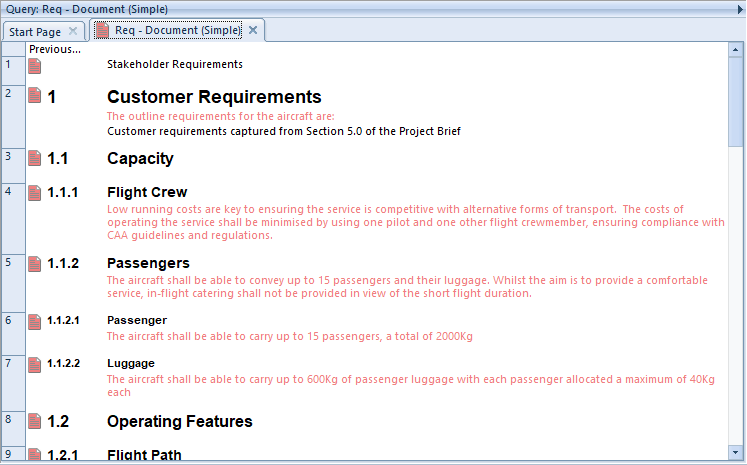
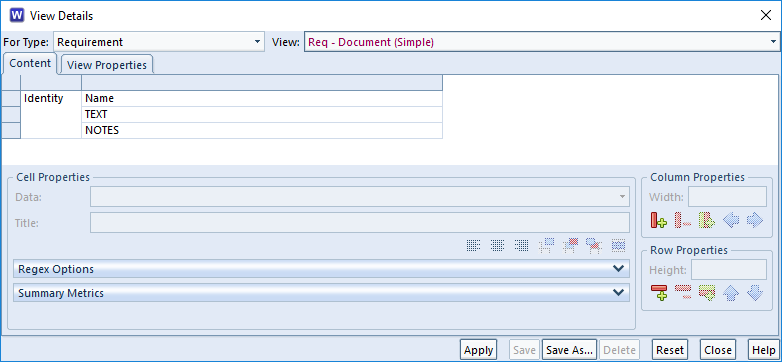
For document style, you should use views that show attributes in successive rows, rather than successive columns. For example:
Arrangement of Attributes in a View for Document Style
The result is that items are displayed in a style that looks like a document, with large font for section headings and smaller fonts used for subsection headings.
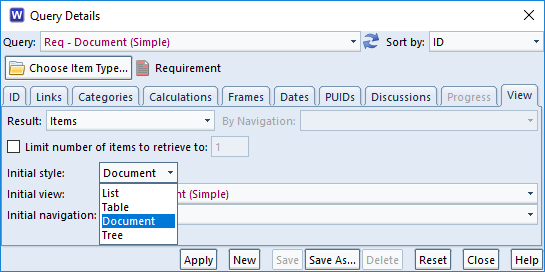
To have items displayed in this style:
Specify it in the query to be run:
Specify Document Style in a Query
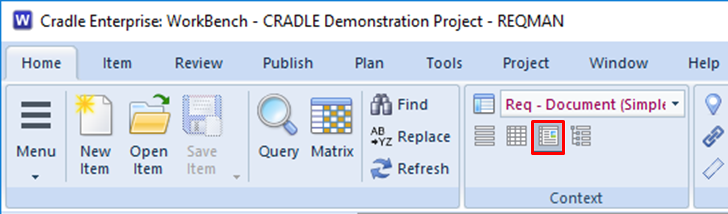
Also, select it from the Context group in the Home tab:
Choose Document Style in the UI Ribbon
Or, right click and choose Style -> Document from the context-sensitive menu
Finally, press CTRL and 3
Facilities
Document style provides a wide range of faciltiies.
Selecting Items
Use the left mouse button to select individual items
You can select a groups of items by selecting the first and then pressing SHIFT and the left mouse button to select the end of the group
Press <CTRL> and the left mouse button to select or de-select individual items
Changing the Display
You can shrink and widen the display columns. Move your cursor to the edge of a column heading and the cursor will become a pair of arrows. Press, drag and release the left mouse button to change the column’s width.
You can move any row or column in the view. Move your cursor onto any cell border and the cursor will become a pair of arrows. Press, drag and release the left mouse button to move that border.
By default, all rows are displayed with different heights, you can increase or decrease the height of any row
You can sort the data in any column. Click the column heading and choose a sort order, either ascending or descending, in either a case-sensitive or case-insensitve manner (this only applies to languages that have upper-case and lower-case characters)
Tooltips are displayed for each column. Move your cursor into a column heading and after a second, a description of that attribute will be shown. You can enter these descriptions in the schema.
You can see tooltips for some attribute values. Move your cursor into a cell that displays a category with a pick-list of possible values. A tooltip appears containing a description of that category and category value. You can enter these descriptions in the schema.
Exploring Data
You can expand rows to follow cross references. Double-click the heading for an item’s row and that row will expand to show one new row for each item linked to the original item. Repeat this as many times as you like.
You will see the level of any expanded row as the number of dots in its row heading
You can collapse rows by double-clicking the row heading.
Editing Data
You can edit items directly Click inside any cell. If you have RW access to the item, Cradle locks the item so you can edit it.
Advantages
The advantages of document style are that it is:
Flexible. You can adjust the display and sort information.
Navigable. You can explore the database by expanding rows to follow cross references.
Editable. You can edit information through the display style.
Readable. All items are shown with a display height to display their entire contents.
Disadvantages
The disadvantages of document style are that:
It takes much longer to display than list style or tree style
The rows displaying information are of different heights, so you may not see many items at the same time. You may need to scroll more than in other display styles.
Summary
Document style is the second most flexible of Cradle’s four display styles, after table style. It is not the quickest style to generate, but it does provide a familiar document-like view of information and a lot of capability.
Therefore, we recommend document style whenever you want to display items in a document format. This can be very helpful for users who are more familiar with using documents, rather than data-orientated tools.